Danby DAR154BLSST Product Manual - Page 4
Installation Instructions - refrigerator
 |
View all Danby DAR154BLSST manuals
Add to My Manuals
Save this manual to your list of manuals |
Page 4 highlights
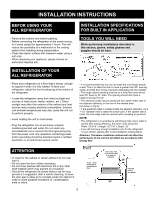
INSTALLATION INSTRUCTIONS BEFOR USING YOUR ALL REFRIGERATOR • Remove the exterior and interior packing. • Before connecting the refrigerator to the power source, let it stand upright for approximately 2 hours. This will reduce the possibility of a malfunction in the cooling system from handling during transportation. • Clean the interior surface with lukewarm water using a soft cloth. • When disposing your appliance, please choose an authorized disposal site. INSTALLATION SPECIFICATIONS FOR BUILT IN APPLICATION TOOLS YOU WILL NEED While performing installations described in this section, gloves, safety glasses and goggles should be worn. INSTALLATION OF YOUR ALL REFRIGERATOR • Place your refrigerator on a floor that is strong enough to support it when it is fully loaded. To level your refrigerator, adjust the front leveling leg at the bottom of the refrigerator. • Locate the refrigerator away from direct sunlight and sources of heat (stove, heater, radiator, etc.). Direct sunlight may affect the exterior of the cabinet and heat sources may increase electrical consumption. Extreme cold ambient temperatures may also cause the unit not to perform properly. • Avoid locating the unit in moist areas. • Plug the refrigerator into an exclusive, properly installed-grounded wall outlet. Do not under any circumstances cut or remove the third (ground) prong from the power cord. Any questions concerning power and/or grounding should be directed toward a certified electrician or an authorized service center. • It is recommended that you do not install the unit directly beside a wall. This is to allow the door to have a greater then 90° opening swing. A limited door swing may lead todamaging the door gasket. • The rough cabinet opening must be on a level floor area and at least 26" deep by 24" wide. The opening should also have a height of at least 34 3/4". • The electrical outlet may be positioned from within either side of the adjacent cabinetry, or the rear of the shaded area (as shown in Fig A). • If the electrical outlet is located inside the adjacent cabinetry, cut a 1-1/2" diameter hole to admit the power cord. If the cabinet wall is metal, the hole edge must be covered with a bushing or grommet. NOTE: • This refrigerator is in accordance with Energy Star, but in order to get the best energy efficiency, the built-in size should be: Width- 25 9/16" x Height- 35 7/16" x Depth- 26" • If you did not leave enough installation size for the refrigerator in your kitchen, please refer to the installation drawing below. Attention: The below installation method will not affect the performance of the unit but will affect the accordance with Energy Star. ATTENTION • In order for the cabinet to remain efficient do not over load it; • Do not open the door unless necessary; • Do not cover shelves with aluminum foil or any other shelf material which may prevent air circulation; • Should the refrigerator be stored without use for long periods it is suggested, after a careful cleaning, to leave the door ajar to allow air to circulate inside the cabinet in order to avoid possible formations of condensation, mold or odors. 2 FFiigg.A u334n4d33e//4r4s"i"dfferrooomfm cuounndteerrtsoipdtoe floor. of countertop tofloor 1111//22""ddiiaamm.. hhoollee ** IIff eellecetcritcraliocuoatullet-t leitsiccsianaibbaniindnejaetcrtyer..nyt 26" Electrical Access 24" CCaabbinientests sqsuqaureare andapnldumb plumb
-
 1
1 -
 2
2 -
 3
3 -
 4
4 -
 5
5 -
 6
6 -
 7
7 -
 8
8 -
 9
9 -
 10
10 -
11
-
12
-
13
-
14
-
15
-
16
-
17
-
18
-
19
-
20
-
21
-
22
-
23
-
24
-
25
-
26
-
27
 |
 |
