Danby DWC1233BL-SC Product Manual - Page 4
Installation - wine cooler parts
 |
View all Danby DWC1233BL-SC manuals
Add to My Manuals
Save this manual to your list of manuals |
Page 4 highlights
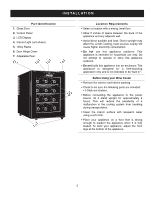
I N S TA L L AT I O N Part Identification 1. Glass Door 2. Control Panel 3. LCD Display 4. Interior Light (not shown) 5. Wine Racks 6. Door Hinge Cover 7. Adjustable Feet 1 2 3 6 ºC/ºF 5 7 Location Requirements • Select a location with a strong, level floor. • Allow 5 inches of space between the back of the appliance and any adjacent wall. • Avoid direct sunlight and heat. Direct sunlight may affect the acrylic coating, heat sources nearby will cause higher electricity consumption. • Do not use this appliance outdoors: This appliance is intended for household use only. Do not attempt to operate or store this appliance outdoors. • Do not build this appliance into an enclosure: This appliance is designed for a free-standing application only and is not intended to be "built-in". Before Using your Wine Cooler • Remove the exterior and interior packing • Check to be sure the following parts are included: • 3 Slide-out shelves. • Before connecting the appliance to the power source, let it stand upright for approximately 2 hours. This will reduce the possibility of a malfunction in the cooling system from handling during transportation. • Clean the interior surface with lukewarm water using a soft cloth. • Place your appliance on a floor that is strong enough to support the appliance when it is fully loaded. To level your appliance, adjust the front legs at the bottom of the appliance. 3
-
 1
1 -
 2
2 -
 3
3 -
 4
4 -
 5
5 -
 6
6 -
 7
7 -
 8
8 -
 9
9 -
 10
10 -
11
-
12
-
13
 |
 |
