DeLonghi BCO70 Owner Manual - Page 6
English - coffee espresso machine
 |
View all DeLonghi BCO70 manuals
Add to My Manuals
Save this manual to your list of manuals |
Page 6 highlights
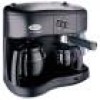
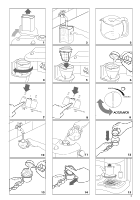
ENGLISH Please read this instructions manual carefully before installing and using the appliance. Only by following these directions will you be able to obtain the best results from the appliance and in complete safety. DESCRIPTION OF THE APPLIANCE The following terms are used throughout the instructions manual. 1. Power supply cable 2. Tube for steam escape 3. Cappuccino maker 4. Drip collection pan 5. Boiler outlet 6. Warming plate 7. ON/OFF switch espresso coffee/cappuccino 8. 5/10 cup drip coffee switch 9. ON/OFF switch drip coffee 10. ON indicator light drip coffee 11. 5/10 cup drip coffee indicator light 12. ON indicator light espresso coffee/cappuc- cino 13. Small coffee pot for espresso coffee/cappucci- no 14. Two cup attachment for espresso coffee 15. Measuring spoon 16. Filter holder for espresso coffee 17. Filter for espresso coffee 18. Filter holder for drip coffee 19. Drip coffee pot 20. "ACCUFLAVOR" drip coffee aroma selector switch 21. "Vario system" espresso coffee aroma selector switch 22. Removable water tank 23. Lid for water tank 24. Boiler 25. Boiler cap 26. Steam release knob 6 INSTALLATION • Place the appliance on a flat work surface away from water sources such as taps or sinks. • Check that the voltage of the electrical power line corresponds to the voltage indicated on the appliance label. Connect the appliance only to a power source having a minimum load capacity of 10 amps and having a proper grounding feature. The manufacturer takes no responsibility for any accidents caused by the lack of a grounding device for the appliance. • Never install the machine in an environment which can reach a temperature of less than or equal to 0°C (if the water inside the machine freezes, the machine might be damaged): HOW TO PREPARE DRIP COFFEE • Raise the lid and remove the water tank (fig. 1). • Fill the tank with cold, clean water, up to the level indicated on the tank corresponding to the number of cups of coffee that are desired (fig. 2). • Insert the tank into the machine by pressing it slightly. If desired, the tank can be left in its place and to fill it, the drip coffee pot can be used which also has the level indicators on it (fig. 3). • Open the filter holder by swinging it out to the left (fig. 4). • Place the paper filter into the filter holder (fig. 5). We recommend using #4 type paper filters. • Put the ground coffee into the filter by using the measuring spoon included with the machine and level off the grounds uniformly (fig. 6). As a general rule, use one level measuring spoonful of coffee (about 7 grams) for each cup of coffee (for example, use 10 measures to make 10 cups of coffee). In any case, the quantity of ground coffee to use can vary according to the strength desired and personal taste. Use high quality ground coffee, with a medium grind and the kind packaged especially for drip coffee makers. • Close the filter holder and place the pot, with its lid inserted, onto the hot plate.
-
 1
1 -
 2
2 -
 3
3 -
 4
4 -
 5
5 -
 6
6 -
 7
7 -
 8
8 -
 9
9 -
 10
10 -
 11
11 -
 12
12 -
13
-
14
-
15
-
16
-
17
-
18
-
19
-
20
 |
 |
