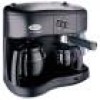
DeLonghi BCO70 Owner Manual - Page 7
How To Select The Aroma Of The Drip, Coffee, How To Prepare Espresso Coffee - filter
 |
View all DeLonghi BCO70 manuals
Add to My Manuals
Save this manual to your list of manuals |
Page 7 highlights
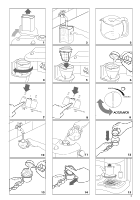
• Select the aroma desired as indicated in the paragraph "How to select the aroma". • Press the "ON/OFF" switch for drip coffee (fig. 7). The ON indicator light for drip coffee above the switch itself indicates that the coffee machine filter is functioning properly. • If more than five cups of coffee are desired, press the switch (with the symbol) (fig. 8) and the indicator light will light up. If, on the other hand, five or fewer cups of coffee are desired, the switch should not be pressed. In this way, the hot water will flow more slow- ly through the ground coffee and a more flavourful beverage will be obtained. • The brewed coffee will begin to drip out after a few seconds. It is completely normal that during the percolation of the coffee, some steam may escape from the machine. • If you keep "ON/OFF" switch for drip coffee on the ON position after the percolation, the warming plate will maintain the hot coffee at an ideal drinking temperature. HOW TO SELECT THE AROMA OF THE DRIP COFFEE With the ACCUFLAVOR , it is possible to select the aroma of the dripcoffee depending on personal taste. By turning the aroma regulation knob of the coffee filter (fig. 9), the coffee machine can be programmed for a strong flavour (STRONG position) or a lighter flavour (LIGHT position). The ACCUFLAVOR feature changes the flavour of the coffee, more or less strong, while the taste of the coffee remains unchanged. HOW TO PREPARE ESPRESSO COFFEE 1. Unscrew the boiler cap by turning it in a counter-clockwise direction. 2. Using the level indications stamped on the WATER LEVEL side, fill the small pot with the amount of water suggested (fig. 10) according to the number of cups of espresso coffee that are desired (see the chart at the end of this text). 3. Pour the water into the boiler (fig. 11). 4. Replace the plug in the boiler cap by turning firmly in a clockwise direction. 5. Insert the filter for espresso coffee into the filter holder (fig. 12). 6. Fill the filter with the ground coffee, respecting the dosages indicated in the chart at the end of this text and distribute it uniformly in the filter (fig. 13). It is important to use the highest quality coffee and having a medium grind in order to avoid the obstruction of the filter during the brewing. Remove any excess coffee from around the edges of the filter (fig. 14). 7. To attach the filter holder to the appliance, position it under the boiler outlet with the handle towards the left, see fig. 15. Push upwards, and at the same time, turn the handle towards the right. Always turn right to the end. 8. Place the coffee pot for espresso coffee under the filter holder so that the spout where the coffee exits is inside of the opening on the lid of the coffee pot (fig. 16). 9. Position the "Vario System" selector according the type of espresso coffee desired: "LIGHT" for a lighter coffee and "STRONG" for a stronger tasting brew (fig. 17). 10. Make sure that the steam release knob is closed. 11. Push the ON/OFF switch for espresso/cappuccino. The ON/OFF indicator light for espresso/cappuccino will turn on (fig. 18). 12. After approximately two minutes, the espresso coffee will begin to flow out (fig. 19). ATTENTION: to avoid spraying, never detach the filter holder while the machine in brewing coffee. 13. When the coffee no longer flows out from the filter holder, push the ON/OFF switch for espresso/cappuccino to turn off the hot water heater (fig. 18). Pour the coffee into the cups. Before removing the filter holder, it is important to eliminate all of the residual steam from the inside of the boiler to avoid puffs of steam. Allow it to blow out completely by rotating the steam release knob (fig. 20). 14. To dispose of used grounds in the filter, first remove the filter holder by turning the handle to the left. Using the special lever in the handle to keep the filter in place, remove the grounds by turning the filter holder upside down and striking gently. (fig. 21). 7
-
 1
1 -
 2
2 -
 3
3 -
 4
4 -
 5
5 -
 6
6 -
 7
7 -
 8
8 -
 9
9 -
 10
10 -
 11
11 -
 12
12 -
13
-
14
-
15
-
16
-
17
-
18
-
19
-
20
 |
 |
