DeLonghi BCO90 Owner Manual - Page 9
Cleaning And Maintenance, Cleaning The Milk Frother, Other Cleaning Procedures, Descaling - coffee makers
 |
View all DeLonghi BCO90 manuals
Add to My Manuals
Save this manual to your list of manuals |
Page 9 highlights
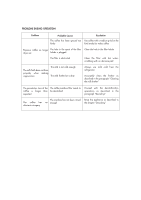
always wait for the "OK" warning light to turn on before frothing milk between one cappuccino and the other. • Attention: after the last capppuccino has been prepared, before turning off the coffee maker, lift the suction tube of the milk tank above the level of any remaining milk (as indicated in fig. 27) and allow the steam to come out for a few seconds. With the tube extracted from the remaning milk close the steam knob. For reasons of hygiene, it is recommended that this operation always be carried out so as to prevent any milk from going sour in the internal circuits of the coffee maker. • Press the ON/OFF switch for espresso/cappuccino to turn off the appliance. • In order to make 4 cappuccinos, it is necessary to repeat the previous operations, paying attention to the quantity of ground coffee and water, indicated in the chart at the end of the text. Furthermore, before positioning the Vario System selector to the Cappuccino position, brew enough espresso coffee into the coffee pot to reach the level 4 on the "COFFEE LEVEL" side as indicated in figure 29. • To make the perfect cappuccino, we recommend the use of the following proportions: 1/3 coffee, and 2/3 frothed milk. CLEANING AND MAINTENANCE • Before beginning any cleaning or maintenance operation, turn the machine off, remove the plug from the electrical power source and let the machine cool down. CLEANING THE MILK FROTHER The cleaning operations for the milk frother must be done after each use. Proceed as follows: • Remove the milk tank by pressing the (C) lever (fig. 30), pulling upwards at the same time. Wash it with hot water. • Remove the red milk frothing instrument by pressing down on lever (A) and at the same time, pulling upwards (fig. 30). Remove the rubber mixer, rinse it and clean it thoroughly with hot water, with special attention paid to the four holes illustrated in figure 31 (clean them with the use of a needle). Make sure that the hole marked with the arrow B has not been clogged (clean it with the use of a needle). • Once clean, all of the pieces must be reassembled in the correct order. In particular, make sure that the rubber mixer has been inserted properly all the way down and that the milk tank and the red milk frother have been inserted all the way until a click is heard. If this cleaning procedure is not performed after every use, the milk may not froth properly or it may happen that milk is either not drawn up properly or drips from the milk tube. OTHER CLEANING PROCEDURES • To clean the machine, do not use solvents or abrasive detergents. A soft damp cloth should be used to clean the surfaces. • Regularly clean the filter holder, the drip collection pan, the hot water drip spout, and the coffee pots. Do not wash the filter holder in the dish washer. • Never immerse the machine in water: it is an electrical appliance. • Check from time to time that the holes in the filter for espresso coffee are not obstructed. If necessary, carefully clean the filter with hot water, scrubbing with an abrasive pad. DESCALING If the water in your area is quite hard, the lime from this water can accumulate with the passage of time. Lime deposits can compromise the proper functioning of the appliance. The espresso coffee machine must be decalcified every 1 to 3 months (depending on the hardness of the water and the frequency of use) using white wine vinegar. Proceed as follows: • Fill the coffee pot for espresso coffee with vinegar to level 4 (WATER LEVEL side); • Pour the vinegar into the hot water tank and replace the plug; • Attach the filter holder; • Place the small coffee pot under the filter holder; 9
-
 1
1 -
2
-
3
-
 4
4 -
 5
5 -
 6
6 -
 7
7 -
 8
8 -
 9
9 -
 10
10 -
 11
11 -
 12
12 -
 13
13
 |
 |
