DeLonghi DCF6212TTC Owner Manual - Page 8
Installation - Chlorine filter, Setting the clock - How to make drip coffee - 11
 |
View all DeLonghi DCF6212TTC manuals
Add to My Manuals
Save this manual to your list of manuals |
Page 8 highlights
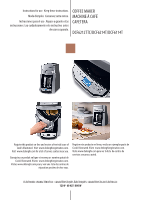
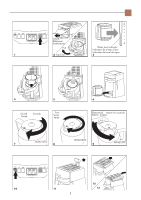
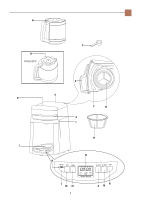
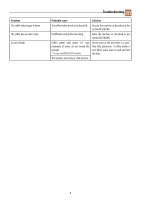
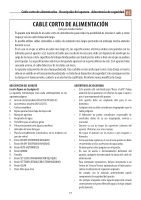
en Installation - Chlorine filter - Setting the clock - How to make drip coffee INSTALLATION • After removing the packaging, make sure the product is complete and in perfect condition. If in doubt, do not use the appliance and contact qualified De'Longhi personnel only. • The packing elements (plastic bags, Styrofoam, etc.) should be kept out of the reach of children, as they are safety hazards. • Place the appliance on a firm level surface far from water faucets, sinks, and heat sources. • When positioning the appliance on the counter, make sure to leave a space of at least 2 in. (5 cm) between the appliance and the walls or objects beside and behind it, and at least 8 in. (20 cm) above it. • Never install the appliance in a room where the temperature may reach 32°F (0°C) or lower (the appliance may be damaged if the water freezes). • Check that the voltage of the electrical mains corresponds to the voltage shown on the appliance rating plate. Connect the appliance only to an efficiently grounded outlet with a minimum rating of 10A only. The manufacturer may not be considered liable for possible incidents caused by failure to adequately ground the outlet. • If the power socket does not match the plug on the appliance, have the socket replaced with a suitable type by a qualified electrician. • The power cord on this appliance must not be replaced by the user, as this operation requires the use of special tools. If the cable is damaged or needs to be replaced, contact an authorized De'Longhi service center only in order to avoid all risks. CHLORINE FILTER (certain models only) The filter eliminates the taste of chlorine from the water. To install, proceed as follows: • Remove the chlorine filter from the plastic bag and rinse in tap water. • Remove the filter holder from its housing by lifting it upwards (fig. 11). • Open the filter holder and carefully position the filter. • Close the filter holder and replace in its housing. Press down as far as it will go. • The chlorine filter must be replaced every 80 cycles and always after six months of operation. SETTING THE CLOCK Plug the appliance in; when the coffee machine is connected to the outlet for the first time, "AM 0:00" appears on the display. To set the time, press the SET CLOCK button (fig. 1) and keep it pressed until the correct hour is displayed: then release the button. The time can be set at any moment. HOW TO MAKE DRIP COFFEE IMPORTANT: When using the appliance for the first time, all the accessories and the internal circuits must be washed making at least two carafes using only water, without any ground coffee. • Check that the inspection's lid is correctly closed and the chlorine filter holder (if provided) correctly inserted. • Open the frontal door by pulling the handle and, by using the provided carafe, pour fresh water into the water compartment up to the level corresponding to the number of cups you want to make (fig. 2): check the water level viewer and it is suggested to use the provided carafe as the measure, as the maximum volume of the carafe corresponds to those of the water tank (fig. 3). • Position the permanent filter (if provided) or paper filter in the filter holder (fig. 4). • Place the ground coffee in the filter using the measuring spoon supplied and level evenly (fig. 5). Please refer to chart 1 for the recommended quantities. Use good quality medium grind coffee for drip coffee machines. Chart 1: Recommended Quantities DCF6114T DCF6214T N° CUPS 14 12 N° MEASURING SPOONS 14 12 10 10 8 8 6 6 4 4 Use more or less coffee to suit your taste. To avoid coffee overflow, never exceed the maximum quantity of 15 measuring spoons. The quality of coffee you use can affect the taste of your coffee. We suggest trying different brands of coffee to find the one most suitable to your taste. 6
-
 1
1 -
2
-
 3
3 -
 4
4 -
 5
5 -
 6
6 -
 7
7 -
 8
8 -
 9
9 -
 10
10 -
 11
11 -
 12
12 -
 13
13 -
14
-
15
-
16
-
17
-
18
-
19
-
20
-
21
-
22
-
23
 |
 |