DeLonghi DCF6212TTC Owner Manual - Page 9
Programming the automatic start - Cleaning and maintenance - Descaling - coffee maker
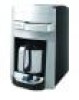 |
View all DeLonghi DCF6212TTC manuals
Add to My Manuals
Save this manual to your list of manuals |
Page 9 highlights
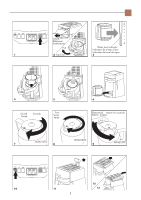
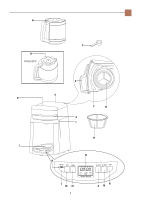
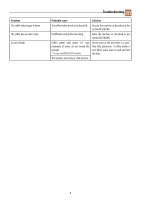
en Programming the automatic start - Cleaning and maintenance - Descaling • Models with glass carafe: close the frontal door and Activating the timer place the closed glass carafe on the non stick warming After you have: plate (fig. 6). - set the time for switch-on as described in the previous Models with thermal carafe: Before placing the carafe section; on the plate, make sure the lid is closed (fig. 7). - prepare the machine for making coffee. Press the AUTO • You can enhance the flavor of your coffee by pressing the button. The display shows AUTO indicating the coffee AROMA button. This feature activates a unique brewing maker is in operation. process, slowly releasing water into the filter basket; saturating coffee grounds a little at a time extracting the best flavor and aroma from your coffee. To activate, press the AROMA button; the display shows AROMA indicating the function is selected. Press the button again to turn the selection off. It is recommended to use the aroma button if not brewing a whole carafe of coffee. Press the ON/OFF button (fig. 10). The light indicates that the coffee maker is in operation and the display shows "BREW". • The coffee will begin to emerge after a few seconds. It is completely normal for the appliance to release a little steam while the coffee is brewing. • In models with glass carafe, if you leave the appliance switched on after brewing is finished, the non-stick warming plate will keep the coffee at the ideal temperature. The unit automatically shuts off after two hours. • Models with thermal carafe: To pour the coffee, turn the lid to the position shown in (fig. 8). To completely remove the lid from the carafe, turn it to the position shown in (fig. 9). The appliance switches automatically off after brewing cycle. Important: Removing the carafe before the machine has finished producing the coffee does not interrupt the brewing process, but simply stops the flow of coffee into the carafe. If you want to pour out a little coffee before brewing is completed, do so as quickly as possible to avoid coffee overflow. CLEANING AND MAINTENANCE Before carrying out any cleaning operations, switch the appliance off, unplug it from the power outlet, and let it cool down. • Do not use solvents or abrasive detergents to clean the appliance. A soft damp cloth is sufficient. • Never immerse the coffee maker in water: it is an electri- cal appliance. • If necessary: - unhook the inspection's lid (fig. 11-12-13): the appliance must be switched off and disconnected! - always close the lid and insert the chlorine filter holder before using the appliance. DESCALING If the water in your area is hard, lime scale deposits may build up over time. These deposits may affect the correct operation of the appliance. When CLEAN flashes on the display, you have to descale the appliance using commercially available descalers specifically for drip coffee machines. Follow the instructions provided with these products. 1. Dilute the descaler in the carafe, following the directions on the packaging of the descaler. 2. Pour the descaling solution in the water compartment; 3. Put the carafe on the non stick plate; 4. Press the CLEAN button.The CLEAN program automatical- ly performs a series of supplies to remove the lime scale from inside the appliance Freshness indicator 5. The program has ended when CLEAN disappears on the The freshness indicator shows the time elapsed since the display. coffee was prepared. Two hours after coffee preparation, the 6. Rinse by operating the machine with water only for at appliance goes off. least three cycles (3 full tanks of water). PROGRAMMING THE AUTOMATIC START Make sure that the time is set correctly. The warranty is not valid if the cleaning operation described above is not carried out regularly. To program the time to start coffee preparation: It is recommended to descale the appliance after 60 • Press the SET TIMER button and keep it depressed until uses. you reach the desired switch-on time. • Then release the SET TIMER button. The time will flash for a few seconds until set: then the display will show the current hour. 7
-
 1
1 -
2
-
3
-
 4
4 -
 5
5 -
 6
6 -
 7
7 -
 8
8 -
 9
9 -
 10
10 -
 11
11 -
 12
12 -
 13
13 -
 14
14 -
15
-
16
-
17
-
18
-
19
-
20
-
21
-
22
-
23
 |
 |