DeLonghi DCM900 Owner Manual - Page 9
Operating Your Coffee Maker - carafe
 |
View all DeLonghi DCM900 manuals
Add to My Manuals
Save this manual to your list of manuals |
Page 9 highlights
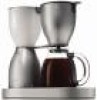
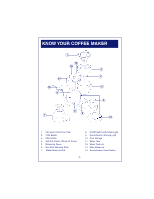
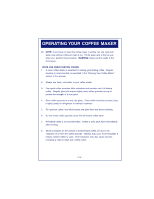
OPERATING YOUR COFFEE MAKER PREPARING COFFEE MAKER FOR BREWING COFFEE: 1. Place the coffee maker on a flat, level surface away from any edge. 2. Plug the unit into a 120V / 60Hz only outlet. 3. The lid of the carafe must be fitted properly during the brewing process. And the carafe must be set on the warming plate. 4. WARNING: The lid of the coffee maker must be completely closed during operation. FILLING THE WATER TANK: 5. Remove the lid from the water tank. 6. Fill the tank with the desired amount of cold water. The water level must be between the top and bottom cup marks. NOTE: Do not fill above the MAX level. 7. Always use cold water. NOTE: The amount of brewed coffee after the brewing process is complete will always be slightly less than the amount of water placed in the coffee maker's water tank, since some water is absorbed by the coffee grounds and filter. Add a little extra water at the beginning so that you have the exact number of cups desired. PREPARING THE COFFEE: 8. Lift the lid on the filter holder. Be sure the filter basket and filter are properly positioned inside the filter holder. The permanent gold-tone filter (included) may be used instead of or in addition to a paper filter (not included). If using paper filters, insert a #4 cone-shaped filter into the filter basket before filling with coffee. 9. Place the desired amount of ground coffee in the filter using the measuring spoon provided. According to coffee industry standards, use one standard coffee measure (2 level tablespoons) of grounds for each cup/mug of water. After using your coffee maker several times, the amount of coffee may be adjusted to suit your particular taste by decreasing or increasing the amount of coffee used. NOTE: Be sure to use coffee grounds prepared specifically for use with automatic drip coffee makers. -9-
-
 1
1 -
2
-
3
-
 4
4 -
 5
5 -
 6
6 -
 7
7 -
 8
8 -
 9
9 -
 10
10 -
 11
11 -
 12
12 -
 13
13 -
 14
14 -
15
-
16
-
17
-
18
-
19
-
20
-
21
-
22
-
23
-
24
-
25
-
26
-
27
-
28
-
29
-
30
-
31
-
32
-
33
-
34
-
35
-
36
-
37
-
38
-
39
-
40
-
41
-
42
-
43
-
44
-
45
-
46
-
47
-
48
-
49
-
50
-
51
-
52
-
53
-
54
-
55
-
56
-
57
-
58
 |
 |