DeLonghi EAM4000 Owner Manual - Page 17
Cleaning the Drip Tray and Used Water Tray, 4 Cleaning the Coffee Spout, 5 Cleaning the Milk
 |
View all DeLonghi EAM4000 manuals
Add to My Manuals
Save this manual to your list of manuals |
Page 17 highlights
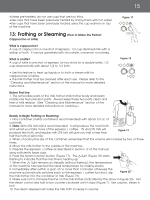
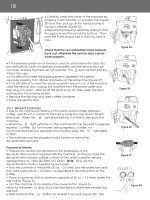
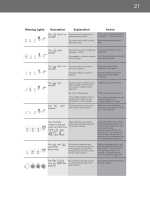
17 15.3 Cleaning the Drip Tray and Used Water Tray: • The drip tray is fitted with a red level indicator, showing the level of the water inside. • When the indicator is visible, the drip tray and used water tray must be emptied and cleaned. • Wash the drip tray and used water tray with warm water and mild detergent. Rinse and dry thoroughly. • Replace the used water tray and drip tray. 15.4 Cleaning the Coffee Spout: • Check that the holes in the coffee spout are not blocked. • To clean them, carefully scrape the dry coffee residues from the coffee spout with a needle (Figure 21). Figure 21 15.5 Cleaning the Milk Frother: Note: The milk frother must be cleaned after each use. Deactivate the steam function before cleaning. Please proceed as follows (the machine must be on during the cleaning of the milk frother): •Release a little steam for a few seconds by turning the steam control dial counter-clockwise until it stops. (Figure 7). •With this operation, the steam nozzle discharges any milk that may have been left inside. IMPORTANT: For health reasons, this operation should always be performed to prevent previously used milk from remaining inside the milk frother. • With one hand, hold the milk frother handle and with the other hand unscrew the milk frother by turning it clockwise and then pull it down. (Figure 22) • Carefully wash the milk frother and steam nozzle in warm water. • Check that the two holes (indicated by the arrows in Figure 23) are not clogged. If necessary, clean them using a needle or pin. • Replace the steam nozzle by inserting it and vigorously turning it upwards into the steam spout. • Replace the milk frother by pushing it upwards and turning it counterclockwise. Figure 22 15.6 Cleaning the Brewing System: Warning: The brewing system can only be removed when the machine is off. Attempting to remove the brewing system with the machine on will risk causing damage. Figure 23 Note: The brewing system must be cleaned very frequently (depending on use) to prevent it from filling with coffee deposits (that may lead to malfunctions). To clean it, proceed as follows: • Make sure the machine is turned off, but do not unplug it. Wait for all indicator lights to go off. • Open the service door. • Remove the drip tray and used coffee container and clean them (as noted above) • Press the two red release buttons on the brewing system (Figure 24) and pull it out. • Wash the brewing system under running water, without using detergents. Never place the brewing system in the dishwasher.
-
 1
1 -
2
-
3
-
4
-
5
-
6
-
7
-
8
-
9
-
10
-
11
-
 12
12 -
 13
13 -
 14
14 -
 15
15 -
 16
16 -
 17
17 -
 18
18 -
 19
19 -
 20
20 -
 21
21 -
 22
22 -
23
-
24
-
25
-
26
-
27
 |
 |
