DeLonghi EC5 Owner Manual - Page 9
Cleaning And Maintenance - espresso and cappuccino maker
 |
View all DeLonghi EC5 manuals
Add to My Manuals
Save this manual to your list of manuals |
Page 9 highlights
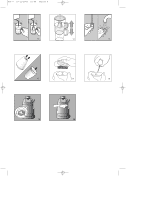
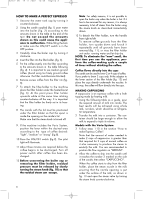
ec5/7 GB 19-11-2002 10:08 Pagina 9 5 Move the container up and down under the steam nozzle as in fig. 14 (this will give maximum froth). Froth the milk until the steam in the boiler has been completely used up, then turn the steam knob in a clockwise direction in order to close the steam valve and set the ON/OFF switch to "OFF" Warning: Always empty the boiler of any residual water or steam after using the appliance by turning on the steam knob. 6 Pour gently or preferably spoon the frothy milk onto the coffee, then sprinkle on a little chocolate powder for perfect cappuccino coffee. Models without the Vario System 3 Follow steps 1-10 in the section "Making Espresso". Note that the amount of water needed to make 2 cups of cappuccino is greater than that required for 2 cups of normal coffee as it also necessary to produce the steam to emulsify the milk. 4 When the coffee starts to drip from the filter holder, place the steam nozzle in the milk ensuring that the nozzle opening is just under the surface of the milk, as shown in fig. 13 and open the steam valve by turning the steam knob counter-clockwise. 5. Move the container up and down under the steam nozzle as in fig. 14 (this will give maximum froth). Froth the milk until the steam in the boiler has been completely used up, then turn the steam knob in a clockwise direction. 6 Allow the remaining coffee to drip thorugh the filter holder into the carafe, it takes about 3 minutes,then switch the appliance OFF. Warning: Always empty the boiler of any residual water or steam after using the appliance by turning on the steam knob. 7 Pour the coffee into cups, gently pour, or preferably spoon the frothy milk onto the coffee, then sprinkle on a little chocolate powder for perfect cappuccino coffee. Cleaning the cappuccino nozzle Clean the steam tube (with the cappuccino nozzle) of milk immediately after use, as dried milk can be difficult to remove. Remember: You do this by turning the steam control knob counter-clockwise. IMPORTANT: Always clean the milk frother and steam nozzle immediately after use. Proceed as follows: • By turning the steam knob (fig. 15), allow a little steam to come out for a few seconds. • Check that the 3 holes shown in fig. 16 are not blocked. If necessary, clean them with the help of a pin. • Wash the cappuccino maker and steam nozzle thoroughly with warm water. • Re-attach the cappuccino maker. HINTS Making good espresso and cappuccino is not difficult, however it does require practice. The following tips will help you get the best results from your machine: • Warm the cups before filling with coffee. • Use a dedicated espresso coffee for best results. They are now widely available from supermarkets. • Freshly ground coffee provides the best flavor. To maintain flavor, fresh coffee is best stored in an airtight container in a cool place, even in the fridge. CLEANING AND MAINTENANCE 1.Do not use solvents or detergents in cleaning the coffee maker. Use a soft, damp cloth. 2. Clean the filter-holder, filter and drip tray regularly. ATTENTION: During cleaning, never immerse the unit in water - it is an electrical appliance. CLEANING THE FILTER HOLDER About every 300 coffees, clean the filter holder for ground coffee as follows: • Remove the filter • Clean the inside of the filter holder. Never wash in a dishwasher. • Rinse all components and clean the metal filter thoroughly in hot water using a brush (fig. 17). Make sure the holes in the metal filter are not blocked. If necessary, clean with a pin (fig. 18). 9
-
 1
1 -
2
-
3
-
 4
4 -
 5
5 -
 6
6 -
 7
7 -
 8
8 -
 9
9 -
 10
10 -
 11
11
 |
 |