Dell 2330dn User's Guide (HTML) - Page 116
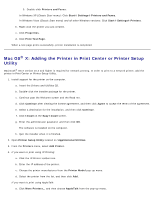
Mac OS, X: Adding the Printer in Print Center or Printer Setup, Utility, Printer Setup Utility
 |
UPC - 807027103130
View all Dell 2330dn manuals
Add to My Manuals
Save this manual to your list of manuals |
Page 116 highlights
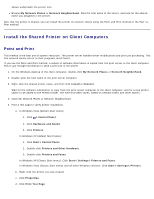
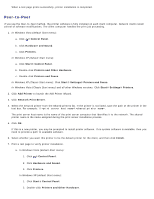
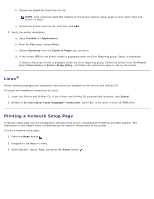
3. Double-click Printers and Faxes. In Windows XP (Classic Start menu): Click Start® Settings® Printers and Faxes. In Windows Vista (Classic Start menu) and all other Windows versions: Click Start® Settings® Printers. b. Right-click the printer you just created. c. Click Properties. d. Click Print Test Page. When a test page prints successfully, printer installation is completed. Mac OS® X: Adding the Printer in Print Center or Printer Setup Utility Macintosh® OS X version 10.3 and higher is required for network printing. In order to print to a network printer, add the printer in Print Center or Printer Setup Utility. 1. Install support for the printer on the computer. a. Insert the Drivers and Utilities CD. b. Double-click the installer package for the printer. c. Continue past the Welcome screen and the Read me. d. Click Continue after viewing the license agreement, and then click Agree to accept the terms of the agreement. e. Select a destination for the installation, and then click Continue. f. Click Install on the Easy Install screen. g. Enter the administrator password, and then click OK. The software is installed on the computer. h. Quit the installer when it is finished. 2. Open Printer Setup Utility located in /Applications/Utilities. 3. From the Printers menu, select Add Printer. 4. If you want to print using IP Printing: a. Click the IP Printer toolbar icon. b. Enter the IP address of the printer. c. Choose the printer manufacturer from the Printer Model pop-up menu. d. Select the printer from the list, and then click Add. If you want to print using AppleTalk: a. Click More Printers... and then choose AppleTalk from the pop-up menu.
-
 1
1 -
2
-
3
-
4
-
5
-
6
-
7
-
8
-
9
-
10
-
11
-
12
-
13
-
14
-
15
-
16
-
17
-
18
-
19
-
20
-
21
-
22
-
23
-
24
-
25
-
26
-
27
-
28
-
29
-
30
-
31
-
32
-
33
-
34
-
35
-
36
-
37
-
38
-
39
-
40
-
41
-
42
-
43
-
44
-
45
-
46
-
47
-
48
-
49
-
50
-
51
-
52
-
53
-
54
-
55
-
56
-
57
-
58
-
59
-
60
-
61
-
62
-
63
-
64
-
65
-
66
-
67
-
68
-
69
-
70
-
71
-
72
-
73
-
74
-
75
-
76
-
77
-
78
-
79
-
80
-
81
-
82
-
83
-
84
-
85
-
86
-
87
-
88
-
89
-
90
-
91
-
92
-
93
-
94
-
95
-
96
-
97
-
98
-
99
-
100
-
101
-
102
-
103
-
104
-
105
-
106
-
107
-
108
-
109
-
110
-
 111
111 -
 112
112 -
 113
113 -
 114
114 -
 115
115 -
 116
116 -
 117
117 -
 118
118 -
 119
119 -
 120
120 -
 121
121 -
122
-
123
-
124
-
125
-
126
-
127
-
128
-
129
-
130
-
131
-
132
-
133
 |
 |
