Dell C2665dnf Dell Color Laser Multifunction Printer Dell Document Hub Quic - Page 2
About the Operator Panel
 |
View all Dell C2665dnf manuals
Add to My Manuals
Save this manual to your list of manuals |
Page 2 highlights
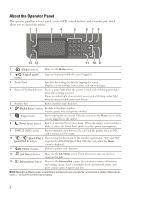
About the Operator Panel The operator panel has a touch panel, a status LED, control buttons, and a number pad, which allows you to control the printer. 12 34 5 678 13 12 11 10 9 1 (Home) button Moves to the Home screen. 2 (Login/Logout) button Logs out if pressed while the user is logged in. 3 Touch Panel Specifies the settings by directly tapping the screen. Displays various settings, instructions, and error messages. 4 Status LED (Ready/Error) Shows a green light when the printer is ready and a blinking green light when data is being received. Shows an amber light when an error occurs and a blinking amber light when an unrecoverable print error occurs. 5 Number Pad Enters numbers and characters. 6 (Redial/Pause) button Re-dials a telephone number. Inserts a pause into a telephone number. 7 (Copy) button Starts copying the document. Effective only from the Home screen while you are logged in to the printer. 8 (Power Saver) button Enters or exits the Power Saver mode. When the printer is not used for a while, it enters the Power Saver mode to reduce power consumption. 9 (NFC) reader Starts communication between the card and the printer when an NFC card is waved over the reader. 10 / (Quick Dial 1/ Starts faxing the document to the number registered as "001" and "002" Quick Dial 2) button respectively of the FAX Speed Dial. Effective only when the Home screen is displayed. 11 (Delete) button Deletes numbers and characters. 12 (Job Status) button Moves to the Job Status screen. From this screen, you can check or cancel active jobs. 13 (Information) button Moves to the Information screen. You can access various information and settings menu, check consumable levels and network status, and print various types of reports and lists. NOTE: Moving to a different menu or returning to a previous screen cancels the current entry or setting. Make sure to select OK to save the current entry or setting. 2
-
 1
1 -
 2
2 -
 3
3 -
 4
4 -
 5
5 -
 6
6 -
 7
7 -
 8
8
 |
 |
