Dell C3760dn Dell /C3760n Color Laser Printer Users Guide - Page 264
Printer Utility Software, Status Window, Tool Box - troubleshooting
 |
View all Dell C3760dn manuals
Add to My Manuals
Save this manual to your list of manuals |
Page 264 highlights
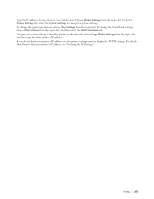
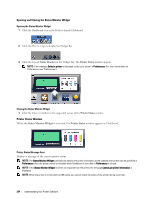
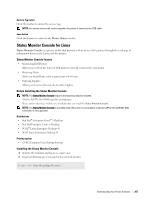
If you want to install the printer driver with the same settings on multiple computers running the same operating system, create a setup disk in a floppy disk or in a server on the network. Using the setup disk that you have created will reduce the amount of work required when installing the printer driver. • Install the printer driver in the computer on which the setup disk is to be created. • The setup disk can only be used on the operating system on which the disk was created or computers running the same operating system. Create a separate setup disk for each of the operating systems. Software Update The firmware and/or driver updates can be downloaded from the Dell Support web site located at support.dell.com. Printer Utility Software You can open the Status Window, Tool Box, Updater, and Troubleshooting using the Quick Launch Utility window. NOTE: Quick Launch Utility is only supported on Microsoft® Windows®. To use the Quick Launch Utility, select to install the Quick Launch Utility when you install the Dell software. To install the Dell software, follow the instructions below. 1 Insert the Software and Documentation disc into your computer and click setup_assist.exe to start Easy Setup Navigator. 2 Click Installing Driver and Software. 3 Follow the on-screen instructions. To open the Quick Launch Utility window: 1 Click Start→ All Programs→ Dell Printers→ Additional Color Laser Software→ Quick Launch Utility. The Quick Launch Utility window provides four buttons: Status Window, Tool Box, Updater, and Troubleshooting. To exit the Quick Launch Utility window: 1 Click the Close (x) button at the top-right of the window. For details, click Help of each application. Status Window The Status Window button opens the Printer Status window. For more information about using Status Window, refer to "Printer Status Window." Tool Box The Tool Box button opens the Tool Box. For more information about using Tool Box, refer to "Understanding the Tool Box Menus." 262 Understanding Your Printer Software
-
 1
1 -
2
-
3
-
4
-
5
-
6
-
7
-
8
-
9
-
10
-
11
-
12
-
13
-
14
-
15
-
16
-
17
-
18
-
19
-
20
-
21
-
22
-
23
-
24
-
25
-
26
-
27
-
28
-
29
-
30
-
31
-
32
-
33
-
34
-
35
-
36
-
37
-
38
-
39
-
40
-
41
-
42
-
43
-
44
-
45
-
46
-
47
-
48
-
49
-
50
-
51
-
52
-
53
-
54
-
55
-
56
-
57
-
58
-
59
-
60
-
61
-
62
-
63
-
64
-
65
-
66
-
67
-
68
-
69
-
70
-
71
-
72
-
73
-
74
-
75
-
76
-
77
-
78
-
79
-
80
-
81
-
82
-
83
-
84
-
85
-
86
-
87
-
88
-
89
-
90
-
91
-
92
-
93
-
94
-
95
-
96
-
97
-
98
-
99
-
100
-
101
-
102
-
103
-
104
-
105
-
106
-
107
-
108
-
109
-
110
-
111
-
112
-
113
-
114
-
115
-
116
-
117
-
118
-
119
-
120
-
121
-
122
-
123
-
124
-
125
-
126
-
127
-
128
-
129
-
130
-
131
-
132
-
133
-
134
-
135
-
136
-
137
-
138
-
139
-
140
-
141
-
142
-
143
-
144
-
145
-
146
-
147
-
148
-
149
-
150
-
151
-
152
-
153
-
154
-
155
-
156
-
157
-
158
-
159
-
160
-
161
-
162
-
163
-
164
-
165
-
166
-
167
-
168
-
169
-
170
-
171
-
172
-
173
-
174
-
175
-
176
-
177
-
178
-
179
-
180
-
181
-
182
-
183
-
184
-
185
-
186
-
187
-
188
-
189
-
190
-
191
-
192
-
193
-
194
-
195
-
196
-
197
-
198
-
199
-
200
-
201
-
202
-
203
-
204
-
205
-
206
-
207
-
208
-
209
-
210
-
211
-
212
-
213
-
214
-
215
-
216
-
217
-
218
-
219
-
220
-
221
-
222
-
223
-
224
-
225
-
226
-
227
-
228
-
229
-
230
-
231
-
232
-
233
-
234
-
235
-
236
-
237
-
238
-
239
-
240
-
241
-
242
-
243
-
244
-
245
-
246
-
247
-
248
-
249
-
250
-
251
-
252
-
253
-
254
-
255
-
256
-
257
-
258
-
 259
259 -
 260
260 -
 261
261 -
 262
262 -
 263
263 -
 264
264 -
 265
265 -
 266
266 -
 267
267 -
 268
268 -
 269
269 -
270
-
271
-
272
-
273
-
274
-
275
-
276
-
277
-
278
-
279
-
280
-
281
-
282
-
283
-
284
-
285
-
286
-
287
-
288
-
289
-
290
-
291
-
292
-
293
-
294
-
295
-
296
-
297
-
298
-
299
-
300
-
301
-
302
-
303
-
304
-
305
-
306
-
307
-
308
-
309
-
310
-
311
-
312
-
313
-
314
-
315
-
316
-
317
-
318
-
319
-
320
-
321
-
322
-
323
-
324
-
325
-
326
-
327
-
328
-
329
-
330
-
331
-
332
-
333
-
334
-
335
-
336
-
337
-
338
-
339
-
340
-
341
-
342
-
343
-
344
-
345
-
346
-
347
-
348
-
349
-
350
-
351
-
352
-
353
-
354
-
355
-
356
-
357
-
358
-
359
-
360
-
361
-
362
-
363
-
364
-
365
-
366
-
367
-
368
-
369
-
370
-
371
-
372
-
373
-
374
-
375
-
376
-
377
-
378
-
379
-
380
-
381
-
382
-
383
-
384
-
385
-
386
-
387
-
388
-
389
-
390
-
391
-
392
-
393
-
394
-
395
-
396
-
397
-
398
-
399
-
400
-
401
-
402
-
403
-
404
-
405
-
406
-
407
-
408
-
409
-
410
-
411
-
412
 |
 |