Dell Chromebook 3110 2-in-1 SIM/eSIM Setup Guide for Chromebook - Page 4
Install the SIM card and connect to the, cellular network service
 |
View all Dell Chromebook 3110 2-in-1 manuals
Add to My Manuals
Save this manual to your list of manuals |
Page 4 highlights
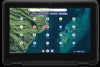
1 Install the SIM card and connect to the cellular network service WARNING: Before performing any of the steps in this document, read and follow the safety information that is shipped with your computer. CAUTION: Do not install or remove the Subscriber Identity Module (SIM) card when your computer is powered on. NOTE: Information in this guide is only applicable to computers with cellular enabled platforms. Install the SIM card CAUTION: Do not touch the SIM-card connectors to avoid damage to the SIM card from electrostatic discharge. NOTE: Computers could be with dual SIM or a single SIM. In computers with dual SIM, there is an in-built eSIM always available and the Network menu screen shows both the SIM and the eSIM options. NOTE: In computers with single SIM, the Network menu screen shows either a SIM or eSIM option available. 1. Turn off the computer. 2. Insert the SIM card into the SIM-card slot on your computer. NOTE: The SIM card slot location varies by computer model. To view your computer's documentation for location and access instructions, go to https://www.dell.com/support/ and enter the model number in Identify your product. 3. Turn on the computer. 4. On the bottom-right corner, select Time > Settings > Network > Mobile data. NOTE: Ensure to turn on the slider for the Mobile data. SIM with the network icon and the name of the carrier is displayed. Connect to a cellular data network for the first time NOTE: Your WWAN enabled computer does not include cellular service. To activate cellular service, you must provide the device IMEI and ICCID to your selected WWAN service provider. For more information, see Activation or service support. For more information about connecting to a Wi-Fi and other networks, see Connect to Wi-Fi & other networks. For more information about connecting and activating mobile data, see Connect to a mobile data network. 4 Install the SIM card and connect to the cellular network service
-
 1
1 -
 2
2 -
 3
3 -
 4
4 -
 5
5 -
 6
6 -
 7
7 -
 8
8 -
 9
9
 |
 |
