Dell Chromebook 5190 Owners Manual - Page 13
Installing the base cover, Battery, Lithium-ion battery precautions, Removing the battery
 |
View all Dell Chromebook 5190 manuals
Add to My Manuals
Save this manual to your list of manuals |
Page 13 highlights
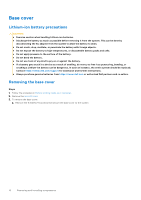
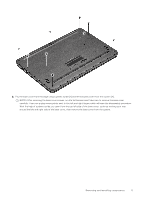
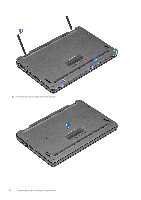
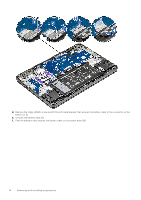
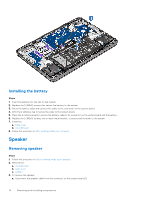
Installing the base cover Steps 1. Toe in the base cover front edge into the system. 2. Press the edges of the cover until it clicks into place. 3. Replace the M2.5x7.5 screws to secure the base cover to the system. 4. Install the microSD card. 5. Follow the procedure in After working inside your computer. Battery Lithium-ion battery precautions CAUTION: ● Exercise caution when handling Lithium-ion batteries. ● Discharge the battery as much as possible before removing it from the system. This can be done by disconnecting the AC adapter from the system to allow the battery to drain. ● Do not crush, drop, mutilate, or penetrate the battery with foreign objects. ● Do not expose the battery to high temperatures, or disassemble battery packs and cells. ● Do not apply pressure to the surface of the battery. ● Do not bend the battery. ● Do not use tools of any kind to pry on or against the battery. ● If a battery gets stuck in a device as a result of swelling, do not try to free it as puncturing, bending, or crushing a Lithium-ion battery can be dangerous. In such an instance, the entire system should be replaced. Contact https://www.dell.com/support for assistance and further instructions. ● Always purchase genuine batteries from https://www.dell.com or authorized Dell partners and re-sellers. Removing the battery Steps 1. Follow the procedure in Before working inside your computer. 2. Remove the: a. microSD card b. base cover 3. To remove the battery: a. Remove the single (M2x3) screw and lift the right metal bracket that secures the battery cable to the system board [1, 2]. b. Peel the adhesive tape that secures the keyboard cable in place [3]. c. Disconnect the keyboard cable from the connector in the system board [4]. Removing and installing components 13
-
 1
1 -
2
-
3
-
4
-
5
-
6
-
7
-
 8
8 -
 9
9 -
 10
10 -
 11
11 -
 12
12 -
 13
13 -
 14
14 -
 15
15 -
 16
16 -
 17
17 -
 18
18 -
19
-
20
-
21
-
22
-
23
-
24
-
25
-
26
-
27
-
28
-
29
-
30
-
31
-
32
-
33
-
34
-
35
-
36
-
37
-
38
-
39
-
40
-
41
-
42
-
43
-
44
-
45
-
46
-
47
-
48
-
49
-
50
-
51
-
52
-
53
-
54
-
55
-
56
-
57
-
58
-
59
-
60
-
61
-
62
-
63
-
64
-
65
-
66
-
67
-
68
-
69
-
70
-
71
-
72
-
73
-
74
-
75
-
76
-
77
-
78
-
79
-
80
-
81
-
82
-
83
 |
 |
