Dell DX6012S Hardware Owner's Manual - Page 116
Installing the System Board, Replace the expansion-card riser. See Installing an Expansion-Card Riser
 |
View all Dell DX6012S manuals
Add to My Manuals
Save this manual to your list of manuals |
Page 116 highlights
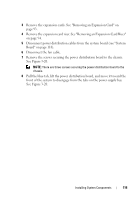
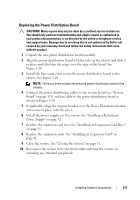
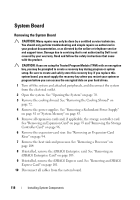
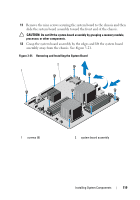
Installing the System Board 1 Unpack the new system board. 2 Remove the labels from the processor shield and affix them to the system identification panel on the front of the system. See Figure 1-1. 3 Holding the system board by the edges, lower the system board into the chassis. CAUTION: Do not lift the system board assembly by grasping a memory module, processor, or other components. 4 Slightly lift up the front of the system board and maneuver the system board to the bottom of the chassis until it lays completely flat. 5 Push the system board toward the back of the chassis until the board is in place. 6 Tighten the nine screws that secure the system board to the chassis. See Figure 3-21. 7 Transfer the processor to the new system board. See "Removing a Processor" on page 104 and "Installing a Processor" on page 108. 8 Remove the memory modules and transfer them to the same locations on the new board. See "Removing Memory Modules" on page 89 and "Installing Memory Modules" on page 87. 9 Connect the cables to the system board. See Figure 6-1 for the locations of the connectors on the system board. 10 Replace the expansion-card riser. See "Installing an Expansion-Card Riser" on page 95. 11 Install all expansion cards. See "Installing an Expansion Card" on page 91. 12 If applicable, reinstall the storage controller card. See "Installing the Storage Controller Card" on page 98. After connecting the SAS cables to the controller, make sure to place the cables under the guide on the end of riser 1. 13 If applicable, install the iDRAC6 Enterprise card. See "Installing an iDRAC6 Enterprise Card" on page 101. 14 If applicable, install the iDRAC6 Express card. See "Installing an iDRAC6 Express Card" on page 99. 120 Installing System Components
-
 1
1 -
2
-
3
-
4
-
5
-
6
-
7
-
8
-
9
-
10
-
11
-
12
-
13
-
14
-
15
-
16
-
17
-
18
-
19
-
20
-
21
-
22
-
23
-
24
-
25
-
26
-
27
-
28
-
29
-
30
-
31
-
32
-
33
-
34
-
35
-
36
-
37
-
38
-
39
-
40
-
41
-
42
-
43
-
44
-
45
-
46
-
47
-
48
-
49
-
50
-
51
-
52
-
53
-
54
-
55
-
56
-
57
-
58
-
59
-
60
-
61
-
62
-
63
-
64
-
65
-
66
-
67
-
68
-
69
-
70
-
71
-
72
-
73
-
74
-
75
-
76
-
77
-
78
-
79
-
80
-
81
-
82
-
83
-
84
-
85
-
86
-
87
-
88
-
89
-
90
-
91
-
92
-
93
-
94
-
95
-
96
-
97
-
98
-
99
-
100
-
101
-
102
-
103
-
104
-
105
-
106
-
107
-
108
-
109
-
110
-
 111
111 -
 112
112 -
 113
113 -
 114
114 -
 115
115 -
 116
116 -
 117
117 -
 118
118 -
 119
119 -
 120
120 -
 121
121 -
122
-
123
-
124
-
125
-
126
-
127
-
128
-
129
-
130
-
131
-
132
-
133
-
134
-
135
-
136
-
137
-
138
-
139
-
140
-
141
-
142
-
143
-
144
-
145
-
146
-
147
-
148
-
149
-
150
-
151
-
152
 |
 |