Dell Dimension 1000 Owner's Manual - Page 71
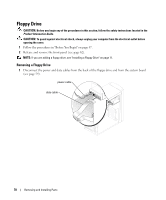
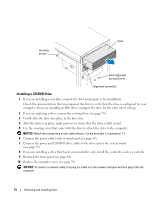
Installing a Floppy Drive, If you are replacing a floppy drive
 |
View all Dell Dimension 1000 manuals
Add to My Manuals
Save this manual to your list of manuals |
Page 71 highlights
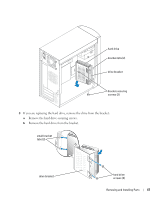
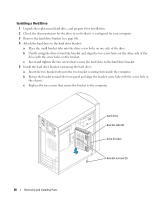
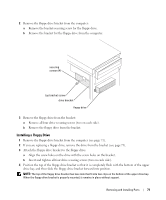
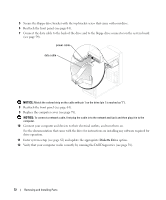
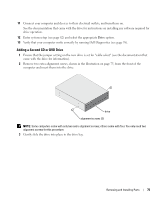
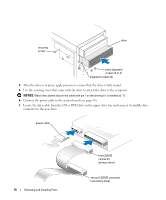
2 Remove the floppy drive bracket from the computer: a Remove the bracket-securing screw for the floppy drive. b Remove the bracket for the floppy drive from the computer. securing screws (4) top bracket screw drive bracket floppy drive 3 Remove the floppy drive from the bracket: a Remove all four drive-securing screws (two on each side). b Remove the floppy drive from the bracket. Installing a Floppy Drive 1 Remove the floppy drive bracket from the computer (see page 71). 2 If you are replacing a floppy drive, remove the drive from the bracket (see page 71). 3 Attach the floppy drive bracket to the floppy drive: a Align the screw holes on the drive with the screw holes on the bracket. b Insert and tighten all four drive-securing screws (two on each side). 4 Position the top of the floppy drive bracket so that it is completely flush with the bottom of the upper drive bay, and then slide the floppy drive bracket forward into position. NOTE: The top of the floppy drive bracket has two slots that fit into two clips on the bottom of the upper drive bay. When the floppy drive bracket is properly mounted, it remains in place without support. Removing and Installing Parts 71
-
 1
1 -
2
-
3
-
4
-
5
-
6
-
7
-
8
-
9
-
10
-
11
-
12
-
13
-
14
-
15
-
16
-
17
-
18
-
19
-
20
-
21
-
22
-
23
-
24
-
25
-
26
-
27
-
28
-
29
-
30
-
31
-
32
-
33
-
34
-
35
-
36
-
37
-
38
-
39
-
40
-
41
-
42
-
43
-
44
-
45
-
46
-
47
-
48
-
49
-
50
-
51
-
52
-
53
-
54
-
55
-
56
-
57
-
58
-
59
-
60
-
61
-
62
-
63
-
64
-
65
-
 66
66 -
 67
67 -
 68
68 -
 69
69 -
 70
70 -
 71
71 -
 72
72 -
 73
73 -
 74
74 -
 75
75 -
 76
76 -
77
-
78
-
79
-
80
-
81
-
82
-
83
-
84
-
85
-
86
-
87
-
88
-
89
-
90
-
91
-
92
-
93
-
94
-
95
-
96
-
97
-
98
-
99
-
100
-
101
-
102
-
103
-
104
-
105
-
106
-
107
-
108
-
109
-
110
-
111
-
112
-
113
-
114
-
115
-
116
 |
 |
