Dell E2211H User's Guide - Page 16
Using the On-Screen Display OSD Menu - power save mode
 |
View all Dell E2211H manuals
Add to My Manuals
Save this manual to your list of manuals |
Page 16 highlights
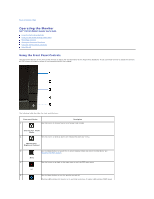
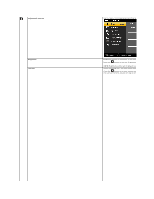
Power (with power light indicator) save mode. Using the On-Screen Display (OSD) Menu Accessing the Menu System NOTE: If you change the settings and then either proceed to another menu or exit the OSD menu, the monitor automatically saves those changes. The changes are also saved if you change the settings and then wait for the OSD menu to disappear. 1. Press the MENU button to launch the OSD menu and display the main menu. Main Menu for Analog (VGA) Input or Main Menu for Digital (DVI-D) Input NOTE: AUTO ADJUST is only available when you use the analog (VGA) connector. 2. Press the and buttons to move between the setting options. As you move from one icon to another, the option name is highlighted. See the following table for a complete list of all the options available for the monitor. 3. Press the or button once to activate the highlighted option. 4. Press the and buttons to select the desired parameter. 5. Press to enter the slide bar and then use the or button, according to the indicators on the menu, to make your changes. 6. Press the button once to return to the main menu to select another option or press the button two or three times to exit from the OSD menu. Icon Menu and Submenus Energy Gauge Description This meter shows the energy level being consumed by the monitor in r consuming low energy level. When the energy consumed increases, th
-
 1
1 -
2
-
3
-
4
-
5
-
6
-
7
-
8
-
9
-
10
-
 11
11 -
 12
12 -
 13
13 -
 14
14 -
 15
15 -
 16
16 -
 17
17 -
 18
18 -
 19
19 -
 20
20 -
 21
21 -
22
-
23
-
24
-
25
-
26
-
27
-
28
-
29
-
30
-
31
-
32
-
33
 |
 |
