Dell EqualLogic PS4210XV35 EqualLogic PS4210 Storage Arrays - Installation and - Page 35
Connect a Computer to a Volume, Step 4: Sector Size, Step 5: Summary
 |
View all Dell EqualLogic PS4210XV35 manuals
Add to My Manuals
Save this manual to your list of manuals |
Page 35 highlights
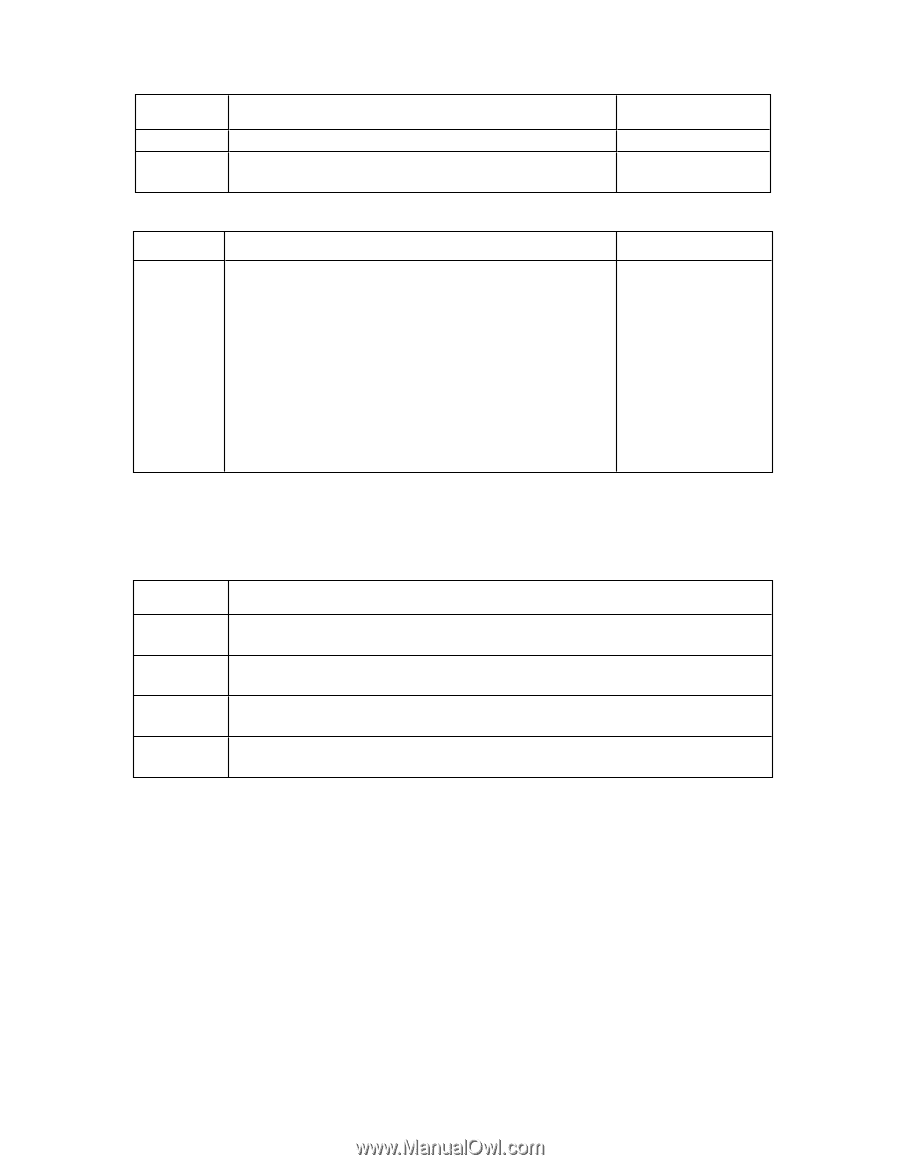
PS4210 Installation Guide 5 Storage Allocation Field New Edit Description Click New to define a new access policy or policy group. From either the Available list or the Selected list, select an access policy or policy group and click Edit to change it. Shortcut Key None None Step 4: Sector Size Field Description Shortcut Key You can create volumes that use either 512-byte or 4KB sectors. The sector size of a volume has no dependency on the sector size of the physical drives in the array. The default volume setting of 512 bytes is almost always optimal, even if the physical drives use 4KB sectors. 512 bytes: Alt+5 Sector Size If you create a volume that uses 4KB sectors, first verify that your operating system supports 4KB sectors. Refer to the 4KB: Alt+4 documentation for your operating system for information about whether 4KB sectors are supported. After you have created a volume, you cannot change its sector size. Step 5: Summary This page lets you review the settings that will be applied to the new volume. Some of these are the settings you just specified in the wizard and others are set as defaults in the software. Review these settings before you click Finish and create the volume. Field Description General Settings Snapshot settings iSCSI Access Copy Displays the volume name, storage pool assignment, volume size, sector size, and description Displays the amount of snapshot reserve space, and the current default settings regarding when to issue space warnings and how to manage space recovery Displays the iSCSI settings for the volume including the access type and the access control rules that will be applied Click this link to copy a text version of the summary settings to the computer's clipboard • To make changes to the settings, use the Back button as necessary to return to previous screens. • To create the volume with the current settings, click the Finish button. • To close the dialog box without creating the volume, click Cancel. Connect a Computer to a Volume When you create a volume, the PS Series group automatically generates an iSCSI target name, with the volume name appended to the end of the target name. Each volume appears on the network as an iSCSI target. An example of an iSCSI target name for a volume named dbvol is as follows: iqn.2001-05.com.equallogic.5-4a0900-2f00000-007eca92d654f160-dbvol To connect a computer to a volume: 27
-
 1
1 -
2
-
3
-
4
-
5
-
6
-
7
-
8
-
9
-
10
-
11
-
12
-
13
-
14
-
15
-
16
-
17
-
18
-
19
-
20
-
21
-
22
-
23
-
24
-
25
-
26
-
27
-
28
-
29
-
 30
30 -
 31
31 -
 32
32 -
 33
33 -
 34
34 -
 35
35 -
 36
36 -
 37
37 -
 38
38 -
 39
39 -
 40
40 -
41
-
42
-
43
-
44
-
45
-
46
-
47
-
48
 |
 |