Dell EqualLogic PS6210XS PS6210 Hardware Owners Manual - Page 41
Inserting a 700W Power Supply and Cooling Module, Inserting a 1080W Power
 |
View all Dell EqualLogic PS6210XS manuals
Add to My Manuals
Save this manual to your list of manuals |
Page 41 highlights
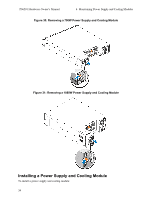
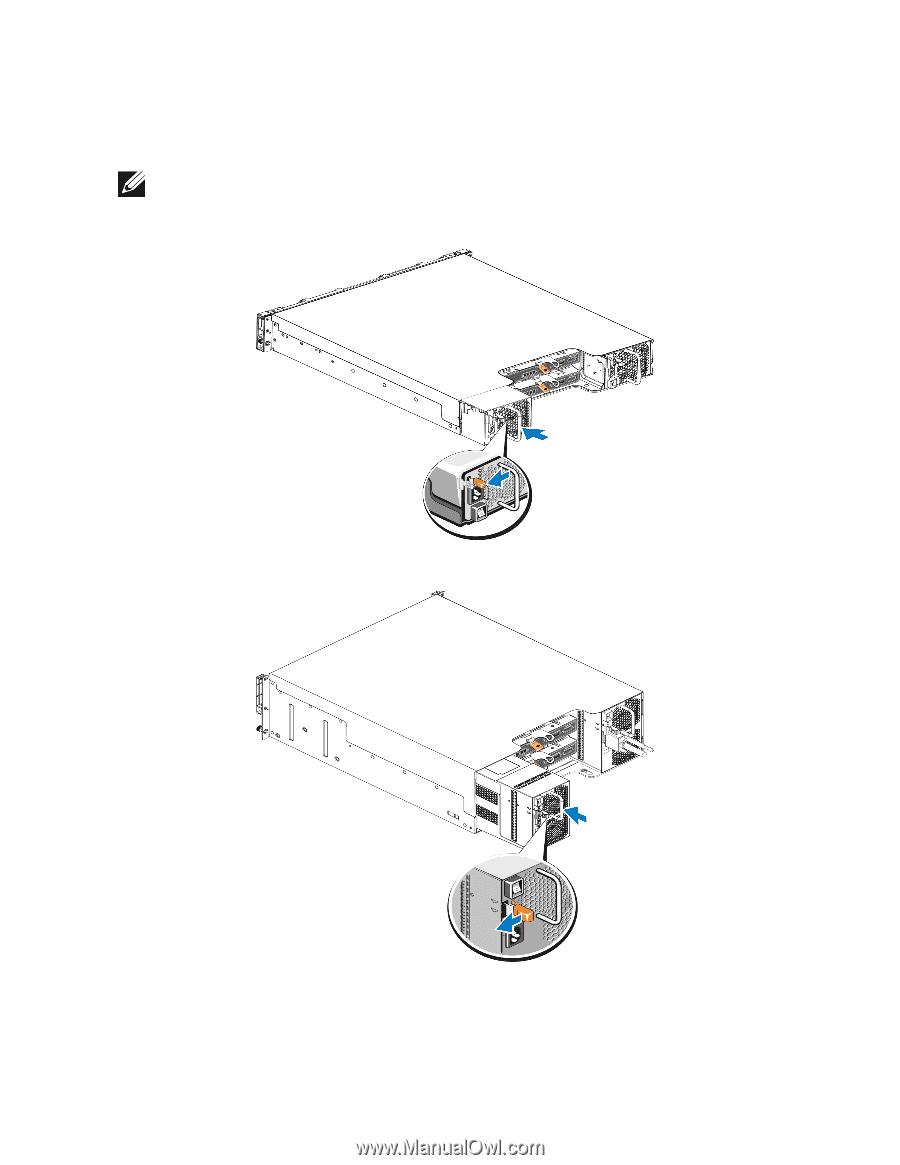
PS6210 Hardware Owner's Manual 4 Maintaining Power Supply and Cooling Modules 1. Hold the power supply module so that the orange release latch is on the upper left. 2. Slide the power supply and cooling module into the chassis until it is fully seated and the release latch clicks into place, as illustrated in Figure 32 and Figure 33. Before the power cable is connected, the fans start spinning, powered by the other power supply module. Figure 32: Inserting a 700W Power Supply and Cooling Module Figure 33: Inserting a 1080W Power Supply and Cooling Module 3. Ensure the power switch is in the OFF position. 4. Connect the power cable to the power supply and cooling module and plug the cable into a power outlet. 35
-
 1
1 -
2
-
3
-
4
-
5
-
6
-
7
-
8
-
9
-
10
-
11
-
12
-
13
-
14
-
15
-
16
-
17
-
18
-
19
-
20
-
21
-
22
-
23
-
24
-
25
-
26
-
27
-
28
-
29
-
30
-
31
-
32
-
33
-
34
-
35
-
 36
36 -
 37
37 -
 38
38 -
 39
39 -
 40
40 -
 41
41 -
 42
42 -
 43
43 -
 44
44 -
 45
45 -
 46
46 -
47
-
48
 |
 |
PS6210 Hardware Owner's Manual
4 Maintaining Power Supply and Cooling Modules
1.
Hold the power supply module so that the orange release latch is on the upper left.
2.
Slide the power supply and cooling module into the chassis until it is fully seated and the release
latch clicks into place, as illustrated in
Figure 32
and
Figure 33
.
Before the power cable is connected, the fans start spinning, powered by the other power supply
module.
Figure 32: Inserting a 700W Power Supply and Cooling Module
Figure 33: Inserting a 1080W Power Supply and Cooling Module
3.
Ensure the power switch is in the OFF position.
4.
Connect the power cable to the power supply and cooling module and plug the cable into a power
outlet.
35