Dell Equallogic PS4110XV EqualLogic PS4110 Storage Arrays - Installation and S - Page 25
Using, Policy, Group, Manager
 |
View all Dell Equallogic PS4110XV manuals
Add to My Manuals
Save this manual to your list of manuals |
Page 25 highlights
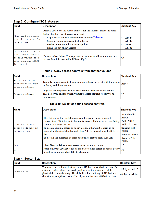
Installation and Setup Guide 4 Software Configuration If you used the setup utility to create or expand a group, or added the array to an existing group with the Remote Setup Wizard, you must set the RAID policy for the group member. Use either the Group Manager command line interface (CLI) or the graphical user interface (GUI) to set the RAID policy. Using the CLI to Set the RAID Policy To use the Group Manager CLI to set the RAID policy for a new group member: 1. Log in to the group, if you are not already logged in. (After the setup utility completes, you will still be logged in to the group.) Use one of the following methods to connect to the group: - Serial connection to a member. See Set Up a Serial Connection to the Array on page 13. - Telnet or ssh connection to the group IP address. 2. At the login prompt, enter the grpadmin account name and the password that you specified when creating the group. 3. At the Group Manager command prompt, enter the following command, to specify RAID6, , RAID10, or RAID50 for the policy variable: member select member_name raid-policy policy For example, the following command configures member1 with RAID6: member select member1 raid-policy raid6 Using the Group Manager GUI to Set the RAID Policy For the latest information on browser support for the Group Manager GUI, see the PS Series Release Notes. After you add a member to a PS Series group, you must set the RAID policy for the member and choose the storage pool. The storage in the member is available after you set the RAID policy. To use the GUI to set the RAID policy for a member: Procedure 1. Click Group and then click the group name to open the Group Summary window. 2. Expand Members and then double-click the member name. The GUI shows whether a member is configured or not. 3. Click Yes in the warning dialog to open The Configure Member - General Settings dialog. 4. Select the pool and click Next. If prompted, confirm you want to assign the member to the pool. 5. Select the RAID policy on the Configure Member - RAID Configuration dialog. 6. [Optional] Select Wait until the member storage initialization completes. 7. Click Next. 8. Click Finish in the Configure Member - Summary dialog. Note: After initial RAID configuration, it takes a few minutes for the Group Manager to display the total usable capacity. The Group Manager might show a smaller amount until the process is complete. 19
-
 1
1 -
2
-
3
-
4
-
5
-
6
-
7
-
8
-
9
-
10
-
11
-
12
-
13
-
14
-
15
-
16
-
17
-
18
-
19
-
 20
20 -
 21
21 -
 22
22 -
 23
23 -
 24
24 -
 25
25 -
 26
26 -
 27
27 -
 28
28 -
 29
29 -
 30
30 -
31
-
32
-
33
-
34
-
35
-
36
-
37
-
38
-
39
-
40
 |
 |
