Dell Force10 C150 Installing and Maintaining the C150 System - Page 28
Removing AC Power Supply Units, Power Cord Requirements
 |
View all Dell Force10 C150 manuals
Add to My Manuals
Save this manual to your list of manuals |
Page 28 highlights
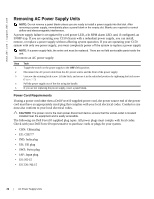
www.dell.com | support.dell.com Removing AC Power Supply Units NOTE: Do not remove a panel blank unless you are ready to install a power supply into that slot. After removing a power supply, immediately place a panel blank in the empty slot. Blanks are required to control airflow and electromagnetic interference. A power supply failure is recognized by a red power LED, a lit RPM alarm LED, and, if configured, an SNMP trap. If you are operating your C150 chassis with a redundant power supply, you can install, remove, or replace a power supply without affecting system operation. If you are operating your C150 system with only one power supply, you must completely power off the system to replace a power supply NOTE: If a power supply fails, the entire unit must be replaced. There are no field serviceable parts inside the unit. .To remove an AC power supply: Step Task 1 Toggle the switch on the power supply to the OFF (left) position. 2 Disconnect the AC power cable from the AC power source and the front of the power supply. 3 Unscrew the retaining latch screw. Lift the latch, and secure it in the unlatched position by tightening the latch screw (Figure 7-2). 4 Pull the power supply out of the slot using the handle. 5 If you are not replacing the power supply, insert a panel blank. Power Cord Requirements If using a power cord other then a Dell Force10 supplied power cord, the power source end of the power cord must have an appropriately sized plug that complies with your local electrical codes. Conductor size must also conform to your local electrical codes. CAUTION: The power cord is the main power disconnect device; ensure that the socket-outlet is located/ installed near the equipment and is easily accessible. The following are Dell Force10 supplied plug types. All power plugs must comply with local codes. Check with your Dell Force10 representative to purchase cords or plugs for your system. • CHN: China plug • EU: CEE7/7 • IND: India plug • UK: UK plug • SWZ: Swiss plug • JAP: Japan plug • US: N5-15 • US 220: N6-15 28 | AC Power Supply Units
-
 1
1 -
2
-
3
-
4
-
5
-
6
-
7
-
8
-
9
-
10
-
11
-
12
-
13
-
14
-
15
-
16
-
17
-
18
-
19
-
20
-
21
-
22
-
 23
23 -
 24
24 -
 25
25 -
 26
26 -
 27
27 -
 28
28 -
 29
29 -
 30
30 -
 31
31 -
 32
32 -
 33
33 -
34
-
35
-
36
-
37
-
38
-
39
-
40
-
41
-
42
-
43
-
44
-
45
-
46
-
47
-
48
-
49
-
50
-
51
-
52
-
53
-
54
-
55
-
56
-
57
-
58
-
59
-
60
-
61
-
62
-
63
-
64
-
65
-
66
 |
 |