Dell Force10 S50-01-GE-48T Quick Start Guide for the S50N and S50V Systems - Page 9
Install the SFP and XFP Optics
 |
View all Dell Force10 S50-01-GE-48T manuals
Add to My Manuals
Save this manual to your list of manuals |
Page 9 highlights
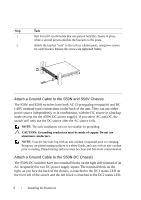
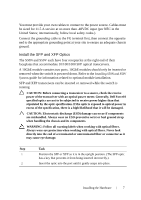
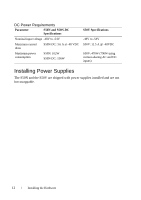
You must provide your own cables to connect to the power source. Cables must be sized for 11.5 A service at no more than -48VDC input (per NEC in the United States; internationally, follow local safety codes.). Connect the grounding cable to the FG terminal first, then connect the opposite end to the appropriate grounding point at your site to ensure an adequate chassis ground. Install the SFP and XFP Optics The S50N and S50V each have four receptacles at the right end of their faceplates that accommodate 10/100/1000 SFP optical transceivers. A 10GbE module contains two ports. 10GbE modules should only be inserted or removed when the switch is powered down. Refer to the Installing S50N and S50V Systems guide for information related to optional module installation. SFP and XFP transceivers can be inserted or removed while the switch is running. CAUTION: Before connecting a transceiver to a source, check the receive power of the transceiver with an optical power meter. Generally, Dell Force10 specified optics are not to be subjected to receive power higher than that stipulated by the optic specification. If the optic is exposed to optical power in excess of the specification, there is a high likelihood that it will be damaged. CAUTION: Electrostatic discharge (ESD) damage can occur if components are mishandled. Always wear an ESD-preventive wrist or heel ground strap when handling the chassis and its components. WARNING: Follow all warning labels when working with optical fibers. Always wear eye protection when working with optical fibers. Never look directly into the end of a terminated or unterminated fiber or connector as it may cause eye damage. Step Task 1 Position the SFP or XFP so it is in the upright position. (The SFP optic has a key that prevents it from being inserted incorrectly.). 2 Insert the optic into the port until it gently snaps into place. Installing the Hardware 7
-
 1
1 -
2
-
3
-
 4
4 -
 5
5 -
 6
6 -
 7
7 -
 8
8 -
 9
9 -
 10
10 -
 11
11 -
 12
12 -
 13
13 -
 14
14 -
15
-
16
-
17
-
18
-
19
-
20
-
21
-
22
-
23
-
24
 |
 |