Dell G2210 Setup Guide - Page 2
Setting
 |
UPC - 070470006512
View all Dell G2210 manuals
Add to My Manuals
Save this manual to your list of manuals |
Page 2 highlights
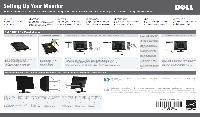
Setting Up our itor Einrichten des Monitors !installation de votre moniteur I Configurar su monitor I Ustawianie monitora I Configuragao de seu monitor I Configurazione del monitor CAUTION: Before setting up your DellTM monitor, see the safety instructions that ship with your monitor. VORSICHT: Bevor Sie Ihren DellTM-Computer einrichten und in Betrieb nehmen, beachten Sie bitte die Sicherheitsanweisungen, die mit lhrem Computer mitgeliefert werden. ATTENTION : Avant de configurer et d'utiliser votre ordinateur DellTM, consultez les precautions de securite livrees avec votre moniteur. PRECAUCION: Antes de configurar y utilizar su equips DellTM, consulte las instrucciones de seguridad que se entregan con el mismo. OSTRZEZENIE: Przed ustawieniem i uruchomieniem komputera DellTM, sprawdz instrukcje bezpieczenstwa dostarczone razem z monitorem. CUIDADO: Antes de voce ajustar e operar seu computador DellTM, veja as instructies de seguranca que sac, enviadas corn seu monitor. ATTENZIONE: Prima di installare ed usare il computer DelITM, leggere le istruzioni di sicurezza fornite in dotazione al monitor. Dell' G2410 Fla4anel Monitor 1 Remove the cover and place the monitor on it 2 Attach the stand to the monitor 3 Connect the monitor using ONLY ONE of the following cables: the Blue VGA cable or the White DVI cable Fir Nehmen Sie die Abdeckung ab, und stellen Sie den Monitor darauf Enlevez le cache et placez le moniteur dessus Extraiga la cubierta y coloque el monitor sobre ella Zdejmij pokrywe i ustaw na niej monitor Retire a cobertura e coloque o monitor sabre a mesma Rimuovere la copertura e collocarvi spora il monitor Fu1am Monitor befestigen Accrochez le support sur le moniteur Acople Ia base al monitor Podtqcz podstawkg do monitora Anexe o suporte no monitor. Fissare it supporto al monitor SchlieBen Sie den Monitor nur mit einem der folgenden Kabel an: dem blauen VGA-Kabel und dem weilen DVI-Kabel Branchez le moniteur en utilisaqt UN SEUL des cables suivants : le cable VGA bleu ou le cable DVI blanc Conecte el monitor utilizando SOLO UNO de los siguientes cables: el cable VGA azul o el cable DVI blanco Podqcz monitor uzywajac WYt.ACZNIE JEDNEGO z nastoujacych kabli: Niebieski kabel VGA lub bialy kabel DVI Ligue o monitor usando APENAS UM dos seguintes cabos: o cabo Azul VGA ou o cabo Branco DVI Collegare il monitor usando SOLO UNO dei seguenti cavi: iI cavo VGA di colore blu oppure it cavo DVI di colore bianco About Your Monitor Info zum Monitor I A propos de votre moniteur I Acerca de su monitor Informacje o monitorze I Sobre seu monitor I Informazioni sul monitor NOTE: It is recommended that you connect the monitor using the White DVI cable for better performance. HINWEIS: Wir empfehlen, den Monitor Ober das weine DVI-Kabel anzuschliel3en; so erzielen Sie eine bessere Leistung. REMARQUE : Nous vous recommandons d'utiliser le cable DVI avec le moniteur pour obtenir de meilleures performances. NOTA: se recomienda conectar el monitor utilizando el cable DVI blanco para conseguir un mejor rendimiento. UWAGA: DIa uzyskania lepszej wydajnoki zaleca sic, aby monitor podiqczyo bialym kablem DVI. OBS.: E recomendavel que ligue o monitor usando o cabo DVI Branco para uma meihor performance. NOTA: si consiglia di collegare il monitor usando it cavo DVI bianco, per ottenere una prestazione migliore. 4 Connect the power cable and press the power button SchlieBen Sie das Netzkabel an, und drticken Sie den Netzschalter. Branchez le cable d'alimentation et appuyez sur le bouton d'alimentation Conecte el cable de alimentaciOn y presione el boton de encendido Podtqcz kabel zasilajqcy i naci§nij przycisk zasilania Conecte o cabo de energia e pressione o botao de energia Collegare it cavo d'alimentazione e premere it tasto d'accensione 0 0 0 0 0 8 Finding Information For more information see the User's Guide on the Drivers and Documentation media. Weitere Informationen Weitere Informationen finden Sie in demBenutzerhandbuch aufdem Treiber- und Dokumentationsmedium. Rechercher des informations Pour plus d'informations, reportezvous au Guide de l'utilisateur sur le CD Pilotes et Documentation. B6squeda de information Para mas informaci6n, consulte el manualdelusuario en losmedios de controladores y documentation. Wyszukiwanie informacji Dodatkowe informacje, patrz Przewodnik u2ytkownika na nogniku ze sterownikami dokumentacja. Encontrar informacOes Para obter mais informacoes consulte o guia de usuario no CD do drive e documentacao. Dove trovare le informazioni Tune le altre informazioni si trovano sul supporto the contiene Ia Guida all'uso,i Drivere la Documentazione. 4e* Information in this document is subject to %i t, Printed in China change without notice. O 2008 Dell Inc. All rights reserved. Les informations contanues dans ce document tont striates 8 modifications sans preavis. O2008 Dell Inc. Ins droits reserves. La informaciOn de este documents se encuentra As informagOes nests documents estas sujeitas a alleragao sujeta a cambios sin aviso previo. sem aviso. O2008 Dell Inc. Todos las derechos resenrados. C200B Dell Inc. Todo as direitos reservados. DOLL Reproduction of these mamrials in any wavier whatsoever without tho written permission of Delft's. is strict y forbidden. Dell and :he DELL logo are tracemarks of Dell Inc.. Del disclaims proprietary interest in the marks aid rames of others. La reproductor de ces comerus de gJelque 'ago-, sans la permission Ocri-s Ce Dell Inc. est strivement nterdite. Dell et le logo DELL sont des marques depose. de Dell Inc..Dellrenonce 4 toutinter* de propriete dans les marques et noms des autres. La reprocucci6n de chos materiales sin peno so for escri's dc Dell Inc. gueda terminarternmite orohibida. descarga todo inroads de propiedadsobre las mamas y nornbres de otras empresas. A reprodugao des:es mmeriais em gualgLer maneira sem a permissho cscrita (lentil Inc. 0 estlamentc proibica. Dell e o logotipo DELL sgo mamas comerciais da Dell Inc.. A Dell nega qualquerirderesse de propriedade em mamas e nornes de terceiros. Informacje zawarte w niniejszym dokumencie padlagaja mianom bee uprzathania. O2008 Dell Inc. Wszystkie prawa satrzeione. Le informazioni di guest document° sons soggette a eambiamenli sense preavviso. O2008 Dell Inc. Tuft i dirihi sons riservati.. Anderung der Informationen in diesem Dokumant jedarzeit vorbahalten. C 200B Dell Inc. Alle Rechte vorbehalten. Powielanie tych materiatow w jakikawiak sposOla boo pisemnej 7gody Dell Inc. jest surowo 7abronione. Dell i logo DELL sa zastra2onymi znakami towarowymi Dell Inc.. Firma DO zapaccza zaintcrosowaniu prawami wlasnaki do marak f nazw nafatacych do innych. Qualsiasi t po di riprorkgrie di quest meter all. senza Die Reproduzierung dieser Materialien unter irgenceiner rautorina7 one sc-itta della Dell Ins. a scvoramerrtc oroibita. Form ohm die schrittlichc Frlaubnis von Darns. syengstens verboten. Doll od logo DELL sono march/ di fabbrica rogistrah della Dell Inc.. Dellnega ognHaleresse dipropriety in Delland das DELL Logo rind Warenaichen von Dell Inc.. marchi e nom' diversi dalpropdo. Dellhat keine £igentumsrechte Ober Marken and Minn anderer inhaber. 1. Short Cut Key 1/ Up button 1. Schnelltaste 1/Aufvvartstaste 2. Short Cut Key 2/ Down button 2. Schnelltaste 2/Aufvvartstaste 3. OSD Menu/ OK button 3. OSD-Menu-Taste/OK-Taste 4. Back/ Exit button 4. Zurikk-/Beenden-Taste 5. Power button 5. Stromschalter (with power light indicator) 6. FuBentfernungstaste 6. Stand removal button 7. Sicherheitsverschlussschlitz 7. Security lock slot 8. Dell Soundbar-Tragbiigel 8. Dell Soundbar mounting brackets 9. Kabelfiihrungsoffnung 9. Cable management slot 1.Touche de raccourci 1 / Bouton Haut 1. Bot6n de Acceso Directo 1 / Bot6n Arriba 1. Klawisz skratu 1 /przycisk w gore 2. Touche de raccourci 2/ Bouton Haut 2. Boton de Acceso Directo 2/ Boton Arriba 2. Klawisz skrotu 2 /przycisk w gore 3. Bouton Menu OSD / OK 3. Boton del menu OSD / Bot6n Aceptar 3. Przycisk menu OSD/przycisk OK 4. Bouton Retour/ Quitter 4. Boton Atras/ Salir 4. Przycisk Wstecz/Zakoncz 5. Bouton marche/arret 5. Boton de Encendido 5. Przycisk zasilania 6. Bouton depose du support 6. Boton para extraccion de la base 6. Przycisk ocitgczania stojaka 7. Fente du verrouillage de securite 7.Ranura de bloqueo de seguridad 7. Gniazdo blokady bezpieczeristwa 8. Supports de montage de la 8. Soportes de montaje Dell 8. Uchwyty montaiowe panelu barre de son Dell Soundbar diwickowego Dell 9. Fente de gestion des cables 9. Ranura para el manejo de los 9. Szczelina zarzgdzania kablami cables. 1.Tecla de Atalho 1 / both() Cima 2.Tecla de Atalho 2/ botao Cima 3.Bab de menu OSD / botao OK 4. botao Voltar/ Sair 5. Botao Alimentacao 6. Both() re remocao da base 7. Fenda de bloqueio de seguranca 8. Suportes de montagem da barra de som 9. Fenda de controle do cabo 1. Tasto di scelta rapida 1 / pulsante Su 2. Tasto di scelta rapida 2/ pulsante Su 3. Pulsante menu OSD / pulsante OK 4. Pulsante Indietro / Esci 5. Pulsante accensione 6. Pulsante smontaggio support 7. Apertura blotto di sicurezza 8. Staffe di montaggio Soundbar Dell 9. Apertura passacavi January 2009 Januar 2009 Janvler 2009 Enero 2009 &yawl 2009 Janeiro 2009 11H1 O iii i 11 www.dell.com support.dell.com 7730203915BOA (DELL P/N R708K Rev. A00) Gennalo 2008 ENERGY STAR
-
 1
1 -
 2
2
 |
 |
