Dell Inspiron 13 1370 Inspiron 1370 Service Manual - Page 31
Replacing the Memory Modules
 |
View all Dell Inspiron 13 1370 manuals
Add to My Manuals
Save this manual to your list of manuals |
Page 31 highlights
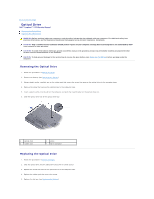
1 memory module connector 3 memory module 2 securing clips (2) Replacing the Memory Module(s) CAUTION: If you need to install memory modules in two connectors, install a memory module in the connector labeled "DIMM A" before you install a memory module in the connector labeled "DIMM B." 1. Follow the procedures in Before You Begin. 2. Align the notch in the memory module with the tab in the memory module connector. 3. Slide the memory module firmly into the slot at a 45-degree angle, and press the memory module down until it clicks into place. If you do not hear the click, remove the memory module and reinstall it. NOTE: If the memory module is not installed properly, the computer may not boot. 1 tab 2 notch 4. Align the tabs on the memory module cover with the slots on the computer base and snap the cover into place. 5. Replace the screw that secures the memory module cover to the computer base. 6. Replace the battery (see Replacing the Battery). Connect the AC adapter to your computer and an electrical outlet. 7. Turn on the computer. As the computer boots, it detects the memory module and automatically updates the system configuration information. To confirm the amount of memory installed in the computer, click Start ® Control Panel® System and Security® System. CAUTION: Before turning on the computer, replace all screws and ensure that no stray screws remain inside the computer. Failure to do so may result in damage to the computer. Back to Contents Page
-
 1
1 -
2
-
3
-
4
-
5
-
6
-
7
-
8
-
9
-
10
-
11
-
12
-
13
-
14
-
15
-
16
-
17
-
18
-
19
-
20
-
21
-
22
-
23
-
24
-
25
-
 26
26 -
 27
27 -
 28
28 -
 29
29 -
 30
30 -
 31
31 -
 32
32 -
 33
33 -
 34
34 -
 35
35 -
 36
36 -
37
-
38
-
39
-
40
-
41
-
42
-
43
-
44
-
45
-
46
-
47
-
48
-
49
-
50
-
51
 |
 |
