Dell Latitude D500 System Information Guide - Page 26
Running the Dell Diagnostics - windows 7 drivers
 |
View all Dell Latitude D500 manuals
Add to My Manuals
Save this manual to your list of manuals |
Page 26 highlights
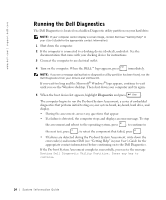
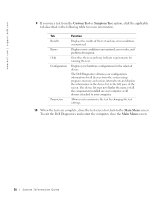
www.dell.com | support.dell.com Running the Dell Diagnostics The Dell Diagnostics is located on a hidden Diagnostic utility partition on your hard drive. NOTE: If your computer cannot display a screen image, contact Dell (see "Getting Help" in your User's Guide for the appropriate contact information). 1 Shut down the computer. 2 If the computer is connected to a docking device (docked), undock it. See the documentation that came with your docking device for instructions. 3 Connect the computer to an electrical outlet. 4 Turn on the computer. When the DELL™ logo appears, press immediately. NOTE: If you see a message stating that no diagnostics utility partition has been found, run the Dell Diagnostics from your Drivers and Utilities CD. If you wait too long and the Microsoft® Windows® logo appears, continue to wait until you see the Windows desktop. Then shut down your computer and try again. 5 When the boot device list appears, highlight Diagnostics and press . The computer begins to run the Pre-boot System Assessment, a series of embedded diagnostics that perform initial testing on your system board, keyboard, hard drive, and display. • During the assessment, answer any questions that appear. • If a failure is detected, the computer stops and displays an error message. To stop the assessment and reboot to the operating system, press ; to continue to the next test, press ; to retest the component that failed, press . • If failures are detected during the Pre-boot System Assessment, write down the error code(s) and contact Dell (see "Getting Help" in your User's Guide for the appropriate contact information) before continuing on to the Dell Diagnostics. If the Pre-boot System Assessment completes successfully, you receive the message Booting Dell Diagnostic Utility Partition. Press any key to continue. 24 System Infor mation Guide
-
 1
1 -
2
-
3
-
4
-
5
-
6
-
7
-
8
-
9
-
10
-
11
-
12
-
13
-
14
-
15
-
16
-
17
-
18
-
19
-
20
-
 21
21 -
 22
22 -
 23
23 -
 24
24 -
 25
25 -
 26
26 -
 27
27 -
 28
28 -
 29
29 -
 30
30 -
 31
31 -
32
-
33
-
34
-
35
-
36
-
37
-
38
-
39
-
40
-
41
-
42
-
43
-
44
-
45
-
46
-
47
-
48
-
49
-
50
-
51
-
52
-
53
-
54
-
55
-
56
-
57
-
58
-
59
-
60
-
61
-
62
-
63
-
64
-
65
-
66
-
67
-
68
-
69
-
70
-
71
-
72
-
73
-
74
-
75
-
76
-
77
-
78
-
79
-
80
-
81
-
82
-
83
-
84
-
85
-
86
-
87
-
88
-
89
-
90
-
91
-
92
-
93
-
94
-
95
-
96
-
97
-
98
-
99
-
100
-
101
-
102
-
103
-
104
-
105
-
106
-
107
-
108
-
109
-
110
-
111
-
112
-
113
-
114
-
115
-
116
-
117
-
118
-
119
-
120
-
121
-
122
-
123
-
124
-
125
-
126
-
127
-
128
-
129
-
130
-
131
-
132
-
133
-
134
-
135
-
136
-
137
-
138
-
139
-
140
-
141
-
142
-
143
-
144
-
145
-
146
-
147
-
148
-
149
-
150
-
151
-
152
-
153
-
154
 |
 |