Dell Latitude D610 Service Manual - Page 20
Hard Drive
 |
View all Dell Latitude D610 manuals
Add to My Manuals
Save this manual to your list of manuals |
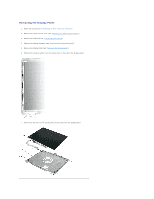
Page 20 highlights
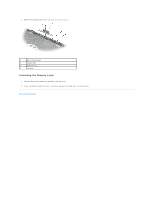
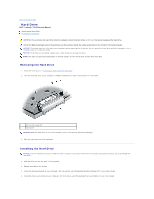
Back to Contents Page Hard Drive Dell™ Latitude™ D610 Service Manual Removing the Hard Drive Installing the Hard Drive CAUTION: If you remove the hard drive from the computer when the drive is hot, do not touch the metal housing of the hard drive. CAUTION: Before you begin any of the procedures in this section, follow the safety instructions in the Product Information Guide. NOTICE: To prevent data loss, shut down your computer before removing the hard drive. Do not remove the hard drive while the computer is on, in standby mode, or in hibernate mode. NOTICE: Hard drives are extremely fragile; even a slight bump can damage the drive. NOTE: Dell does not guarantee compatibility or provide support for hard drives from sources other than Dell. Removing the Hard Drive 1. Follow the instructions in "Preparing to Work Inside the Computer." 2. Turn the computer over. Use a standard #1 Phillips screwdriver to remove the two M3 x 3- mm screws. 1 M3 x 3-mm screws (2) 2 hard drive NOTICE: When the hard drive is not in the computer, store it in protective antistatic packaging. 3. Slide the hard drive out of the computer. Installing the Hard Drive NOTICE: Use firm and even pressure to slide the drive into place. If you force the hard drive into place using excessive force, you may damage the connector. 1. Slide the drive into the bay until it is fully seated. 2. Replace and tighten the screws. 3. Install the operating system for your computer. For instructions, see "Reinstalling Microsoft Windows XP" in your User's Guide. 4. Install the drivers and utilities for your computer. For instructions, see "Reinstalling Drivers and Utilities" in your User's Guide.
-
 1
1 -
2
-
3
-
4
-
5
-
6
-
7
-
8
-
9
-
10
-
11
-
12
-
13
-
14
-
 15
15 -
 16
16 -
 17
17 -
 18
18 -
 19
19 -
 20
20 -
 21
21 -
 22
22 -
 23
23 -
 24
24 -
 25
25 -
26
-
27
-
28
-
29
-
30
-
31
-
32
-
33
-
34
-
35
-
36
-
37
-
38
-
39
-
40
-
41
-
42
-
43
-
44
-
45
-
46
-
47
 |
 |
