Dell OptiPlex 270 Service Manual - Page 14
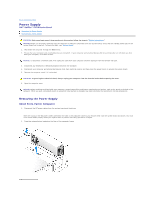
Replacing the I/O Panel
 |
View all Dell OptiPlex 270 manuals
Add to My Manuals
Save this manual to your list of manuals |
Page 14 highlights
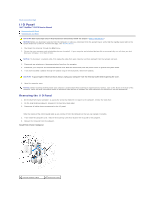
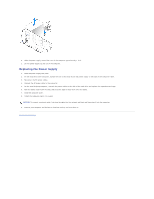
2 chassis-intrusion switch cable 5 front audio cable 3 control panel cable 6 I/O cable Small Desktop Computer 1 chassis-intrusion switch cable 4 control panel cable 2 internal speaker cable 5 front audio cable 3 I/O cable 6 mounting screw Small Mini-Tower Computer 1 control panel cable 4 mounting screw 2 front audio cable 5 internal speaker cable 3 I/O cable 6 chassis-intrusion switch cable Replacing the I/O Panel To replace the I/O panel, follow the removal procedures in the reverse order. Back to Contents Page
-
 1
1 -
2
-
3
-
4
-
5
-
6
-
7
-
8
-
 9
9 -
 10
10 -
 11
11 -
 12
12 -
 13
13 -
 14
14 -
 15
15 -
 16
16 -
 17
17 -
 18
18 -
 19
19 -
20
-
21
-
22
-
23
-
24
-
25
 |
 |

Small Desktop Computer
Small Mini-Tower Computer
Replacing the I/O Panel
To replace the I/O panel, follow the removal procedures in the reverse order.
Back to Contents Page
2
chassis-intrusion switch cable
5
front audio cable
3
control panel cable
6
I/O cable
1
chassis-intrusion switch cable
4
control panel cable
2
internal speaker cable
5
front audio cable
3
I/O cable
6
mounting screw
1
control panel cable
4
mounting screw
2
front audio cable
5
internal speaker cable
3
I/O cable
6
chassis-intrusion switch cable