Dell OptiPlex 7070 Small Form Factor Setup and Specifications - Page 18
Boot menu, One time boot menu, System setup options
 |
View all Dell OptiPlex 7070 Small Form Factor manuals
Add to My Manuals
Save this manual to your list of manuals |
Page 18 highlights
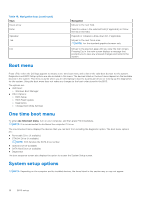
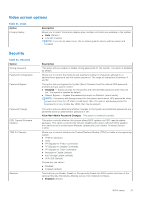
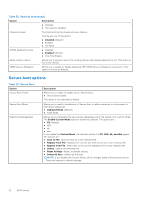
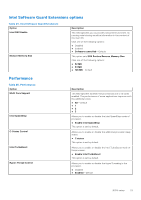
Table 18. Navigation keys (continued) Keys Down arrow Enter Spacebar Tab Esc Navigation Moves to the next field. Selects a value in the selected field (if applicable) or follow the link in the field. Expands or collapses a drop-down list, if applicable. Moves to the next focus area. NOTE: For the standard graphics browser only. Moves to the previous page until you view the main screen. Pressing Esc in the main screen displays a message that prompts you to save any unsaved changes and restarts the system. Boot menu Press when the Dell logo appears to initiate a one-time boot menu with a list of the valid boot devices for the system. Diagnostics and BIOS Setup options are also included in this menu. The devices listed on the boot menu depend on the bootable devices in the system. This menu is useful when you are attempting to boot to a particular device or to bring up the diagnostics for the system. Using the boot menu does not make any changes to the boot order stored in the BIOS. The options are: ● UEFI Boot: ○ Windows Boot Manager ● Other Options: ○ BIOS Setup ○ BIOS Flash Update ○ Diagnostics ○ Change Boot Mode Settings One time boot menu To enter one time boot menu, turn on your computer, and then press F12 immediately. NOTE: It is recommended to shutdown the computer if it is on. The one-time boot menu displays the devices that you can boot from including the diagnostic option. The boot menu options are: ● Removable Drive (if available) ● STXXXX Drive (if available) NOTE: XXX denotes the SATA drive number. ● Optical Drive (if available) ● SATA Hard Drive (if available) ● Diagnostics The boot sequence screen also displays the option to access the System Setup screen. System setup options NOTE: Depending on the computer and its installed devices, the items listed in this section may or may not appear. 18 BIOS setup
-
 1
1 -
2
-
3
-
4
-
5
-
6
-
7
-
8
-
9
-
10
-
11
-
12
-
 13
13 -
 14
14 -
 15
15 -
 16
16 -
 17
17 -
 18
18 -
 19
19 -
 20
20 -
 21
21 -
 22
22 -
 23
23 -
24
-
25
-
26
-
27
-
28
-
29
-
30
-
31
-
32
-
33
 |
 |
