Dell OptiPlex NX Service Manual - Page 137
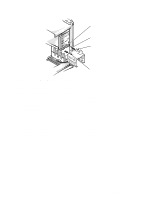
System Power Supply, the pin on the power supply as you position the power supply in the chassis
 |
View all Dell OptiPlex NX manuals
Add to My Manuals
Save this manual to your list of manuals |
Page 137 highlights
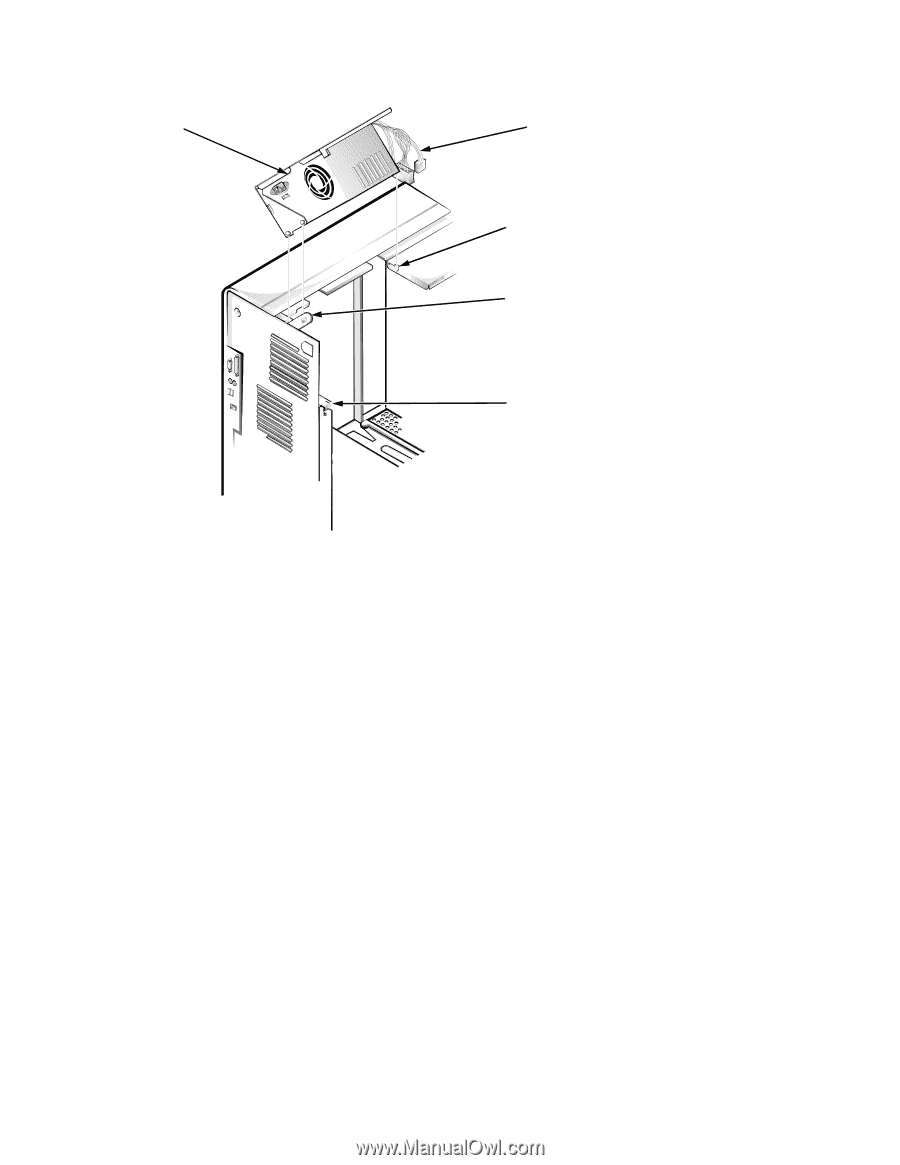
System Power Supply power supply DC power cables slot power-supply detent link securing tab Figure 6-15. System Power-Supply Removal To remove the system power supply, follow these steps: 1. Disconnect the AC power cable from the back of the power supply. 2. Free the system power supply from the securing tab labeled "RELEASE ->," and rotate it upward until it locks. Press the securing tab to release the power supply. 3. Disconnect the DC power cables from the system board and the drives. 4. Facing the left side of the computer, move the front end of the system power supply toward you, and lift it up to disengage the power supply from the slot in the chassis. 5. Lift the system power supply from the computer. When you reinstall the power supply, place the power-supply detent link over the pin on the power supply as you position the power supply in the chassis opening. NOTE: When replacing the power supply on an enhanced manageability system, ensure that the replacement power supply is an EM power supply. Removing and Replacing Parts on the Mini Tower Chassis 6-17
-
 1
1 -
2
-
3
-
4
-
5
-
6
-
7
-
8
-
9
-
10
-
11
-
12
-
13
-
14
-
15
-
16
-
17
-
18
-
19
-
20
-
21
-
22
-
23
-
24
-
25
-
26
-
27
-
28
-
29
-
30
-
31
-
32
-
33
-
34
-
35
-
36
-
37
-
38
-
39
-
40
-
41
-
42
-
43
-
44
-
45
-
46
-
47
-
48
-
49
-
50
-
51
-
52
-
53
-
54
-
55
-
56
-
57
-
58
-
59
-
60
-
61
-
62
-
63
-
64
-
65
-
66
-
67
-
68
-
69
-
70
-
71
-
72
-
73
-
74
-
75
-
76
-
77
-
78
-
79
-
80
-
81
-
82
-
83
-
84
-
85
-
86
-
87
-
88
-
89
-
90
-
91
-
92
-
93
-
94
-
95
-
96
-
97
-
98
-
99
-
100
-
101
-
102
-
103
-
104
-
105
-
106
-
107
-
108
-
109
-
110
-
111
-
112
-
113
-
114
-
115
-
116
-
117
-
118
-
119
-
120
-
121
-
122
-
123
-
124
-
125
-
126
-
127
-
128
-
129
-
130
-
131
-
 132
132 -
 133
133 -
 134
134 -
 135
135 -
 136
136 -
 137
137 -
 138
138 -
 139
139 -
 140
140 -
 141
141 -
 142
142 -
143
-
144
-
145
-
146
-
147
-
148
-
149
-
150
-
151
-
152
-
153
-
154
-
155
-
156
-
157
-
158
-
159
-
160
-
161
-
162
-
163
-
164
-
165
-
166
-
167
-
168
-
169
-
170
-
171
-
172
-
173
-
174
-
175
-
176
-
177
-
178
-
179
-
180
-
181
 |
 |