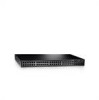
Dell PowerConnect 2748 Getting Started Guide
Dell PowerConnect 2748 Manual
 |
View all Dell PowerConnect 2748 manuals
Add to My Manuals
Save this manual to your list of manuals |
Dell PowerConnect 2748 manual content summary:
- Dell PowerConnect 2748 | Getting Started Guide - Page 1
Dell™ PowerConnect™ 27xx Systems Getting Started Guide Guide de mise en route Guia de inicialização Guía de introducción Models: PC2708, PC2716, PC2724, and PC2748 www.dell.com | support.dell.com - Dell PowerConnect 2748 | Getting Started Guide - Page 2
- Dell PowerConnect 2748 | Getting Started Guide - Page 3
Dell™ PowerConnect™ 27XX Systems Getting Started Guide www.dell.com | support.dell.com - Dell PowerConnect 2748 | Getting Started Guide - Page 4
or loss of data and tells you how to avoid the problem. CAUTION: A CAUTION indicates a potential for property damage, personal Dell Inc. is strictly forbidden. Trademarks used in this text: Dell, Dell OpenManage, PowerEdge, the DELL logo, Inspiron, Dell Precision, Dimension, OptiPlex, PowerConnect - Dell PowerConnect 2748 | Getting Started Guide - Page 5
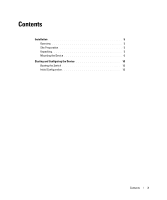
Contents Installation 5 Overview 5 Site Preparation 5 Unpacking 5 Mounting the Device 6 Starting and Configuring the Device 10 Booting the Switch 10 Initial Configuration 10 Contents 3 - Dell PowerConnect 2748 | Getting Started Guide - Page 6
4 Contents - Dell PowerConnect 2748 | Getting Started Guide - Page 7
. For more information, see the Dell™ PowerConnect™ 27xx Series User's Guide, which is available on your Documentation CD, or check the Dell Support website at support.dell.com for the latest updates on documentation and software. Site Preparation PowerConnect 27xx Series devices can be mounted - Dell PowerConnect 2748 | Getting Started Guide - Page 8
immediately. Mounting the Device The following mounting instructions apply to the PowerConnect 27xx Series devices. There are three device in a rack or on a wall. The surface must be able to support the weight of the device and the device cables. 1 Attach the ventilation. 6 Getting Started Guide - Dell PowerConnect 2748 | Getting Started Guide - Page 9
Guide as well as the safety information for other devices that connect to or support the switch. CAUTION: When mounting multiple devices into a rack, mount the devices from the bottom up. 1 Place the supplied Installation for Rack Mounting PowerConnect Switch 2 Insert the supplied screws into the - Dell PowerConnect 2748 | Getting Started Guide - Page 10
Figure 1-2. Bracket Installation for Wall Mounting PowerConnect Switch 2 Insert the supplied screws into the rack-mounting holes and holes in the wall for the brackets and install the appropriate mounting hardware (not supplied). 6 Place the device against the wall so that the bracket holes align - Dell PowerConnect 2748 | Getting Started Guide - Page 11
to a grounded AC outlet at this time. You will connect the device to a power source in the steps detailed in Starting and Configuring the Device. Figure 1-4. Back-Panel Power Connectors PowerConnect Switch Rear View Power Connector Connect the device to an AC outlet. After you have connected the - Dell PowerConnect 2748 | Getting Started Guide - Page 12
is deployed as an unmanaged switch. To use the management functions, refer the configuration options and details in the User's Guide on the enclosed CD. Without specific configuration, the device functions with the default settings, as described in the User's Guide. NOTE: Before proceeding, read the - Dell PowerConnect 2748 | Getting Started Guide - Page 13
IP Address, Subnet Mask and Default Gateway. 4 Click Apply Changes. The device is configured. NOTE: This getting started guide provides information on the steps necessary for basic setup of the switch. For more information on the management capabilities of the switch, please refer the PowerConnect - Dell PowerConnect 2748 | Getting Started Guide - Page 14
12 Getting Started Guide - Dell PowerConnect 2748 | Getting Started Guide - Page 15
Systèmes Dell™ PowerConnect™ 27XX Guide de mise en route www.dell.com | support.dell.com - Dell PowerConnect 2748 | Getting Started Guide - Page 16
est strictement interdite. Marques utilisées dans ce document : Dell, Dell OpenManage, PowerEdge, le logo DELL, Inspiron, Dell Precision, Dimension, OptiPlex, PowerConnect, PowerApp, PowerVault, Axim, DellNet et Latitude sont des marques de Dell Inc. ; Microsoft et Windows sont des marques déposées - Dell PowerConnect 2748 | Getting Started Guide - Page 17
Sommaire Installation 17 Présentation générale 17 Préparation du site 17 Déballage 17 Montage de l'unit 18 Démarrage et configuration de l'unit 22 Démarrage du commutateur 22 Configuration initiale 22 Sommaire 15 - Dell PowerConnect 2748 | Getting Started Guide - Page 18
16 Sommaire - Dell PowerConnect 2748 | Getting Started Guide - Page 19
consultez le Guide d'utilisation Dell™ PowerConnect™ 27xx, que vous trouverez sur le CD de documentation. Vous pouvez également vous rendre sur le site support.dell.com pour en rack ou kit de fixation murale • CD de documentation • Guide d'information sur le produit Guide de mise en route 17 - Dell PowerConnect 2748 | Getting Started Guide - Page 20
Montage de l'unité Les instructions de montage ci-après s'appliquent aux unités PowerConnect 27xx. Il existe trois installée dans un rack ou sur un mur. Cette surface doit pouvoir supporter le poids de l'unité et de ses câbles. 1 Fixez les patins suffisamment ventilée. 18 Guide de mise en route - Dell PowerConnect 2748 | Getting Started Guide - Page 21
. L'illustration suivante indique l'emplacement où les supports doivent être placés. Figure 1-1. Installation des supports pour un montage en rack Commutateur PowerConnect 2 Insérez les vis fournies dans les Vérifiez que les orifices de ventilation ne sont pas obstrués. Guide de mise en route 19 - Dell PowerConnect 2748 | Getting Started Guide - Page 22
de montage approprié (non fourni). 6 Placez l'unité contre le mur en alignant les trous du support sur ceux que vous avez percés dans le mur. 7 Insérez les vis dans chaque support de montage et serrez-les. Vérifiez que les orifices de ventilation ne sont pas obstrués. 20 Guide de mise en route - Dell PowerConnect 2748 | Getting Started Guide - Page 23
d'alimentation du panneau arrière Vue arrière du PowerConnect Connecteur d'alimentation Branchez l'unité sur une prise électrique. Une fois ce branchement effectué, vérifiez que l'unité fonctionne correctement en examinant les voyants situés sur le panneau avant. Guide de mise en route 21 - Dell PowerConnect 2748 | Getting Started Guide - Page 24
disponible sur le site support.dell.com. Démarrage du configurer l'unité : • Adresse IP à attribuer à l'interface VLAN 1 utilisée pour la gestion de l'unité • Masque de sous-réseau IP • Adresse IP de la passerelle par défaut (routeur suivant) permettant de configurer la route par défaut 22 Guide - Dell PowerConnect 2748 | Getting Started Guide - Page 25
IP). La fenêtre System IP Address (Adresse IP du système) s'affiche. 3 Entrez l'adresse IP, le masque de sous-réseau et la passerelle par défaut. 4 Cliquez sur Apply Changes (Appliquer les modifications). L'unité est configurée. REMARQUE : le présent guide contient uniquement les instructions - Dell PowerConnect 2748 | Getting Started Guide - Page 26
24 Guide de mise en route - Dell PowerConnect 2748 | Getting Started Guide - Page 27
Sistemas Dell™ PowerConnect™ 27XX Guia de inicialização www.dell.com | support.dell.com - Dell PowerConnect 2748 | Getting Started Guide - Page 28
ção por quaisquer meios sem a permissão por escrito da Dell Inc. Marcas comerciais mencionadas neste texto: Dell, Dell OpenManage, PowerEdge, o logotipo da DELL, Inspiron, Dell Precision, Dimension, OptiPlex, PowerConnect, PowerApp, PowerVault, Axim, DellNet e Latitude são marcas comerciais da - Dell PowerConnect 2748 | Getting Started Guide - Page 29
Conteúdo Instalação 29 Visão geral 29 Preparação do local 29 Remoção da embalagem 29 Montagem do dispositivo 30 Inicialização e configuração do dispositivo 34 Inicialização do comutador 34 Configuração inicial 34 Conteúdo 27 - Dell PowerConnect 2748 | Getting Started Guide - Page 30
28 Conteúdo - Dell PowerConnect 2748 | Getting Started Guide - Page 31
o Guia do usuário do Dell™ PowerConnect™ da série 27xx, disponível no CD de documentação, ou visite o site de suporte da Dell no endereço support.dell.com para obter as atualizações mais recentes em documentação e software. Preparação do local Os dispositivos PowerConnect da série 27xx podem ser - Dell PowerConnect 2748 | Getting Started Guide - Page 32
e nos acessórios. Em caso positivo, informe imediatamente o fabricante. Montagem do dispositivo As seguintes instruções de montagem aplicam-se aos dispositivos PowerConnect da série 27xx. Há três opções de montagem do dispositivo: • Instalação em superfície plana • Instalação em rack • Instalação em - Dell PowerConnect 2748 | Getting Started Guide - Page 33
ícios de montagem do suporte. A seguinte figura ilustra onde montar os suportes. Figura 1-1. Instalação de suportes para montagem em rack Comutador PowerConnect 2 Insira os parafusos fornecidos nos orifícios das laterais do dispositivo e aparafuse com uma chave-de-fenda. 3 Repita o processo para - Dell PowerConnect 2748 | Getting Started Guide - Page 34
os orifícios de montagem do suporte. A seguinte figura ilustra onde montar os suportes. Figura 1-2. Instalação de suportes para montagem em parede Comutador PowerConnect 2 Insira os parafusos fornecidos nos orifícios de montagem do rack e aperte-os com uma chave de fenda. 3 Repita o processo para - Dell PowerConnect 2748 | Getting Started Guide - Page 35
ção Inicialização e configuração do dispositivo. Figura 1-4. Conectores de energia do painel posterior Conector de energia Visão posterior do comutador PowerConnect Conecte o dispositivo a uma tomada CA. Depois de ter conectado o dispositivo a uma fonte de alimentação, confirme se o dispositivo est - Dell PowerConnect 2748 | Getting Started Guide - Page 36
PowerConnect inicializou corretamente. Para começar a utilizar o dispositivo, configure-o utilizando os parâmetros específicos do sistema. OBSERVAÇÃO: Obtenha as seguintes informações do administrador da rede antes de configurar o dispositivo: • O endereço IP a ser atribuído à interface VLAN - Dell PowerConnect 2748 | Getting Started Guide - Page 37
de usuário da web, clique em IP Addressing (Endereçamento IP). A janela System IP Address (Endereço IP do sistema) é apresentada. 3 Insira o endereço IP, a máscara de sub-rede e o , consulte o Guia do usuário do PowerConnect da série 27xx encontrado no CD de documentação. Guia de inicialização 35 - Dell PowerConnect 2748 | Getting Started Guide - Page 38
36 Guia de inicialização - Dell PowerConnect 2748 | Getting Started Guide - Page 39
Sistemas Dell™ PowerConnect™ 27XX Guía de introducción www.dell.com | support.dell.com - Dell PowerConnect 2748 | Getting Started Guide - Page 40
en cualquier forma sin la autorización por escrito de Dell Inc. Marcas comerciales utilizadas en este texto: Dell, Dell OpenManage, PowerEdge, el logotipo de DELL, Inspiron, Dell Precision, Dimension, OptiPlex, PowerConnect, PowerApp, PowerVault, Axim, DellNet y Latitude son marcas comerciales de - Dell PowerConnect 2748 | Getting Started Guide - Page 41
Contenido Instalación 41 Información general 41 Preparación del sitio 41 Desembalaje 41 Montaje del dispositivo 42 Inicio y configuración del dispositivo 46 Inicio del conmutador 46 Configuración inicial 46 Contenido 39 - Dell PowerConnect 2748 | Getting Started Guide - Page 42
40 Contenido - Dell PowerConnect 2748 | Getting Started Guide - Page 43
User's Guide (Guía del usuario de Dell™ PowerConnect™ serie 27xx), incluida en el CD de documentación, o consulte la página Web de asistencia de Dell (support.dell.com) para conseguir las últimas actualizaciones de la documentación y del software. Preparación del sitio Los dispositivos PowerConnect - Dell PowerConnect 2748 | Getting Started Guide - Page 44
no estén dañados. Informe inmediatamente de cualquier daño. Montaje del dispositivo Las instrucciones de montaje siguientes corresponden a los dispositivos PowerConnect de la serie 27xx. Existen tres opciones de montaje del dispositivo: • Instalación en una superficie plana • Instalación en un rack - Dell PowerConnect 2748 | Getting Started Guide - Page 45
la figura siguiente se muestra dónde deben montarse los soportes. Figura 1-1. Instalación de los soportes para el montaje en rack Conmutador PowerConnect 2 Inserte los tornillos suministrados en los orificios de los laterales del dispositivo y apriételos con un destornillador. 3 Repita el proceso - Dell PowerConnect 2748 | Getting Started Guide - Page 46
. En la figura siguiente se muestra dónde deben montarse los soportes. Figura 1-2. Instalación de los soportes para el montaje en pared Conmutador PowerConnect 2 Inserte los tornillos suministrados en los orificios de montaje en rack y apriételos con un destornillador. 3 Repita el proceso para el - Dell PowerConnect 2748 | Getting Started Guide - Page 47
ón Inicio y configuración del dispositivo. Figura 1-4. Conectores de alimentación del panel posterior Conector de alimentación Vista posterior del conmutador PowerConnect Conecte el dispositivo a una toma eléctrica de CA. Después de conectar el dispositivo a una fuente de alimentación, compruebe - Dell PowerConnect 2748 | Getting Started Guide - Page 48
del usuario que encontrará en la página Web de asistencia de Dell (support.dell.com). Inicio del conmutador Cuando se conecta el dispositivo a una PowerConnect está configurado de forma predeterminada con la dirección IP 192.168.2.1 y la máscara de subred 255.255.255.0. • El dispositivo PowerConnect - Dell PowerConnect 2748 | Getting Started Guide - Page 49
haga clic en IP Addressing (Direccionamiento IP). Aparece la ventana System IP Address (Dirección IP del sistema). 3 Especifique la dirección IP, la máscara de del conmutador, consulte la publicación PowerConnect 27xx Series User's Guide (Guía del usuario de PowerConnect serie 27xx) que se incluye - Dell PowerConnect 2748 | Getting Started Guide - Page 50
48 Guía de introducción - Dell PowerConnect 2748 | Getting Started Guide - Page 51
-
 1
1 -
 2
2 -
 3
3 -
 4
4 -
 5
5 -
 6
6 -
 7
7 -
8
-
9
-
10
-
11
-
12
-
13
-
14
-
15
-
16
-
17
-
18
-
19
-
20
-
21
-
22
-
23
-
24
-
25
-
26
-
27
-
28
-
29
-
30
-
31
-
32
-
33
-
34
-
35
-
36
-
37
-
38
-
39
-
40
-
41
-
42
-
43
-
44
-
45
-
46
-
47
-
48
-
49
-
50
-
51
 |
 |

www.dell.com | support.dell.com
Dell™ PowerConnect™ 27xx Systems
Getting Started Guide
Guide de mise en route
Guia de inicialização
Guía de introducción
Models: PC2708, PC2716, PC2724, and PC2748