Dell PowerConnect 8100 Getting Started Guide
Dell PowerConnect 8100 Manual
 |
View all Dell PowerConnect 8100 manuals
Add to My Manuals
Save this manual to your list of manuals |
Dell PowerConnect 8100 manual content summary:
- Dell PowerConnect 8100 | Getting Started Guide - Page 1
Dell PowerConnect 81xx Series Switch Getting Started Guide Guide de mise en route Handbuch zum Einstieg Panduan Pengaktifan Guia de Primeiros Passos Guía de introducción Başlangıç Kılavuzu Regulatory Model: PC8132, PC8132F, PC8164, PC8164F - Dell PowerConnect 8100 | Getting Started Guide - Page 2
- Dell PowerConnect 8100 | Getting Started Guide - Page 3
Dell PowerConnect 81xx Series Switch Getting Started Guide Regulatory Model: PC8132, PC8132F, PC8164, PC8164F - Dell PowerConnect 8100 | Getting Started Guide - Page 4
: Dell™, the DELL logo, PowerConnect™, OpenManage™, ReadyRails™ , and Torx™ are trademarks of Dell Inc. Microsoft®, Windows® are registered trademarks of Microsoft Corporation in the United States and/or other countries. Other trademarks and trade names may be used in this publication to refer to - Dell PowerConnect 8100 | Getting Started Guide - Page 5
Fixed Ports 8 Expansion Slot 8 UART Interface 8 System LEDs 9 3 Installation 11 Site Preparation 11 Unpacking the Switch 11 Package Contents 11 Unpacking Steps 12 Rack Mounting the Switch 12 Rack Mounting Safety Considerations 12 Installing the Dell ReadyRails System 13 Installing the - Dell PowerConnect 8100 | Getting Started Guide - Page 6
4 Starting and Configuring the Switch . . . 19 Connecting a Switch to a Terminal 20 Booting the Switch 21 Performing the Initial Configuration 21 Initial Configuration Procedure 22 Example Session 23 Next Steps 26 4 Contents - Dell PowerConnect 8100 | Getting Started Guide - Page 7
Guide, which is available on the Dell Support website at support.dell.com/support for the latest updates on documentation and firmware. This document contains the following sections: • Hardware Overview • Installation • Starting and Configuring the Switch Features The PowerConnect 8100 Series - Dell PowerConnect 8100 | Getting Started Guide - Page 8
the PC8100 family includes Dell's Lifetime Limited Warranty with Basic Hardware Service (repair or replacement) for life. Hardware Overview This section contains information about device characteristics and modular hardware configurations for the PowerConnect 81xx switches. PowerConnect 81xx has the - Dell PowerConnect 8100 | Getting Started Guide - Page 9
(TMP75) • Software readable thermal monitor • RTC time clock support • Hot plugging redundant power supply • Current monitoring for Power chassis high Front Panel The following image shows the PowerConnect 81xx front panel: Figure 1. PowerConnect 81xx Front Panel QSFP+ Ports The front panel - Dell PowerConnect 8100 | Getting Started Guide - Page 10
for stacking. Stacking is supported at distances of up to 100M. NOTE: The QSFP modules can be used only for the PowerConnect 81xxseries switches. Expansion Slot The 80 Gbps expansion slot supports the following modules: • SFP+ (four 10G ports) • 10G Base-T (four 10G ports) • QSFP+ (may be configured - Dell PowerConnect 8100 | Getting Started Guide - Page 11
. System LEDs The system contains light emitting diodes (LEDs) that provide indications about the System, Temp, Diag, Fan, Stack, and Locator status of the PowerConnect 81xx unit. Table 1 contains the status LED definitions: Table 1. LED Definitions for System Feature System LED Temp LED Diag - Dell PowerConnect 8100 | Getting Started Guide - Page 12
green - Fan On back panel powered and at expected RPM • Solid red - Fan failed Stack LED • Solid blue - Switch in stacking mode On back panel • Solid green - Switch in stacking slave mode • Off - Switch in stand alone mode Locator LED • Blinking blue - Locator On back panel function is - Dell PowerConnect 8100 | Getting Started Guide - Page 13
are included: • One PowerConnect switch • One RJ45-to-DB-9 female cable • Two sets of rail kits (no tools required) • Two PSUs (packed separately) • Two AC power cords (country/region specific) • Getting Started Guide • Safety and Regulatory Information • Warranty and Support Information • Software - Dell PowerConnect 8100 | Getting Started Guide - Page 14
). The Dell ReadyRails™ system is provided for 1U front-rack, and two-post installations. The ReadyRails system includes two separately packaged rail assemblies and two rails that are shipped attached to the sides of the switch. WARNING: This is a condensed reference. Read the safety instructions in - Dell PowerConnect 8100 | Getting Started Guide - Page 15
should not be mounted with the rear panel facing in the downward position. Installing the Dell ReadyRails System The ReadyRails rack mounting system is provided to easily configure your rack for installation of your switch. The ReadyRails system can be installed using the 1U tool-less method or one - Dell PowerConnect 8100 | Getting Started Guide - Page 16
post flange. In Figure 3, item 1 and its extractions illustrate how the pegs appear in both the square and unthreaded round holes. Figure 3. 1U Tool-less Configuration 2 Align and seat the front flange pegs in the holes on the front side of the vertical post. See Figure 3, item 2. 3 Repeat this - Dell PowerConnect 8100 | Getting Started Guide - Page 17
switch side of the rail) and remove each casting. Retain the castings for future rack requirements. It is not necessary to remove the rear flange castings. Figure 4. Two-post Flush-mount Configuration 2 Attach one rail to the front post flange with two user-supplied screws. See - Dell PowerConnect 8100 | Getting Started Guide - Page 18
1 Slide the plunger bracket rearward until it clicks into place and secure the bracket to the front post flange with two user-supplied screws. See Figure 5, item 1. Figure 5. Two-post Center-mount Configuration 2 Slide the back bracket towards the post and secure it to the post flange with two - Dell PowerConnect 8100 | Getting Started Guide - Page 19
1 on page 17. Retain the castings for future rack requirements. 2 For each rail, attach the front and rear flanges to the post flanges with two user-supplied screws at each end. See Figure 6, item 2 on page 17. Figure 6. Four-post Threaded Configuration Installation 17 - Dell PowerConnect 8100 | Getting Started Guide - Page 20
into the rails in the same manner as the four-post configurations. 1U Front-rack Installation The rails that are attached to the switch must be configured. 1 Attach the switch rails (inner chassis members) to the PC81xx switch. Figure 7, item 1 shows the detail for the front standoff with locking - Dell PowerConnect 8100 | Getting Started Guide - Page 21
and Console Power On Yes Choose Option 2 Boot Menu (Special Functions) Reboot Enter Boot Menu? No Loading Program from Flash to RAM Enter Wizard? No Manual Initial Configuration Yes Easy Setup Wizard Configuration Advanced Configuration Starting and Configuring the Switch 19 - Dell PowerConnect 8100 | Getting Started Guide - Page 22
download the release notes from the Dell Support website at support.dell.com/support. NOTE: We recommend that you obtain the most recent version of the user documentation from the Dell Support website at support.dell.com/support. To monitor and configure the switch via serial console, use the RJ45 - Dell PowerConnect 8100 | Getting Started Guide - Page 23
. For more information about the Boot menu functions, see the CLI Reference Guide. Performing the Initial Configuration The initial configuration procedure is based on the following assumptions: • The PowerConnect switch was never configured before and is in the same state as when you received - Dell PowerConnect 8100 | Getting Started Guide - Page 24
performing the initial configuration by using the CLI, see the CLI Reference Guide. This Getting Started Guide shows how to use the Easy Setup Wizard for initial switch configuration. The wizard sets up the following configuration on the switch: • Establishes the initial privileged user account with - Dell PowerConnect 8100 | Getting Started Guide - Page 25
the possible user options or configuration, please wait ... Welcome to Dell Easy Setup Wizard The Setup Wizard guides you through the initial switch configuration, and gets you up and running as quickly as possible. You can skip the setup wizard, and enter CLI mode to manually configure the switch - Dell PowerConnect 8100 | Getting Started Guide - Page 26
addresses are setup on the OOB (Out-Of-Band) Interface and/or the VLAN1 routing interface. You can use these IP addresses to access the CLI, Web interface, or SNMP interface of the switch. To access the switch through any Management Interface you can 24 Starting and Configuring the Switch - Dell PowerConnect 8100 | Getting Started Guide - Page 27
up configuration file. If the information is incorrect, enter (N) to discard the configuration and restart the wizard: [Y/N] y Thank you for using the Dell Easy Set up Wizard. You will now enter CLI mode. Applying Interface configuration, please wait ... console> Starting and Configuring the Switch - Dell PowerConnect 8100 | Getting Started Guide - Page 28
management interface or the CLI to configure the features your network requires. For information about how to configure the switch features, see the User's Configuration Guide or CLI Reference Guide available on the support site support.dell.com/support. 26 Starting and Configuring the Switch - Dell PowerConnect 8100 | Getting Started Guide - Page 29
Dell PowerConnect 81xx PC8132、PC8132F、PC8164、 PC8164F - Dell PowerConnect 8100 | Getting Started Guide - Page 30
注 2012 Dell Inc Dell Inc Dell™、DELL 徽标、PowerConnect™、OpenManage™、ReadyRails™ 和 Torx™ 是 Dell Inc Microsoft®、Windows® 是 Microsoft Corporation Dell Inc PC8132、PC8132F、PC8164、PC8164F 2012 年 2 月 P/N JHCTM Rev. A00 - Dell PowerConnect 8100 | Getting Started Guide - Page 31
目录 1 31 31 2 32 33 四端口 SFP 33 34 UART 34 系统 LED 35 3 37 37 37 37 38 38 38 安装 Dell ReadyRails 39 43 目录 29 - Dell PowerConnect 8100 | Getting Started Guide - Page 32
4 44 45 46 46 47 48 51 30 目录 - Dell PowerConnect 8100 | Getting Started Guide - Page 33
、PC8164F Dell User's Configuration Guide support.dell.com/support。 • 安装 功能 PowerConnect 8100 10 GbE 3 10/40 GbE 10 GbE 运行。 PC8100 10 GbE 40 GbE 10GbE 或 40GbE USB CLI Web Dell OpenManage Network Manager SNMP PC8100 iSCSI Dell EqualLogic 8100 iSCSI Dell Compellent Dell - Dell PowerConnect 8100 | Getting Started Guide - Page 34
81xx 440 x 460 x 44 x 厚 x 17.32 x 18.11 x 1.73 x 厚 x 高)。 PowerConnect 81xx 640 Gbps 和 320 Gbps 1 PC8132F - 24 端口 SFP+ 10G + 40G/80G 2 PC8164F - 48 端口 SFP+ 10G + 2 端口 40G QSFP + 40G/80G 3 PC8132 - 24 端口 10GBaseT + 40G/80G 4 PC8164 - - Dell PowerConnect 8100 | Getting Started Guide - Page 35
1U 机箱高 前面板 PowerConnect 81xx 图 1. PowerConnect 81xx 前面板 QSFP+ 端口 24/48 固定 10G Base-T 或 SFP USB 2.0 端口 LED 四端口 SFP PC8164 和 PC8164F QSFP QBO 电缆的 10G CR4、SR4 和 LR4 40G LED QSFP 100M 注:QSFP PowerConnect 81xx 硬件概览 33 - Dell PowerConnect 8100 | Getting Started Guide - Page 36
扩充槽 80 Gbps SFP+(四个 10G 10G Base-T(四个 10G QSFP 40G 10G UART 接口 UART 16550 UART UART RS-232 RJ45 YOST 到内孔 DB-9 CLI。 UART 1200 波特至 4M UART 5、6、7 或 8 1、1.5 或 2 9600 8 1 34 硬件概览 - Dell PowerConnect 8100 | Getting Started Guide - Page 37
系统 LED PowerConnect 81xx LED)。表 1 LED 定义: 表 1. 系统的 LED 定义 功能 详细说明 注释 系统 LED 温度 LED a 诊断 LED 风扇 LED RPM 堆栈 LED 定位器 LED a 75C LED 硬件概览 35 - Dell PowerConnect 8100 | Getting Started Guide - Page 38
图 2. 端口 LED Console OOB FAN 1 Locator Stack Temp Dlag System LED owerConnecPtow8er1C6on4nect 8164 51 37 5 79 9 1111 13 13 15 1517 19 1271 23 1 2 4 6 8 10 12 14 16 18 20 22 24 36 硬件概览 - Dell PowerConnect 8100 | Getting Started Guide - Page 39
安装 现场准备 10 至 35C(50 至 95F)。 注:在 900 米(2955 300 米(985 1C (1.8F 8% 到 85 10%。 PowerConnect RJ45 至 DB-9 PSU 安装 37 - Dell PowerConnect 8100 | Getting Started Guide - Page 40
1 2 3 4 5 19 EIA-310-E Dell ReadyRails 1U ReadyRails 50 38 安装 - Dell PowerConnect 8100 | Getting Started Guide - Page 41
安装 Dell ReadyRails 系统 提供 ReadyRails 1U 1U ReadyRails 系统。 1U 1 将 ReadyRails 3 1 图 3. 1U 2 3,项目 2。 安装 39 - Dell PowerConnect 8100 | Getting Started Guide - Page 42
3 4 3,项目 3。 1 ReadyRails 4,第 页 40 1。 用 Torx 图 4 2 4, 项目 2。 40 安装 - Dell PowerConnect 8100 | Getting Started Guide - Page 43
3 4,项目 3。 4 1 5,项目 1。 图 5 2 5,项目 2。 3 安装 41 - Dell PowerConnect 8100 | Getting Started Guide - Page 44
1 ReadyRails Torx 6,第 页 42 1 2 6,第 页 42 2。 图 6 42 安装 - Dell PowerConnect 8100 | Getting Started Guide - Page 45
1U 1U 1U 1U 1U 1 PC81xx 7,项目 1 图 7 2 Ready-Rails 3 安装 43 - Dell PowerConnect 8100 | Getting Started Guide - Page 46
图 8 开机 2 重新引导 否 RAM 否 是 高级配置 44 - Dell PowerConnect 8100 | Getting Started Guide - Page 47
dell.com/support Dell support.dell.com/support RJ45 VT100 VT100 DTE • VT100 VT100 Microsoft HyperTerminal RJ45 DB-9 1 DB-9 VT100 2 a COM 1 b 9600 波特。 c 8 1 d none(无)。 e VT100。 f Ctrl Microsoft Windows 键)。 注:在 Microsoft Windows 2000 Windows 2000 Service - Dell PowerConnect 8100 | Getting Started Guide - Page 48
POST)。POST POST POST RAM 中。POST 60 POST Boot Boot Boot CLI • PowerConnect • PowerConnect Dell VT100 IP 地址。 OOB IP 地址。 • OOB 接口的 IP • OOB IP 地址。 要通过 Telnet(Telnet HTTP(Web 46 - Dell PowerConnect 8100 | Getting Started Guide - Page 49
Dell CLI ctrl+z 60 CLI 模式。 CLI CLI • 启用 CLI 登录和 HTTP • 设置 OOB 接口的 IP 地址。 • 设置 SNMP IP SNMP SNMP 47 - Dell PowerConnect 8100 | Getting Started Guide - Page 50
)> Applying Global configuration, please wait ... Welcome to Dell Easy Setup Wizard The Setup Wizard guides you through the initial switch configuration, and gets you up and running as quickly as possible. You can skip the setup wizard, and enter CLI mode to manually configure the switch. You must - Dell PowerConnect 8100 | Getting Started Guide - Page 51
enter the user password: Please reenter the user password: Step 3: Next, IP addresses are setup on the OOB (Out-Of-Band) Interface and/or the VLAN1 routing interface. You can use these IP addresses to access the CLI, Web interface, or SNMP interface of the switch. To access the switch through any - Dell PowerConnect 8100 | Getting Started Guide - Page 52
the settings to the start-up configuration file. If the information is incorrect, enter (N) to discard the configuration and restart the wizard: [Y/N] y Thank you for using the Dell Easy Set up Wizard. You will now enter CLI mode. Applying Interface configuration, please wait ... console> 50 - Dell PowerConnect 8100 | Getting Started Guide - Page 53
IP DHCP IP IP show ip interface out-of-band。 要访问 Dell OpenManage Switch Administrator Web OOB IP CLI Telnet 或 SSH OOB IP CLI 访问。 您的 PowerConnect 81xx VLAN、 802.1X、RADIUS 和 TACACS 3 Web CLI Users Configuration Guide CLI Reference Guide》(CLI support.dell.com/support。 51 - Dell PowerConnect 8100 | Getting Started Guide - Page 54
52 - Dell PowerConnect 8100 | Getting Started Guide - Page 55
Dell PowerConnect 81xx 入門指南 PC8132、PC8132F、 PC8164、PC8164F - Dell PowerConnect 8100 | Getting Started Guide - Page 56
注 2012 Dell Inc Dell Inc Dell™、DELL 徽標、PowerConnect™、OpenManage™、ReadyRails™ 和 Torx™ 是 Dell Inc Microsoft®、Windows® 是 Microsoft Corporation Dell Inc PC8132、PC8132F、PC8164、PC8164F 2012 年 2 月 P/N JHCTM Rev. A00 - Dell PowerConnect 8100 | Getting Started Guide - Page 57
目錄 1 簡 介 57 57 2 58 59 SFP 60 60 UART 60 系統 LED 61 3 安裝 63 63 63 63 64 64 64 安裝 Dell ReadyRails 65 69 目錄 55 - Dell PowerConnect 8100 | Getting Started Guide - Page 58
4 70 71 72 72 73 74 77 56 目錄 - Dell PowerConnect 8100 | Getting Started Guide - Page 59
支援 Web User's Configuration Guide http://support.dell.com/support。 • 安裝 功能 PowerConnect 8100 10 GbE 3 10/40 GbE 10 GbE 運行。 PC8100 10 GbE 40 GbE 10GbE 或 40GbE USB CLI Web Dell OpenManage Network Manager SNMP PC8100 iSCSI Dell EqualLogic 8100 iSCSI Dell Compellent Dell - Dell PowerConnect 8100 | Getting Started Guide - Page 60
81xx 440 x 460 x 44 x 厚 x 17.32 x 18.11 x 1.73 x 厚 x 高)。 PowerConnect 81xx 640 Gbps 和 320 Gbps 1 PC8132F - 24 連接埠 SFP+ 10G + 40G/80G 2 PC8164F - 48 連接埠 SFP+ 10G + 2 連接埠 40G QSFP + 40G/80G 擴充 模組 3 PC8132 - 24 連接埠 10GBaseT + 40G/80G 4 PC8164 - - Dell PowerConnect 8100 | Getting Started Guide - Page 61
1U 機箱高 前板 PowerConnect 81xx 1. PowerConnect 81xx 前板 QSFP+ 連接埠 24/48 固定 10G Base-T 或 SFP USB 2.0 連接埠 LED 硬體概覽 59 - Dell PowerConnect 8100 | Getting Started Guide - Page 62
和 LR4 40G LED QSFP 100M 註:Q S F P P o w e r C o n n e c t 8 1 x x 擴充槽 80 Gbps SFP+(四個 10G 10G Base-T(四個 10G QSFP 40G 10G UART 介面 UART 16550 UART UART RS-232 RJ45 YOST 到內孔 DB-9 CLI。 UART 1200 波特至 4M UART 5、6、7 或 8 1、1.5 或 2 60 硬體概覽 - Dell PowerConnect 8100 | Getting Started Guide - Page 63
預設為 9600 8 1 系統 LED PowerConnect 81xx LED)。表 1 LED 定義: 表 1. 系統的 LED LED 溫度 LED 診斷 LED 風扇 LED 堆疊 LED 詳細說明 注釋 在背板上 a 在背板上 RPM 硬體概覽 61 - Dell PowerConnect 8100 | Getting Started Guide - Page 64
表 1. 系統的 LED 功能 詳細說明 注釋 定位 LED a 75C LED 圖 2. 連接埠 LED Console OOB FAN 1 Locator Stack Temp Dlag System LED owerConnecPtow8er1C6on4nect 8164 51 37 5 79 9 1111 13 13 15 1517 19 1271 23 1 2 4 6 8 10 12 14 16 18 20 22 24 - Dell PowerConnect 8100 | Getting Started Guide - Page 65
安裝 現場準備 10 至 35C(50 至 95F)。 註:在 900 米(2955 300 米(985 1C (1.8F 8% 到 85 10%。 PowerConnect RJ45 至 DB-9 PSU 安裝 63 - Dell PowerConnect 8100 | Getting Started Guide - Page 66
1 2 3 4 5 19 EIA-310-E Dell ReadyRails 1U ReadyRails 50 64 安裝 - Dell PowerConnect 8100 | Getting Started Guide - Page 67
安裝 Dell ReadyRails 系統 提供 ReadyRails 1U 1U ReadyRails 系統。 1U 1 將 ReadyRails 3 1 圖 3. 1U 2 3, 項目 2。 3 4 3,項目 3。 安裝 65 - Dell PowerConnect 8100 | Getting Started Guide - Page 68
1 ReadyRails 4,頁碼 66 1。 用 Torx 圖 4 2 4, 項目 2。 3 4,項目 3。 4 66 安裝 - Dell PowerConnect 8100 | Getting Started Guide - Page 69
1 5,項目 1。 圖 5 2 5,項目 2。 3 安裝 67 - Dell PowerConnect 8100 | Getting Started Guide - Page 70
1 ReadyRails Torx 6,頁碼 68 1 2 6,頁碼 68 2。 圖 6 68 安裝 - Dell PowerConnect 8100 | Getting Started Guide - Page 71
1U 1U 1U 1U 1U 1 PC81xx 7,項目 1 圖 7 2 ReadyRails 3 安裝 69 - Dell PowerConnect 8100 | Getting Started Guide - Page 72
圖 8 開機 2 重新動 否 RAM 否 是 進階設定 70 - Dell PowerConnect 8100 | Getting Started Guide - Page 73
.dell.com/support Dell support.dell.com/support RJ45 VT100 VT100 DTE • VT100 VT100 Microsoft HyperTerminal RJ45 DB-9 1 DB-9 VT100 2 a COM 1 b 9600 波特。 c 8 1 d none e VT100。 f Ctrl Microsoft Windows 鍵)。 註:在 Microsoft Windows 2000 Windows 2000 Service - Dell PowerConnect 8100 | Getting Started Guide - Page 74
POST)。POST POST POST RAM 中。POST 60 秒。 POST Boot Boot Boot CLI • PowerConnect • PowerConnect Dell VT100 IP 位址。 OOB IP 位址。 • OOB 介面的 IP • OOB IP 位址。 要通過 Telnet(Telnet HTTP(Web 72 - Dell PowerConnect 8100 | Getting Started Guide - Page 75
Dell CLI ctrl+z 60 CLI 模式。 CLI CLI • 啟用 CLI 登入和 HTTP • 設定 OOB 介面的 IP 位址。 • 設定 SNMP IP SNMP SNMP 73 - Dell PowerConnect 8100 | Getting Started Guide - Page 76
)> Applying Global configuration, please wait ... Welcome to Dell Easy Setup Wizard The Setup Wizard guides you through the initial switch configuration, and gets you up and running as quickly as possible. You can skip the setup wizard, and enter CLI mode to manually configure the switch. You must - Dell PowerConnect 8100 | Getting Started Guide - Page 77
user name. [root]: Please enter the user password: Please reenter the user password: Step 3: Next, IP addresses are setup on the OOB (Out-Of-Band) Interface and/or the VLAN1 routing interface. You can use these IP addresses to access the CLI, Web interface, or SNMP interface of the switch. 75 - Dell PowerConnect 8100 | Getting Started Guide - Page 78
the settings to the start-up configuration file. If the information is incorrect, enter (N) to discard the configuration and restart the wizard: [Y/N] y Thank you for using the Dell Easy Set up Wizard. You will now enter CLI mode. Applying Interface configuration, please wait ... console> 76 - Dell PowerConnect 8100 | Getting Started Guide - Page 79
DHCP 來分配 OOB IP DHCP IP IP show ip interface out-of-band。 要存取 Dell OpenManage Switch Administrator Web OOB IP CLI Telnet 或 SSH OOB IP CLI 存取。 您的 PowerConnect 81xx VLAN、 802.1X、RADIUS 和 TACACS 3 Web CLI User's Configuration Guide CLI support.dell.com/support。 77 - Dell PowerConnect 8100 | Getting Started Guide - Page 80
78 - Dell PowerConnect 8100 | Getting Started Guide - Page 81
Commutateur Dell PowerConnect 81xx Series Guide de mise en route Modèle réglementaire : PC8132, PC8132F, PC8164, PC8164F - Dell PowerConnect 8100 | Getting Started Guide - Page 82
quelque manière que ce soit sans l'autorisation écrite de Dell Inc. est strictement interdite. Marques utilisées dans ce document : Dell™, le logo DELL, PowerConnect™, et OpenManage™, ReadyRails™ et Torx™ sont des marques commerciales de Dell Inc. Microsoft®, et Windows® sont des marques déposées de - Dell PowerConnect 8100 | Getting Started Guide - Page 83
du déballage 91 Montage du commutateur en rack 91 Considérations pour la sécurité du montage du rack 92 Installation du système ReadyRails de Dell . . . . 92 Installation du commutateur 97 Table des matières 81 - Dell PowerConnect 8100 | Getting Started Guide - Page 84
4 Démarrage et configuration du commutateur 98 Connexion du commutateur à un terminal 99 Démarrage du commutateur 100 Réalisation de la configuration initiale 100 Procédure de configuration initiale 101 Exemple de session 102 Prochaines étapes 107 82 Table des matières - Dell PowerConnect 8100 | Getting Started Guide - Page 85
.dell.com/support et prenez connaissance des dernières mises à jour concernant la documentation et le micrologiciel. Ce document contient les sections suivantes : • Présentation du matériel • Installation • Démarrage et configuration du commutateur Caractéristiques Les PowerConnect 8100 Series - Dell PowerConnect 8100 | Getting Started Guide - Page 86
et une optimisation iSCSI. Pour simplifier la connectivité avec les baies Dell EqualLogic, la fonction iSCSI Auto-Configuration (Configuration automatique iSCSI) de tous les commutateurs 8100 Series détecte les baies et configure le commutateur pour une capacité optimale. Cette fonction est activ - Dell PowerConnect 8100 | Getting Started Guide - Page 87
: • SFP+ • 10G Base-T • QSFP+ Le système peut également fournir un port de console de type RJ45 pour une interface RS-232 et un port service Ethernet dédié pour les fonctions de gestion hors-bande. Le PC81xx est équipé des fonctions suivantes : • Prise en charge d'un port USB • Quarante-huit ports - Dell PowerConnect 8100 | Getting Started Guide - Page 88
Panneau avant L'image suivante illustre le panneau avant du PowerConnect 81xx : Figure 1. PowerConnect 81xx Panneau avant Ports QSFP+ Le panneau avant comprend : • 24/48 ports fixes 10G Base-T ou SFP+ • Port de gestion • Port USB 2.0 REMARQUE : L'affichage des - Dell PowerConnect 8100 | Getting Started Guide - Page 89
offre une connexion directe au commutateur et vous permet d'accéder à l'interface CLI depuis un terminal de console connecté au port via le câble série fourni (YOST RJ45 vers des connecteurs DB-9 femelles). Le port UART est configurable séparément et peut être exécuté comme lien asynchrone de 1 200 - Dell PowerConnect 8100 | Getting Started Guide - Page 90
équipé de diodes émettant de la lumière (DEL) qui donnent des indications sur l'état de System, Temp, Diag, Fan, Stack et Locator de l'unité PowerConnect 81xx. Tableau 1 contient les définitions des voyants d'état : Tableau 1. Définitions des voyants du système Fonction Voyant du système Voyant - Dell PowerConnect 8100 | Getting Started Guide - Page 91
thermiques est de 75 °C. Lorsque ce seuil est dépassé, le voyant Temp s'allume en orange. Figure 2. Voyants de port Console OOB FAN 1 Locator Stack Temp Dlag System LED owerConnecPtow8er1C6on4nect 8164 51 37 5 79 9 1111 13 13 15 1517 19 1271 23 1 2 4 6 8 10 12 14 16 18 20 - Dell PowerConnect 8100 | Getting Started Guide - Page 92
du commutateur Contenu du carton Lors du déballage de chaque commutateur, vérifiez que le carton contient les éléments suivants : • Un commutateur PowerConnect • Un câble RJ45 vers un connecteur DB-9 femelle • Deux ensembles de kits de rail (aucun outil nécessaire) • Deux processeurs (emballés sépar - Dell PowerConnect 8100 | Getting Started Guide - Page 93
et les réglementations • Les Informations sur la garantie et le support technique • Le Contrat de licence du logiciel Etapes du déballage (méthodes à quatre postes, deux postes ou filetée). Le système ReadyRails™ de Dell est fourni pour un rack frontal 1U et des installations à deux postes. Le syst - Dell PowerConnect 8100 | Getting Started Guide - Page 94
pas être monté avec le panneau arrière faisant face au sol. Installation du système ReadyRails de Dell Le système de montage en rack ReadyRails est fourni pour configurer facilement votre rack pour l'installation de votre commutateur. Le système ReadyRails peut être installé à l'aide d'une méthode - Dell PowerConnect 8100 | Getting Started Guide - Page 95
3, l'élément 1 et ses extractions illustrent la manière dont les taquets apparaissent dans les trous carrés ou les trous ronds non filetés. Figure 3. Configuration 1U sans outil 2 Alignez et placez les taquets de la collerette avant dans les trous sur l'avant du poste vertical. Reportez-vous à la - Dell PowerConnect 8100 | Getting Started Guide - Page 96
les pièces moulées pour plus tard. Il n'est pas nécessaire de retirer les pièces moulées de la collerette arrière. Figure 4. Configuration du montage intégré à deux postes 2 Fixez un rail sur la collerette du poste avant à l'aide des deux vis fournies par l'utilisateur. Reportez-vous à la - Dell PowerConnect 8100 | Getting Started Guide - Page 97
deux vis fournies par l'utilisateur. Reportez-vous à la Figure 4, élément 3. 4 Répétez cette procédure pour le second rail. Configuration du montage centré à deux postes 1 Faites glisser le support piston vers l'arrière jusqu'à ce qu'il s'enclenche fixez-le à la collerette du poste à l'aide des deux - Dell PowerConnect 8100 | Getting Started Guide - Page 98
filetée à quatre postes 1 Pour cette configuration, les pièces moulées de la collerette doivent être retirées de chaque extrémit vis fournies par l'utilisateur à chaque extrémité. Reportez-vous à la Figure 6, élément 2 à la page 96. Figure 6. Configuration filetée à quatre postes 96 Installation - Dell PowerConnect 8100 | Getting Started Guide - Page 99
faire glisser le commutateur dans les rails de la même manière que pour les configurations à quatre postes. Installation du rack avant 1U Les rails fixés au commutateur doivent être configurés. 1 Fixez les rails du commutateur (membres du châssis interne) au commutateur PC81xx. Figure 7, l'élément - Dell PowerConnect 8100 | Getting Started Guide - Page 100
dessous présente un aperçu des étapes que vous devez effectuer lors de la configuration initiale après avoir déballé et monté le commutateur. Figure 8. Organigramme des procédures d'installation et de configuration Connexion de l'alimentation et de la console Mise sous tension Oui Choix de l'option - Dell PowerConnect 8100 | Getting Started Guide - Page 101
de vous procurer la version la plus récente de la documentation utilisateur disponible sur le site du Support Dell à l'adresse support.dell.com/support. Pour pouvoir gérer et configurer le commutateur à partir d'une console série, utilisez le port de console RJ45 situé sur le panneau arri - Dell PowerConnect 8100 | Getting Started Guide - Page 102
Service Pack 2 de Windows 2000 ou une version ultérieure est installé. Ce service CLI Reference Guide (Guide de référence CLI). Réalisation de la configuration initiale La procédure de configuration initiale repose sur les conditions suivantes : • Le commutateur PowerConnect n'a jamais été configur - Dell PowerConnect 8100 | Getting Started Guide - Page 103
l'Assistant Easy Setup dans les 60 secondes, le commutateur entre en mode CLI. Pour plus d'informations sur la configuration initiale à l'aide de l'interface CLI, reportez-vous au CLI Reference Guide (Guide de référence CLI). Ce Guide de mise en route présente la manière d'utiliser l'Assistant Easy - Dell PowerConnect 8100 | Getting Started Guide - Page 104
• Il configure l'ouverture de session de l'interface CLI et l'accès HTTP de sorte qu'ils utilisent l'authentification invites et de réponses qui s'affichent au cours d'une session du Dell Easy Setup Wizard (Assistant Dell de configuration facile) et utilise les valeurs indiquées ci-dessus. Au dé - Dell PowerConnect 8100 | Getting Started Guide - Page 105
as quickly as possible. (L'Assistant de configuration vous guide au cours de la configuration initiale du commutateur et vous permet une mise en route aussi rapide que possible.) You can skip the setup wizard, and enter CLI mode to manually configure the switch. (Vous pouvez passer cet assistant et - Dell PowerConnect 8100 | Getting Started Guide - Page 106
(Le système n'est pas configuré pour une gestion SNMP par défaut.) To manage the switch using SNMP (required for Dell Network Manager) you can (Pour gé user account. (À présent nous devons configurer votre compte utilisateur privilégié initial [niveau 15].) This account is used to login to the CLI - Dell PowerConnect 8100 | Getting Started Guide - Page 107
/or the VLAN 1 routing interface. (Ensuite, les adresses IP sont configurées sur l'interface OOB [hors-bande] et/ou sur l'interface de routage VLAN 1.) You can use these IP addresses to access the CLI, Web interface, or SNMP interface of the switch. (Vous pouvez utiliser ces adresses IP pour accéder - Dell PowerConnect 8100 | Getting Started Guide - Page 108
is manually configured on both routing and OOB interface. (Configurez la passerelle par défaut si l'adresse IP est configurée configuration information that has been collected: (Voici les informations de configuration collectées :) Operational Mode = Simple (Mode de fonctionnement= Simple) User - Dell PowerConnect 8100 | Getting Started Guide - Page 109
Dell Easy Set up.) You will now enter CLI mode. (Vous allez entrer maintenant en mode CLI.) Applying Interface configuration, please wait ... (Application de la configuration out-of-band. Pour accéder à l'interface Dell OpenManage Switch Administrator, entrez l'adresse IP de l'interface de gestion - Dell PowerConnect 8100 | Getting Started Guide - Page 110
la manière de configurer les fonctions du commutateur, reportez-vous au User's Configuration Guide (Guide de configuration) ou au CLI Reference Guide (Guide de référence CLI) disponible sur le site d'assistance à l'adresse : support.dell.com/support. 108 Démarrage et configuration du commutateur - Dell PowerConnect 8100 | Getting Started Guide - Page 111
Dell PowerConnect 81xx-Reihe Switch Handbuch zum Einstieg Genormtes Modell: PC8132, PC8132F, PC8164, PC8164F - Dell PowerConnect 8100 | Getting Started Guide - Page 112
dieser Materialien in jeglicher Weise ohne vorherige schriftliche Genehmigung von Dell Inc. ist streng untersagt. Marken in diesem Text: Dell™, das DELL Logo, PowerConnect™, OpenManage™, ReadyRails™ und Torx™ sind Marken von Dell Inc. Microsoft® und Windows® sind eingetragene Marken von Microsoft - Dell PowerConnect 8100 | Getting Started Guide - Page 113
117 System-LEDs 118 3 Installation 120 Standortvorbereitung 120 Auspacken des Switches 121 Inhalt der Verpackung 121 Auspacken 121 Rack-Montage des Switches 122 Sicherheitserwägungen bei der Rack-Montage 122 Installieren des Dell ReadyRails-Systems . . . . . 123 Installieren des - Dell PowerConnect 8100 | Getting Started Guide - Page 114
4 Starten und Konfigurieren des Switches 129 Verbinden eines Switches mit einem Terminal . . . . 130 Starten des Switches 131 Durchführen der Erstkonfiguration 132 Durchführen der Erstkonfiguration 132 Beispiel-Ablauf 133 Nächste Schritte 137 112 Inhalt - Dell PowerConnect 8100 | Getting Started Guide - Page 115
support.dell.com/manuals. Hier erhalten Sie auch die neuesten Updates für Dokumentation und Firmware. Das vorliegende Dokument umfasst die folgenden Abschnitte: • Hardwareübersicht • Installation • Starten und Konfigurieren des Switches Funktionsmerkmale Die Switches der Reihe PowerConnect 8100 - Dell PowerConnect 8100 | Getting Started Guide - Page 116
sst sich mit einem einzigen Befehl konfigurieren. Dell hat die Reihe PowerConnect 8100 vom Netzkabel bis zu den Ports für PowerConnect 81xx Switches. Die Abmessungen des PowerConnect 81xx sind wie folgt: • 440 x 460 x 44 mm (B x T x H) • 17,32 x 18,11 x 1,73 Zoll (B x T x H) PowerConnect - Dell PowerConnect 8100 | Getting Started Guide - Page 117
SFP+ • 10G Base-T • QSFP+ Das System bietet außerdem einen Konsolen-Port (Schnittstelle RS-232, Typ RJ45) und einen dedizierten Ethernet-Service-Port für OOBVerwaltungsfunktionen. Der PC81xx weist die folgenden Funktionsmerkmale auf: • Unterstützung für einen USB-Port • 48 Ports mit 10 Gbit/s für 1G - Dell PowerConnect 8100 | Getting Started Guide - Page 118
und LR4-Transceiver • Portstatus-LEDs auf der Vorderseite Die QSFP-Verbindungen können für das Stacking verwendet werden. Stacking wird bis zu Distanzen von 100 m unterstützt. ANMERKUNG: Die QSFP-Module können nur für die Switches der Reihe PowerConnect 81xx verwendet werden. 116 Hardwareübersicht - Dell PowerConnect 8100 | Getting Started Guide - Page 119
oder anderen externen Geräten unter Verwendung des RS-232Protokolls ermöglicht. Ein serieller Port stellt eine direkte Verbindung zum Switch her und ermöglicht den CLI-Zugang von einem Konsolenterminal aus, das über das mitgelieferte serielle Kabel (mit RJ45 Yost auf DB-9Buchsen) angeschlossen wird - Dell PowerConnect 8100 | Getting Started Guide - Page 120
System-LEDs Das System enthält LEDs, die den System-, Temperatur-, Diagnose-, Lüfter-, Stack- und Standortstatus der PowerConnect 81xx-Einheit anzeigen. Tabelle 1 enthält die Erklärungen zu den Status-LEDs: Tabelle 1. LED-Definitionen für das System Funktionsmerkmal System-LED Temp-LED (Temperatur - Dell PowerConnect 8100 | Getting Started Guide - Page 121
-Definitionen für das System (fortgesetzt) Funktionsmerkmal Genaue Beschreibung Anmerkung Stack-LED • Stetig blau - Switch im Auf der Rückseite Stacking-Modus • Stetig grün - Switch im Stacking-Slave-Modus • Aus - Switch im eigenständigen Modus Standort-LED • Blau blinkend Standortfunktion - Dell PowerConnect 8100 | Getting Started Guide - Page 122
Installation Standortvorbereitung Bevor Sie den Switch oder die Switches installieren, stellen Sie sicher, dass am Ort der Installation die folgenden Voraussetzungen erfüllt sind: • Zugang - Der Bediener sollte an der Vorder- und Rückseite des - Dell PowerConnect 8100 | Getting Started Guide - Page 123
Inhalt der Verpackung Kontrollieren Sie beim Auspacken der einzelnen Switches, ob jeweils die folgenden Teile vorhanden sind: • Ein PowerConnect-Switch • Ein Kabel für RJ-45 auf DB-9-Buchse • Zwei Sätze Schienenkits (keine Werkzeuge erforderlich) • Zwei Netzteileinheiten (gesondert verpackt) • Zwei - Dell PowerConnect 8100 | Getting Started Guide - Page 124
auf dem Rack-Regal platzieren oder den Switch direkt in ein 19 Zoll breites, EIA-310-E-konformes Rack (Methoden mit vier Stützen, zwei Stützen oder Gewindelöchern) montieren. Das Dell ReadyRails™ System ist für ein 1-HE-Front-Rack und Installationen mit zwei Stützen vorgesehen. Das ReadyRails - Dell PowerConnect 8100 | Getting Started Guide - Page 125
sollte nicht mit der Rückseite nach unten gewandt montiert werden. Installieren des Dell ReadyRails-Systems Das ReadyRails-Rack-Montagesystem dient dazu, das Rack auf einfache Weise für die Installation des Switches zu konfigurieren. Das ReadyRailsSystem kann mit der werkzeuglosen 1-HE-Methode oder - Dell PowerConnect 8100 | Getting Started Guide - Page 126
Werkzeuglose 1-HE-Konfiguration (Vierkantloch- oder Rundloch-Racks mit vier Stützen) 1 Positionieren Sie bei nach außen zeigenden ReadyRails-Flanschohren eine Schiene zwischen den linken und rechten vertikalen Stützen. Richten Sie die Zapfen der hinteren Flanschschiene aus und befestigen Sie sie am - Dell PowerConnect 8100 | Getting Started Guide - Page 127
Bündige Konfiguration mit zwei Stützen 1 Für diese Konfiguration müssen die Beschläge von der Vorderseite jeder ReadyRails-Baugruppe entfernt werden (siehe Abbildung 4, Element 1 auf Seite 125). Lösen Sie die beiden Schrauben mit einem Torx-Schraubendreher von den vorderen Flanschohren (an der Gerä - Dell PowerConnect 8100 | Getting Started Guide - Page 128
3 Schieben Sie den Haltebügel nach vorne in Richtung der vertikalen Stütze und befestigen Sie ihn mit zwei Schrauben (nicht im Lieferumfang enthalten) am Stützenflansch (siehe Abbildung 4, Element 3). 4 Wiederholen Sie diese Schritte für die zweite Schiene. Mittige Konfiguration mit zwei Stützen 1 - Dell PowerConnect 8100 | Getting Started Guide - Page 129
Gewindeloch-Konfiguration mit vier Stützen 1 Bei dieser Konfiguration müssen die Beschläge der Flanschohren von allen Seiten der ReadyRails-Baugruppen entfernt werden. Lösen Sie die beiden Schrauben mit einem Torx-Schraubendreher von den beiden Flanschohren und entfernen Sie die Beschläge (siehe - Dell PowerConnect 8100 | Getting Started Guide - Page 130
) montiert werden. Es folgt ein Beispiel für eine 1-HE-Front-Rack-Konfiguration. Bei den 1-HE-Konfigurationen mit zwei Stützen (bündig und mittig) können Sie den Switch in gleicher Weise in die Schienen schieben wie bei den Konfigurationen mit vier Stützen. 1-HE-Front-Rack-Installation Die am - Dell PowerConnect 8100 | Getting Started Guide - Page 131
Das folgende Flussdiagramm ist ein Überblick für das Durchführen der Erstkonfiguration, nachdem der Switch ausgepackt und eingebaut wurde. Abbildung 8. Flussdiagramm zu Installation und Konfiguration Stromversorgung und Konsole anschließen Einschalten Ja Option 2 wählen Boot-Menü (Sonderfunktionen - Dell PowerConnect 8100 | Getting Started Guide - Page 132
. Sie können die Versionshinweise von der Dell Support-Website unter support.dell.com/support herunterladen. ANMERKUNG: Es wird empfohlen, die aktuelle Version der Benutzerdokumentation von der Dell Support-Website support.dell.com/support herunterzuladen. Um den Switch über die serielle Konsole zu - Dell PowerConnect 8100 | Getting Started Guide - Page 133
beim POST ein kritisches Problem festgestellt wird, bricht der Programmablauf ab. Bei erfolgreicher Ausführung des POST wird eine gültige Firmware in den RAM geladen. über die BootMenü-Funktionen finden Sie im CLI Reference Guide (CLIReferenzhandbuch). Starten und Konfigurieren des Switches 131 - Dell PowerConnect 8100 | Getting Started Guide - Page 134
• Der PowerConnect-Switch wurde erfolgreich gestartet. • Es besteht eine Konsolenverbindung und die Befehlszeile des Dell EasySetup-Assistenten Dell Easy Setup-Assistenten vornehmen oder über die CLI (Befehlszeilenschnittstelle) durchführen. Der Assistent wird automatisch gestartet, wenn die Switch - Dell PowerConnect 8100 | Getting Started Guide - Page 135
CLI erhalten Sie im CLI Reference Guide (CLI-Referenzhandbuch). Im vorliegenden Getting Started Guide (Handbuch zum Einstieg) ist erklärt, wie Sie den Easy Setup-Assistenten für die Switch im Rahmen einer beispielhaften Sitzung mit dem Dell EasySetup-Assistenten, wobei die oben genannten Eingabewerte - Dell PowerConnect 8100 | Getting Started Guide - Page 136
)> Applying Global configuration, please wait ... Welcome to Dell Easy Setup Wizard The Setup Wizard guides you through the initial switch configuration, and gets you up and running as quickly as possible. You can skip the setup wizard, and enter CLI mode to manually configure the switch. You must - Dell PowerConnect 8100 | Getting Started Guide - Page 137
these IP addresses to access the CLI, Web interface, or SNMP interface of the switch. To access the switch through any Management Interface you can . Setup the IP address for the Management Interface. . Setup the default gateway if IP address is manually configured on both routing and OOB interface - Dell PowerConnect 8100 | Getting Started Guide - Page 138
file. If the information is incorrect, enter (N) to discard the configuration and restart the wizard: [Y/N] y Thank you for using the Dell Easy Set up Wizard. You will now enter CLI mode. Applying Interface configuration, please wait ... console> 136 Starten und Konfigurieren des Switches - Dell PowerConnect 8100 | Getting Started Guide - Page 139
die Dell OpenManage Switch Administrator- CLI-Zugriff auf den Switch verwenden. Der PowerConnect 81xx Switch Switch-Funktionen finden Sie im User's Configuration Guide (Konfiguratiosnanleitung) oder dem CLI Reference Guide (CLIReferenzhandbuch) auf der Support-Website unter support.dell.com/support - Dell PowerConnect 8100 | Getting Started Guide - Page 140
138 Starten und Konfigurieren des Switches - Dell PowerConnect 8100 | Getting Started Guide - Page 141
Dell PowerConnect 81xx Series Switch Panduan Pengaktifan Model sesuai Regulasi: PC8132, PC8132F, PC8164, PC8164F - Dell PowerConnect 8100 | Getting Started Guide - Page 142
keras memperbanyak materi ini dengan cara apapun tanpa persetujuan tertulis dari Dell Inc. Merek dagang yang digunakan di dalam teks ini: Dell™, the DELL logo, PowerConnect™, OpenManage™, ReadyRails™ , dan Torx™ are trademarks of Dell Inc. Microsoft®, Windows® adalah merek dagang atau merek dagang - Dell PowerConnect 8100 | Getting Started Guide - Page 143
Uplink Tetap 146 Slot Ekspansi 147 Antarmuka UART 147 LED Sistem 147 3 Instalasi 150 Penyiapan Lokasi 150 Membuka kemasan Switch 150 Isi Kemasan 150 Langkah-langkah Membuka Kemasan 151 Memasang Switch pada Rak 151 Pertimbangan Keamanan Pemasangan pada Rak 151 Menginstal Sistem ReadyRails - Dell PowerConnect 8100 | Getting Started Guide - Page 144
4 Mengaktifkan dan Mengkonfigurasi Switch 158 Menghubungkan Switch ke Terminal 159 Mem-boot Switch 160 Melakukan Konfigurasi Awal 160 Prosedur Konfigurasi Awal 161 Contoh Sesi 162 Langkah Selanjutnya 166 142 Daftar Isi - Dell PowerConnect 8100 | Getting Started Guide - Page 145
situs internet Dukungan Dell di support.dell.com/support untuk pembaruan dokumentasi dan firmware terkini. Dokumen ini berisi bagian-bagian berikut ini: • Gambaran Umum Perangkat Keras • Instalasi • Mengaktifkan dan Mengkonfigurasi Switch Fitur Seri PowerConnect 8100 adalah switch jaringan non-stop - Dell PowerConnect 8100 | Getting Started Guide - Page 146
dan mengonfigurasi switch agar tercapai keluaran optimal. Fitur ini secara default diaktifkan, merampingkan proses hanya dengan menyambungkan satu kabel. Konektivitas dengan larik Dell Compellent juga disederhanakan dengan konfigurasi perintah tunggal. Dell merancang Seri PowerConnect 8100 agar - Dell PowerConnect 8100 | Getting Started Guide - Page 147
Slot modul dapat dipasang pada tiga jenis modul: • SFP+ • 10G Base-T • QSFP+ Sistem juga menyediakan satu port konsol antarmuka RS-232 tipe RJ45 dan port layanan Ethernet khusus untuk pengelolaan OOB. PC81xx memiliki fitur berikut • Mendukung satu port USB • Empat puluh delapan port 10 Gbps untuk - Dell PowerConnect 8100 | Getting Started Guide - Page 148
Panel Depan Gambar berikut menampilkan PowerConnect 81xx panel depan: Gambar 1. PowerConnect 81xx Panel Depan Port QSFP+ Panel depan mencakup • 24/48 port 10G Base-T jarak hingga 100M. CATATAN: Modul QSFP dapat digunakan hanya untuk switch seri PowerConnect 81xx. 146 Gambaran Umum Perangkat Keras - Dell PowerConnect 8100 | Getting Started Guide - Page 149
Port serial ini menyediakan sambungan langsung ke switch dan memungkinkan Anda untuk mengakses CLI dari terminal konsol yang terhubung ke System (Sistem), Temp (Suhu), Diag, Fan (Kipas), Stack (Tumpukan) dan Locator (Lokasi) unit PowerConnect 81xx. Tabel 1 berisi definisi status LED: Gambaran Umum - Dell PowerConnect 8100 | Getting Started Guide - Page 150
dan pada RPM yang diharapkan • Merah solid - Kipas mati LED Stack (Tumpukan) • Biru solid - Switch berada Pada panel belakang pada modus tumpukan • Hijau solid - Switch berada pada modus budak tumpukan • Mati - Switch dalam modus berdiri sendiri LED Locator (Lokasi) • Biru berkedip - Fungsi - Dell PowerConnect 8100 | Getting Started Guide - Page 151
Gambar 2. LED Port Console OOB FAN 1 Locator Stack Temp Dlag System LED owerConnecPtow8er1C6on4nect 8164 51 37 5 79 9 1111 13 13 15 1517 19 1271 23 1 2 4 6 8 10 12 14 16 18 20 22 24 Gambaran Umum Perangkat Keras 149 - Dell PowerConnect 8100 | Getting Started Guide - Page 152
85% (nonkondensasi) dengan gradasi kelembapan maksimum sebesar 10% per jam. Membuka kemasan Switch Isi Kemasan Sewaktu membuka kemasan setiap switch, pastikan bahwa produk-produk berikut ini disertakan: • Satu switch PowerConnect • Satu kabel betina RJ45-ke-DB-9 • Dua set kit rel (tidak memerlukan - Dell PowerConnect 8100 | Getting Started Guide - Page 153
pada Rak Anda dapat meletakkan switch pada rak penyimpan atau memasang switch langsung pada rak selebar 19", yang sesuai dengan EIA-310-E (metode empat tiang, dua tiang atau berulir). Sistem Dell ReadyRails™ tersedia untuk rak depan 1U dan instalasi dua tiang. Sistem ReadyRails mencakup dua rakitan - Dell PowerConnect 8100 | Getting Started Guide - Page 154
• Produk jangan dipasang dengan bagian belakang menghadap ke bawah. Menginstal Sistem ReadyRails Dell Sistem ReadyRails rak pemasangan disediakan untuk memudahkan Anda mengkonfigurasi rak untuk instalasi switch Anda. Sistem ReadyRails dapat diinstal menggunakan metode niralat 1U atau salah satu dari - Dell PowerConnect 8100 | Getting Started Guide - Page 155
Konfigurasi Niralat 1U (Lubang Persegi Empat Tiang atau Lubang Bulat Tanpa Ulir) 1 Dengan kuping flens ReadyRails menghadap keluar, tempatkan satu rel di antara tiang vertikal kiri dan kanan. Sesuaikan dan dudukan pasak rek flens belakang pada flens tiang vertikal belakang. Pada Gambar 3, butir 1 - Dell PowerConnect 8100 | Getting Started Guide - Page 156
. Lihat Gambar 4, butir 1 pada halaman 154. Gunakan obeng Torx untuk melepaskan dua sekrup dari masing-masing kuping flens depan (pada sisi switch rel) dan lepaskan masing-masing casting. Simpan casting untuk kebutuhan rak nanti. Tidak perlu melepas casting flend belakang. Gambar 4. Konfigurasi Dua - Dell PowerConnect 8100 | Getting Started Guide - Page 157
3 Geser braket pendorong ke depan ke arah tiang vertikal dan kencangkan braket pendorong ke flens tiang dengan dua sekrup yang disediakan. Lihat Gambar 4, butir 3. 4 Ulangi prosedur ini untuk rel kedua. Konfigurasi Dua tiang Pemasangan tengah 1 Geser braket pendorong ke belakang sampai berbunyi klik - Dell PowerConnect 8100 | Getting Started Guide - Page 158
Konfigurasi Empat Tiang Berulir 1 Untuk konfigurasi ini, casting harus dilepaskan dari ujung masing-masing rakitan ReadyRails. Gunakan obeng Torx untuk melepaskan dua sekrup dari masing-masing kuping flens dan lepaskan setiap casting Lihat Gambar 6, butir 1 pada halaman 156. Simpan casting untuk - Dell PowerConnect 8100 | Getting Started Guide - Page 159
cara yang sama pada konfigurasi empat tiang. Instalasi 1U Rak depan Rel yang menempel pada switch harus dikonfigurasi. 1 Menempelkan rel switch (bagian rangka sebelah dalam) ke switch PC81xx. Gambar 7, butir 1 menunjukkan detail kunci bagian depan dengan tab pengunci. Gambar 7. Menempelkan Rel - Dell PowerConnect 8100 | Getting Started Guide - Page 160
gambaran umum mengenai langkahlangkah untuk melakukan konfigurasi awal setelah switch dikeluarkan dari kemasannya dan dipasang. Gambar 8. Bagan Alir ke RAM Masuk Wizard? Tidak Konfigurasi Awal Manual Ya Konfigurasi melalui Setup Wizard yang mudah Konfigurasi Tingkat Lanjut 158 - Dell PowerConnect 8100 | Getting Started Guide - Page 161
catatan rilis dari situs web Dukungan Dell di support.dell.com/support. CATATAN: We recommend that you obtain the most recent version of the user documentation from the Dell Support website at support.dell.com/support. Untuk memantau dan mengonfigurasikan switch melalui konsol serial, gunakan port - Dell PowerConnect 8100 | Getting Started Guide - Page 162
microsoft.com untuk informasi lebih lanjut mengenai Windows 2000 service pack. 3 Hubungkan konektor RJ-45 pada kabel langsung ke port konsol RJ45 PowerConnect 81xx yang berada di bagian belakang switch. Mem-boot Switch Ketika daya dinyalakan, switch akan melakukan tes mandiri daya hidup (power-on - Dell PowerConnect 8100 | Getting Started Guide - Page 163
alamat IP bawaan. Sebelum mengatur konfigurasi awal switch, dapatkan informasi berikut ini dari administrator jaringan Anda: • Alamat IP yang akan diberikan menggunakan Dell Easy Setup Wizard atau dengan menggunakan CLI. Wizard tersebut secara otomatis bekerja ketika file konfigurasi switch kosong. - Dell PowerConnect 8100 | Getting Started Guide - Page 164
guides you through the initial switch configuration, and gets you up and running as quickly as possible. (Setup Wizard akan memandu Anda melakukan konfigurasi switch awal, dan menyiapkan mesin Anda untuk dapat dijalankan secepat mungkin). You can skip the setup wizard, and enter CLI mode to manually - Dell PowerConnect 8100 | Getting Started Guide - Page 165
using the default system configuration. (Anda harus menanggapi switch using SNMP (required for Dell Network Manager) you can (Untuk mengelola switch menggunakan SNMP (diharuskan untuk Dell SNMP version 1or 3 account, see the user documentation). (Untuk informasi selengkapnya tentang menyiapkan akun - Dell PowerConnect 8100 | Getting Started Guide - Page 166
2: (Langkah 2:) Now we need to setup your initial privilege (Level 15) user account. (Sekarang kita perlu menetapkan hak istimewa awal (Level 15) akun pengguna Anda IP addresses to access the CLI, Web interface, or SNMP interface of the switch. (Anda dapat menggunakan alamat IP ini untuk mengakses - Dell PowerConnect 8100 | Getting Started Guide - Page 167
switch melalui berbagai Antarmuka Pengelolaan, Anda dapat) . Setup the IP address for the Management Interface. (Menentukan alamat IP untuk Antarmuka Pengelolaan.) . Setup the default gateway if IP address is manually configured (Modul Operasional = Sederhana) User Account setup = root (Penetapkan - Dell PowerConnect 8100 | Getting Started Guide - Page 168
Dell Easy Set up Wizard. ((Terima kasih telah menggunakan Dell Easy Set up Wizard.) You will now enter CLI mode. (Sekarang Anda memasuki modus CLI.) Applying Interface configuration -of-band. Untuk mengakses antarmuka Dell OpenManage Switch Administrator, masukkan alamat IP antarmuka pengelolaan OOB - Dell PowerConnect 8100 | Getting Started Guide - Page 169
berbasis web atau CLI untuk mengonfigurasi fitur-fitur yang diperlukan jaringan Anda. Untuk informasi mengenai cara mengkonfigurasi fitur-fitur switch, lihat Panduan Konfigurasi Pengguna atau Panduan Referensi Pengguna CLI yang tersedia di situs dukungan support.dell.com/support. Mengaktifkan dan - Dell PowerConnect 8100 | Getting Started Guide - Page 170
168 Mengaktifkan dan Mengkonfigurasi Switch - Dell PowerConnect 8100 | Getting Started Guide - Page 171
Dell PowerConnect 81xx はじめに PC8132、PC8132F、 PC8164、PC8164F - Dell PowerConnect 8100 | Getting Started Guide - Page 172
メモ 2012 Dell Inc Dell Inc Dell™、DELL ロゴ、PowerConnect™、OpenManage™、 ReadyRails Torx™ は Dell Inc Microsoft Windows Microsoft Corporation Dell Inc PC8132、PC8132F、PC8164、PC8164F 2012 年 2 月 P/N JHCTM Rev. A00 - Dell PowerConnect 8100 | Getting Started Guide - Page 173
目次 1 173 173 2 174 176 SFP 176 177 UART 177 LED 178 3 設置 180 180 180 180 181 181 181 Dell ReadyRails 182 187 目次 171 - Dell PowerConnect 8100 | Getting Started Guide - Page 174
4 188 189 190 191 191 193 196 172 目次 - Dell PowerConnect 8100 | Getting Started Guide - Page 175
はじめに Dell PowerConnect 81xx PC8132、 PC8132F、PC8164、PC8164F Users Configuration Guide support.dell.com/support • 設置 機能 PowerConnect 8100 10 GbE 3 10/40 GbE 10 GbE PC8100 10 GbE 40 GbE 10GbE または 40GbE USB Rapid Deployment CLI Dell OpenManage Network Manager SNMP はじめに - Dell PowerConnect 8100 | Getting Started Guide - Page 176
PC8100 iSCSI Dell EqualLogic 8100 iSCSI Dell Compellent 1 PowerConnect 8100 EEE PC8100 PowerConnect 81xx PowerConnect 81xx • 440 x 460 x 44 mm(W x D x H) PowerConnect 81xx 4 640 Gbps と 320 Gbps 1 PC8132F - 24 ポート SFP+ 10G + 40G/80G 2 PC8164F - 48 ポート SFP+ 10G + 2 ポート 40G - Dell PowerConnect 8100 | Getting Started Guide - Page 177
RS-232 RJ45 1 個と OOB 1 PC81xx USB ポート 1 1G/10G 10 Gbps ポート 48 個 • 40G 40 Gbps QSFP ポート 2 個 • SFP+、10G Base-T、QSFP 80 Gbps ト 1 CPU XLP308H/256 MB NOR 2GB DDR III RAM TMP75 RTC 1U 175 - Dell PowerConnect 8100 | Getting Started Guide - Page 178
PowerConnect 81xx 図 1. PowerConnect 81xx QSFP+ ポート 24/48 固定 10G Base-T または SFP USB 2.0 ポート LED SFP PC8164 および PC8164F QSFP 2 QBO 10G ポート 4 個 • CR4、SR4、LR4 40G ポート 1 LED QSFP 100M メモ:QSFP PowerConnect 81xx 176 - Dell PowerConnect 8100 | Getting Started Guide - Page 179
80 Gbps • SFP+(10G ポート 4 個) • 10G Base-T(10G ポート 4 個) • QSFP+(40G ポート 2 8 10G UART UART(Universal Asynchronous Receiver Transmitter 16550 UART UART RS-232 RJ45 YOST DB-9 CLI UART 1200 4M UART • 5、6、7 8 1、1.5 2 9600 8 1 177 - Dell PowerConnect 8100 | Getting Started Guide - Page 180
LED PowerConnect 81xx LED LED 1 表 1 LED の定義 LED 温度 LED 診断 LED ファン LED LED 詳細 コメント a RPM 178 - Dell PowerConnect 8100 | Getting Started Guide - Page 181
表 1 LED 機能 詳細 コメント LED a 75 C LED 図 2. ポート LED Console OOB FAN 1 Locator Stack Temp Dlag System LED owerConnecPtow8er1C6on4nect 8164 51 37 5 79 9 1111 13 13 15 1517 19 1271 23 1 2 4 6 8 10 12 14 16 18 20 22 24 - Dell PowerConnect 8100 | Getting Started Guide - Page 182
設置 10 ~ 35C 900 m 300 m 1 C 1 10 8 ~ 85 PowerConnect 1 台 • RJ45-to-DB-9 1 2 PSU 2 AC 2 180 設置 - Dell PowerConnect 8100 | Getting Started Guide - Page 183
1 2 3 4 5 19 EIA-310-E 4 柱型、2 1U 2 Dell ReadyRails ReadyRails 2 2 Safety, Environmental, and Regulatory Information 設置 181 - Dell PowerConnect 8100 | Getting Started Guide - Page 184
50 Dell ReadyRails ReadyRails ReadyRails 1U 3 1U 2 2 4 182 設置 - Dell PowerConnect 8100 | Getting Started Guide - Page 185
1U 4 1 ReadyRails 1 3 の 1 図 3. 1U 2 3 の 2 3 2 4 3 の 3 設置 183 - Dell PowerConnect 8100 | Getting Started Guide - Page 186
2 1 ReadyRails 184 4 の 1 Torx 2 図 4. 2 2 2 1 4 の 2 184 設置 - Dell PowerConnect 8100 | Getting Started Guide - Page 187
3 2 4 の 3 4 2 2 1 2 5 の 1 図 5. 2 2 2 5 の 2 3 2 設置 185 - Dell PowerConnect 8100 | Getting Started Guide - Page 188
4 1 ReadyRails Torx 2 186 6 の 1 2 2 186 6 の 2 図 6. 4 186 設置 - Dell PowerConnect 8100 | Getting Started Guide - Page 189
1U 1U 2 1U 1U 2 4 1U 1 PC81xx 7 の 1 図 7 2 8 cm 設置 187 - Dell PowerConnect 8100 | Getting Started Guide - Page 190
8 はい 2 を 選択 再起動 いいえ RAM いいえ はい Easy Setup Wizard (Easy Setup 詳細設定 188 - Dell PowerConnect 8100 | Getting Started Guide - Page 191
support.dell.com/support support.dell.com/support RJ45 VT100 VT100 DTE • Microsoft VT100 VT100 RJ45 DB-9 1 本 1 DB-9 VT100 2 a COM 1 b 9600 c 8 1 d 189 - Dell PowerConnect 8100 | Getting Started Guide - Page 192
keys(Microsoft Windows Terminal keys メモ:Microsoft Windows 2000 Windows 2000 Service Pack 2 Windows 2000 Service Pack 2 VT100 Windows 2000 microsoft.com 3 RJ45 PowerConnect 81xx RJ45 POST POST POST RAM POST 60 POST Boot Boot Boot CLI Reference Guide』(CLI 190 - Dell PowerConnect 8100 | Getting Started Guide - Page 193
• PowerConnect • PowerConnect VT100 Dell Easy Setup Wizard IP OOB IP • OOB IP • OOB IP Telnet(Telnet HTTP(Web Dell Easy Setup Wizard または CLI Ctrl+Z メモ:Easy Setup Wizard Easy Setup Wizard 60 CLI 191 - Dell PowerConnect 8100 | Getting Started Guide - Page 194
CLI CLI Reference Guide』(CLI Easy Setup Wizard 1 • CLI HTTP • OOB IP • SNMP IP SNMP SNMP 192 - Dell PowerConnect 8100 | Getting Started Guide - Page 195
)> Applying Global configuration, please wait ... Welcome to Dell Easy Setup Wizard The Setup Wizard guides you through the initial switch configuration, and gets you up and running as quickly as possible. You can skip the setup wizard, and enter CLI mode to manually configure the switch. You must - Dell PowerConnect 8100 | Getting Started Guide - Page 196
enter the user password: Please reenter the user password: Step 3: Next, IP addresses are setup on the OOB (Out-Of-Band) Interface and/or the VLAN1 routing interface. You can use these IP addresses to access the CLI, Web interface, or SNMP interface of the switch. To access the switch through any - Dell PowerConnect 8100 | Getting Started Guide - Page 197
the settings to the start-up configuration file. If the information is incorrect, enter (N) to discard the configuration and restart the wizard: [Y/N] y Thank you for using the Dell Easy Set up Wizard. You will now enter CLI mode. Applying Interface configuration, please wait ... console> 195 - Dell PowerConnect 8100 | Getting Started Guide - Page 198
-band. Dell OpenManage Switch Administrator Web OOB IP CLI Telnet または SSH OOB IP CLI PowerConnect 81xx VLAN、802.1X、RADIUS、 TACACS Simple Switch Mode: Port Aggregator Feature White Paper 3 CLI Users Configuration Guide CLI Reference Guide』(CLI support.dell.com/support 196 - Dell PowerConnect 8100 | Getting Started Guide - Page 199
Dell PowerConnect 81xx PC8132, PC8132F, PC8164, PC8164F - Dell PowerConnect 8100 | Getting Started Guide - Page 200
참고 2012 Dell Inc Dell Inc Dell™, DELL 로고, PowerConnect™, OpenManage™, ReadyRails™ 및 Torx™는 Dell Inc Microsoft®, Windows Microsoft Corporation Dell Inc PC8132, PC8132F, PC8164, PC8164F 2012 년 2 월 P/N JHCTM Rev. A00 - Dell PowerConnect 8100 | Getting Started Guide - Page 201
차례 1 소개 201 201 2 202 203 4중 포트 SFP 204 204 UART 205 시스템 LED 206 3 설치 208 208 208 208 209 209 209 Dell ReadyRails 210 215 차례 199 - Dell PowerConnect 8100 | Getting Started Guide - Page 202
4 216 217 218 218 219 220 223 200 차례 - Dell PowerConnect 8100 | Getting Started Guide - Page 203
소개 Dell PowerConnect 81xx PC8132, PC8132F, PC8164, PC8164F Dell support.dell.com/support • 설치 기능 PowerConnect 8100 10GbE 3 10/40GbE 10GbE PC8100 10GbE 40GbE 10GbE 또는 40GbE USB CLI Dell OpenManage Network Manager 등의 SNMP PC8100 iSCSI Dell EqualLogic 8100 iSCSI Dell - Dell PowerConnect 8100 | Getting Started Guide - Page 204
Dell EEE PowerConnect 8100 PC8100 Dell PowerConnect 81xx PowerConnect 81xx 440 x 460 x 44 mm(W x D x H). • 17.32 x 18.11 x 1.73 인치(W x D x H). PowerConnect 81xx 640Gbps 및 320Gbps 1 PC8132F - 24 포트 SFP+ 10G + 40G/80G 2 PC8164F - 48 포트 SFP+ 10G + 2 포트 40G QSFP + 40G/80G 3 PC8132 - - Dell PowerConnect 8100 | Getting Started Guide - Page 205
PC81xx USB 포트 1 1G/10G 10Gbps 포트 48개 • 40G 40Gbps QSFP 포트 2개 • SFP+, 10G Base-T 및 QSFP+ 모듈용 80Gbps 1 CPU 시스템. XLP308H/256MB NOR Flash/2GB DDR III RAM TMP75 RTC 1U PowerConnect 81xx 그림 1. PowerConnect 81xx QSFP+ 포트 203 - Dell PowerConnect 8100 | Getting Started Guide - Page 206
24/48 고정 10G Base-T 또는 SFP USB 2.0 포트 LED 4중 포트 SFP PC8164 및 PC8164F QSFP 포트 2 QBO 10G 포트 4개 • CR4, SR4 및 LR4 40G 포트 1 LED QSFP 100M 주: QSFP 모듈은 PowerConnect 81xx 80Gbps SFP+(10G 포트 4개) • 10G Base-T(10G 포트 4개) • QSFP+(40G 포트 2개 또는 10G 포트 8 204 - Dell PowerConnect 8100 | Getting Started Guide - Page 207
UART UART(Universal Asynchronous Receiver Transmitter 16550 UART UART RS-232 RJ45 YOST to female DB-9 CLI UART 1200 4M UART • 5, 6, 7 또는 8 • 1, 1.5 또는 2 9600 보드율, 8 1 205 - Dell PowerConnect 8100 | Getting Started Guide - Page 208
시스템 LED PowerConnect 81xx LED 1에 상태 LED 표 1 LED 정의 LED 온도 LED 진단 LED 팬 LED a RPM 206 - Dell PowerConnect 8100 | Getting Started Guide - Page 209
표 1 LED 기능 스택 LED LED a 75°C LED 그림 2. 포트 LED Console OOB FAN 1 Locator Stack Temp Dlag System LED owerConnecPtow8er1C6on4nect 8164 51 37 5 79 9 1111 13 13 15 1517 19 1271 23 1 2 4 6 8 10 12 14 16 18 20 22 24 - Dell PowerConnect 8100 | Getting Started Guide - Page 210
설치 10°-35°C(50°-95°F 900m(2955ft 300m(985ft)당 1°C(1.8°F 8%-85 10%입니다. PowerConnect 스위치 1대 • RJ45-to-DB-9 1 2 PSU 2 AC 208 설치 - Dell PowerConnect 8100 | Getting Started Guide - Page 211
1 2 3 4 5 19인치 EIA-310-E 준수 랙(4 2 Dell ReadyRails 1U 2 ReadyRails 2 2 설치 209 - Dell PowerConnect 8100 | Getting Started Guide - Page 212
50도 C Dell ReadyRails ReadyRails ReadyRails 1U 1U 방법(2 2 4 210 설치 - Dell PowerConnect 8100 | Getting Started Guide - Page 213
1U 구성(4 1 ReadyRails 3 1 그림 3 1U 구성 2 3, 항목 2 3 4 3, 항목 3 설치 211 - Dell PowerConnect 8100 | Getting Started Guide - Page 214
2 1 ReadyRails 212의 그림 4, 항목 1 Torx 2 그림 4. 2 2 2 4, 항목 2 212 설치 - Dell PowerConnect 8100 | Getting Started Guide - Page 215
3 2 4, 항목 3 4 2 1 2 5, 항목 1 그림 5. 2 2 2 5, 항목 2 3 설치 213 - Dell PowerConnect 8100 | Getting Started Guide - Page 216
4 1 ReadyRails Torx 2 214 의 그림 6, 항목 1 2 2 214의 그림 6, 항목 2 그림 6. 4 214 설치 - Dell PowerConnect 8100 | Getting Started Guide - Page 217
1U 1U 2 1U 1U 2 4 1U 1 PC81xx 7, 항목 1 그림 7 2 2 Ready-Rails 3 설치 215 - Dell PowerConnect 8100 | Getting Started Guide - Page 218
그림 8 예 옵션 2 선택 Boot 재부팅 Boot 아니오 RAM 램 로드 아니오 예 Easy Setup Wizard 구성 216 - Dell PowerConnect 8100 | Getting Started Guide - Page 219
Dell support.dell.com/support 주: Dell support.dell.com/support RJ45 VT100 VT100 DTE(Data Terminal Equipment • VT100 VT100 Microsoft HyperTerminal RJ45 DB-9 1 VT100 DB-9 2 a COM 1 b 9600 c 8 1 d e VT100 f Ctrl Microsoft Windows 217 - Dell PowerConnect 8100 | Getting Started Guide - Page 220
Windows 2000 Windows 2000 2 Windows 2000 2 VT100 Windows 2000 microsoft.com 3 RJ45 PowerConnect 81xx RJ45 POST(Power-In Self-Test POST POST POST RAM POST 60 POST Boot Boot Boot CLI • PowerConnect • PowerConnect Dell Easy Setup Wizard VT100 218 - Dell PowerConnect 8100 | Getting Started Guide - Page 221
IP OOB IP 주소 • OOB IP • OOB IP 주소 HTTP Dell Easy Setup Wizard CLI Dell Easy Setup Wizard Ctrl+z 주: 60 Easy Setup Wizard Easy Setup Wizard CLI CLI CLI Easy Setup Wizard • CLI HTTP • OOB IP • 해당 IP SNMP SNMP SNMP 219 - Dell PowerConnect 8100 | Getting Started Guide - Page 222
)> Applying Global configuration, please wait ... Welcome to Dell Easy Setup Wizard The Setup Wizard guides you through the initial switch configuration, and gets you up and running as quickly as possible. You can skip the setup wizard, and enter CLI mode to manually configure the switch. You must - Dell PowerConnect 8100 | Getting Started Guide - Page 223
enter the user password: Please reenter the user password: Step 3: Next, IP addresses are setup on the OOB (Out-Of-Band) Interface and/or the VLAN1 routing interface. You can use these IP addresses to access the CLI, Web interface, or SNMP interface of the switch. To access the switch through any - Dell PowerConnect 8100 | Getting Started Guide - Page 224
the settings to the start-up configuration file. If the information is incorrect, enter (N) to discard the configuration and restart the wizard: [Y/N] y Thank you for using the Dell Easy Set up Wizard. You will now enter CLI mode. Applying Interface configuration, please wait ... console> 222 - Dell PowerConnect 8100 | Getting Started Guide - Page 225
OOB IP DHCP DHCP IP IP show ip interface out-of-band. Dell OpenManage OOB IP CLI Telnet 또는 SSH OOB IP CLI PowerConnect 81xx VLAN, 802.1X, RADIUS 및 TACACS Port Aggregator Layer 3 CLI CLI support.dell.com/support 223 - Dell PowerConnect 8100 | Getting Started Guide - Page 226
224 - Dell PowerConnect 8100 | Getting Started Guide - Page 227
Comutador Dell PowerConnect Série 81xx Guia de Primeiros Passos Modelo regulatório: PC8132, PC8132F, PC8164, PC8164F - Dell PowerConnect 8100 | Getting Started Guide - Page 228
Dell™, o logotipo da DELL, PowerConnect™, OpenManage™, ReadyRails™ e Torx™ são marcas comerciais da Dell Inc. Microsoft® e Windows® são marcas registradas da Microsoft Corporation nos Estados Unidos e/ou outros países. Outras marcas e nomes comerciais podem ser mencionados nesta publicação em refer - Dell PowerConnect 8100 | Getting Started Guide - Page 229
da embalagem 236 Etapas de desempacotamento 237 Montagem do comutador em rack 237 Considerações de segurança sobre montagem em rack 237 Instalação do Sistema Dell ReadyRails 238 Instalação do comutador 243 Sumário 227 - Dell PowerConnect 8100 | Getting Started Guide - Page 230
4 Inicialização e configuração do comutador 244 Conexão do comutador ao terminal 245 Inicialização do comutador 246 Realização da configuração inicial 247 Procedimento de configuração inicial 247 Sessão de exemplo 248 Próximas etapas 253 228 Sumário - Dell PowerConnect 8100 | Getting Started Guide - Page 231
ível no site de suporte da Dell no endereço support.dell.com/support. Este documento contém as seguintes seções: • Visão geral do hardware • Instalação • Inicialização e configuração do comutador Recursos Os comutadores Comutador PowerConnect da série 8100 são comutadores de rede diretos e altamente - Dell PowerConnect 8100 | Getting Started Guide - Page 232
do Dell EqualLogic, o recurso de configuração automática iSCSI de todos os comutadores da série 8100 detecte sobre características do dispositivo e configurações modulares de hardware do Comutador PowerConnect 81xx. O Comutador PowerConnect 81xx tem as seguintes dimensões físicas: • 440 x 460 x 44 - Dell PowerConnect 8100 | Getting Started Guide - Page 233
As entradas do módulo aceitam três tipos de módulos: • SFP+ • 10G Base-T • QSFP+ O sistema também possui uma porta de console do tipo RJ45 para interface RS-232 e uma porta de serviço Ethernet dedicada para funções de gerenciamento OOB. O PC81xx possui os seguintes recursos: • Suporte a uma porta - Dell PowerConnect 8100 | Getting Started Guide - Page 234
Painel frontal As imagens a seguir mostram o painel frontal do Comutador PowerConnect 81xx: Figura 1. Painel frontal do Comutador PowerConnect 81xx Portas QSFP+ O painel frontal possui: • Portas SFP+ ou 24/48 fixo 10G Base-T • Porta de gerenciamento • Porta USB 2.0 NOTA: LEDs que indicam o status - Dell PowerConnect 8100 | Getting Started Guide - Page 235
ou outros dispositivos externos através do protocolo RS-232. Uma porta serial oferece uma conexão direta com o comutador e permite que você acesse a CLI de um terminal do console conectado à porta através do cabo serial fornecido (com RJ45 YOST para conectores DB-9 fêmea). A porta UART pode ser - Dell PowerConnect 8100 | Getting Started Guide - Page 236
O sistema possui diodos emissores de luz (LEDs) que indicam o status do sistema, temperatura, diagnóstico, ventilador, empilhamento e localizador da unidade Comutador PowerConnect 81xx. O Tabela 1 possui as definições de LED: Tabela 1. Definições de LED para o sistema Recurso LED do sistema LED da - Dell PowerConnect 8100 | Getting Started Guide - Page 237
térmicos é de 75ºC. Quando este limite é ultrapassado, o LED da temperatura se torna amarelo. Figura 2. LEDs das portas Console OOB FAN 1 Locator Stack Temp Dlag System LED owerConnecPtow8er1C6on4nect 8164 51 37 5 79 9 1111 13 13 15 1517 19 1271 23 1 2 4 6 8 10 12 14 16 - Dell PowerConnect 8100 | Getting Started Guide - Page 238
údo da embalagem Ao retirar cada comutador da respectiva embalagem, certifique-se de que os seguintes itens foram fornecidos: • Um comutador PowerConnect. • Um cabo fêmea RJ45-to-DB-9 • Dois conjuntos de kits de calha (sem necessidade de ferramentas) • Dois PSUs (fornecidos separadamente) • Dois - Dell PowerConnect 8100 | Getting Started Guide - Page 239
19 pol de largura (métodos quatro hastes, duas hastes ou rosqueado). O sistema Dell ReadyRails™ é fornecido para instalações de rack dianteiro 1U e de duas que são presas às laterais do comutador. ADVERTÊNCIA: Esta é uma referência resumida. Leia as instruções de segurança no livreto de informaçõ - Dell PowerConnect 8100 | Getting Started Guide - Page 240
Por exemplo: uso de filtros de linha. • O produto não deve ser montado com o painel traseiro virado para baixo. Instalação do Sistema Dell ReadyRails O sistema de montagem em rack ReadyRails é fornecido para configurar de maneira fácil seu rack para a instalação do comutador. O sistema ReadyRails - Dell PowerConnect 8100 | Getting Started Guide - Page 241
Configuração sem ferramenta 1U (Furo quadrado de quatro hastes ou furo redondo sem rosca) 1 Com as orelhas do flange ReadyRails virada para baixo, coloque uma calha entre as hastes verticais direita e esquerda. Alinhe e assente os pinos da calha do flange traseiro no flange da haste vertical - Dell PowerConnect 8100 | Getting Started Guide - Page 242
Configuração de duas hastes de encastramento 1 Para esta configuração, os moldes devem ser removidos do lado dianteiro de cada conjunto ReadyRails. Consulte Figura 4, item 1 na página 240. Use uma chave Torx para remover os dois parafusos de cada orelha do flange dianteiro (no lado do comutador da - Dell PowerConnect 8100 | Getting Started Guide - Page 243
3 Deslize o suporte do êmbolo para frente, contra a haste vertical e prenda-o ao flange da haste com os dois parafusos fornecidos. Consulte Figura 4, item 3. 4 Repita este procedimento para a segunda calha. Configuração de duas hastes centrais 1 Deslize o suporte do êmbolo para trás, até que se - Dell PowerConnect 8100 | Getting Started Guide - Page 244
Configuração de quatro hastes rosqueadas 1 Para esta configuração, os moldes da orelha do flange precisam ser removidos de cada extremidade dos conjuntos ReadyRails. Use uma chave Torx para remover os dois parafusos de cada orelha do flange e remova cada molde. Consulte Figura 6, item 1 na página - Dell PowerConnect 8100 | Getting Started Guide - Page 245
Instalação do comutador O comutador pode ser montado no rack dianteiro 1U e nas configurações de duas hastes 1U (encastramento e central). A seguir, um exemplo de configuração de rack dianteiro 1U. Nas configurações de duas hastes 1U (encastramento e central), é possível deslizar o comutador nas - Dell PowerConnect 8100 | Getting Started Guide - Page 246
de inicialização (funções especiais) Reinicializar Entrar no menu de inicialização? Não Carregar programa do Flash para RAM Entrar no assistente? Não Configuração inicial manual Sim Definição do Assistente de configuração fácil Configuração avançada 244 Inicialização e configuração do comutador - Dell PowerConnect 8100 | Getting Started Guide - Page 247
Dell no endereço support.dell.com/support. NOTA: Recomendamos que obtenha a versão mais recente da documentação do usuário no site de suporte da Dell, no endereço support.dell.com/support o software de emulação do terminal VT100. 2 Configure o software de emulação do terminal conforme as seguintes - Dell PowerConnect 8100 | Getting Started Guide - Page 248
service packs do Windows 2000. 3 Conecte o conector RJ45 no cabo diretamente à porta RJ45 do console PowerConnect será interrompido. Se o POST for executado com sucesso, o firmware válido será carregado na memória RAM. As mensagens do referência da CLI. 246 Inicialização e configuração do comutador - Dell PowerConnect 8100 | Getting Started Guide - Page 249
PowerConnect inicializou corretamente. • A conexão do console foi estabelecida e o aviso do Dell Easy Setup Wizard (Assistente de configuração fácil da Dell) ção inicial por meio do Dell Easy Setup Wizard (Assistente de configuração fácil da Dell) ou da CLI. O assistente inicia automaticamente - Dell PowerConnect 8100 | Getting Started Guide - Page 250
ções sobre como realizar a configuração inicial usando a CLI, consulte o Guia de referência da CLI. Este Guia de Primeiros Passos mostra como utilizar o à execução de uma sessão de exemplo do Dell Easy Setup Wizard (Assistente de configuração fácil da Dell), em que se utilizam os valores de entrada - Dell PowerConnect 8100 | Getting Started Guide - Page 251
guides you through the initial switch configuration, and gets you up and running as quickly as possible. (O assistente de configuração o guiará pela configuração inicial para que tudo esteja funcionando o mais rápido possível.) You can skip the setup wizard, and enter CLI mode to manually configure - Dell PowerConnect 8100 | Getting Started Guide - Page 252
para gerenciamento SNMP.) To manage the switch using SNMP (required for Dell Network Manager) you can (Para CLI.) You may setup other accounts and change privilege levels later. (É possível configurar outras contas e alterar os níveis de privilégio mais tarde.) For more information on setting up user - Dell PowerConnect 8100 | Getting Started Guide - Page 253
CLI, Web interface, or SNMP interface of the switch. (É possível usar esses endereços IP para acessar a interface SNMP, WEB ou CLI do comutador. To access the switch the default gateway if IP address is manually configured on both routing and OOB interface. (Configure o gateway padrão caso o endereço - Dell PowerConnect 8100 | Getting Started Guide - Page 254
-rede IP (A.B.C.D ou /nn)). [255.255.255.0]: This is the configuration information that has been collected: (Essas são as informações de configuração que foram coletadas:) Operational Mode = Simple (Modo de operação = simples) User Account setup = root (Configuração da conta de usuário = raiz) - Dell PowerConnect 8100 | Getting Started Guide - Page 255
Switch Administrator (Administrador de comutador do Dell OpenManage), insira o endereço IP da interface de gerenciamento fora de banda no campo de endereço de um navegador da Web. Para acesso de gerenciamento remoto à CLI acesso local da CLI ao comutador. O comutador PowerConnect 81xx oferece suporte - Dell PowerConnect 8100 | Getting Started Guide - Page 256
os recursos que a sua rede precisa. Para obter informações sobre como configurar os recursos do comutador, consulte o Guia de configuração do usuário ou o Manual de referência da CLI disponíveis no site de suporte support.dell.com/support. 254 Inicialização e configuração do comutador - Dell PowerConnect 8100 | Getting Started Guide - Page 257
Dell PowerConnect 81xx Series Switch PC8132, PC8132F, PC8164, PC8164F - Dell PowerConnect 8100 | Getting Started Guide - Page 258
2012 Dell Inc Dell Inc Dell DELL, PowerConnect™, OpenManage™, ReadyRails™ и Torx Dell Inc. Microsoft®, Windows Microsoft Corporation Dell Inc PC8132, PC8132F, PC8164, PC8164F 2012 г. P/N JHCTM Ред. A00 - Dell PowerConnect 8100 | Getting Started Guide - Page 259
1 259 259 2 260 262 SFP 262 263 263 264 3 266 266 266 266 267 267 268 Dell ReadyRails 268 273 257 - Dell PowerConnect 8100 | Getting Started Guide - Page 260
4 274 275 276 277 277 278 282 258 - Dell PowerConnect 8100 | Getting Started Guide - Page 261
Dell PowerConnect 81xx, PC8132, PC8132F, PC8164, PC8164F Dell support.dell.com/support. PowerConnect 8100 10 Gigabit Ethernet 3 Ethernet 10/40 10 Gigabit Ethernet PC8100 10 40 Ethernet 10-40 USB (USB Rapid Deployment CLI SNMP Dell OpenManage. 259 - Dell PowerConnect 8100 | Getting Started Guide - Page 262
PC8100 iSCSI Dell EqualLogic iSCSI Auto-Configuration 8100 Series Dell Compellent Dell PowerConnect 8100 Ethernet (EEE PC8100 Dell PowerConnect 81xx. PowerConnect 81xx • 440 x 460 x 44 мм (Ш x Г x В). • 17,32 x 18,11 x 1,73 x Г x В). PowerConnect 81xx 640-320 1 - Dell PowerConnect 8100 | Getting Started Guide - Page 263
SFP+ • 10G Base-T • QSFP+ RJ45 RS-232 Ethernet OOB). PC81xx USB 10 1-10 40 QSFP для 40 80 SFP+, 10 Base-T и QSFP XLP308H/256 MB NOR Flash/2GB DDR III RAM TMP75 RTC 1U 261 - Dell PowerConnect 8100 | Getting Started Guide - Page 264
PowerConnect 81xx. 1. PowerConnect 81xx Порты QSFP+ 24/48 10G Base-T или SFP USB 2.0 SFP PC8164 и PC8164F QSFP 10 QBO 40 CR4, SR4 и LR4 QSFP 100 м. QSFP PowerConnect 81xx. 262 - Dell PowerConnect 8100 | Getting Started Guide - Page 265
80 SFP 10 10G Base-T 10 QSFP 40G 10G 16550 RS-232 CLI RJ45 YOST DB-9). 1200 до 4 5, 6, 7 или 8 1, 1,5 или 2 9600 бод, 8 1 263 - Dell PowerConnect 8100 | Getting Started Guide - Page 266
LED PowerConnect 81xx 1 1 a 264 - Dell PowerConnect 8100 | Getting Started Guide - Page 267
1 a 75°C 2 Console OOB FAN 1 Locator Stack Temp Dlag System LED owerConnecPtow8er1C6on4nect 8164 51 37 5 79 9 1111 13 13 15 1517 19 1271 23 1 2 4 6 8 10 12 14 16 18 20 22 24 265 - Dell PowerConnect 8100 | Getting Started Guide - Page 268
10 °C до 35 °C (50 °F-95 °F). 1 °C (18 °F 300 м (985 900 м (2955 8-85 10% в час. PowerConnect RJ45/DB-9 266 - Dell PowerConnect 8100 | Getting Started Guide - Page 269
1 2 3 4 5 EIA-310-E 19 Dell ReadyRails 1U ReadyRails 267 - Dell PowerConnect 8100 | Getting Started Guide - Page 270
50 °C. Dell ReadyRails ReadyRails ReadyRails 1U 268 - Dell PowerConnect 8100 | Getting Started Guide - Page 271
1U 1 ReadyRails 3 1 3 1U 2 3 2. 3 4 3 3. 269 - Dell PowerConnect 8100 | Getting Started Guide - Page 272
1 ReadyRails 4 1 270 4 2 4 2. 270 - Dell PowerConnect 8100 | Getting Started Guide - Page 273
3 4 3. 4 1 5 1. 5 2 5 2. 3 271 - Dell PowerConnect 8100 | Getting Started Guide - Page 274
1 ReadyRails 6 1 272 2 6 2 272. 6 272 - Dell PowerConnect 8100 | Getting Started Guide - Page 275
1U 1U 1U 1U 1 PC81xx 7 1 7 2 Ready-Rails 10 273 - Dell PowerConnect 8100 | Getting Started Guide - Page 276
8 Yes (Да) 2 No (Нет) No (Нет) Yes (Да) 274 - Dell PowerConnect 8100 | Getting Started Guide - Page 277
support.dell.com. Dell support.dell.com. RJ45 VT100 VT100 DTE). • VT100 VT100 Microsoft HyperTerminal. RJ45 DB9 1 DB9 VT100. 2 a COM 1). b 9600 бод. c 8 1 d 275 - Dell PowerConnect 8100 | Getting Started Guide - Page 278
e VT100. f Ctrl Microsoft Windows). HyperTerminal» в Microsoft Windows 2000 Windows 2000 2 Windows 2000 2 HyperTerminal» VT100 www.microsoft.com Windows 2000. 3 RJ45 RJ45 PowerConnect 81xx POST POST POST POST POST 60 POST 276 - Dell PowerConnect 8100 | Getting Started Guide - Page 279
PowerConnect PowerConnect VT100 Dell. IP • IP OOB IP OOB. • IP OOB. Telnet Telnet) или HTTP Dell ctrl+z 277 - Dell PowerConnect 8100 | Getting Started Guide - Page 280
60 HTTP IP OOB. SNMP SNMP IP SNMP Пример IP-адрес. SNMP root admin123 OOB IP-адрес 192.168.2.1. 278 - Dell PowerConnect 8100 | Getting Started Guide - Page 281
)> Applying Global configuration, please wait ... Welcome to Dell Easy Setup Wizard The Setup Wizard guides you through the initial switch configuration, and gets you up and running as quickly as possible. You can skip the setup wizard, and enter CLI mode to manually configure the switch. You must - Dell PowerConnect 8100 | Getting Started Guide - Page 282
enter the user password: Please reenter the user password: Step 3: Next, IP addresses are setup on the OOB (Out-Of-Band) Interface and/or the VLAN1 routing interface. You can use these IP addresses to access the CLI, Web interface, or SNMP interface of the switch. To access the switch through any - Dell PowerConnect 8100 | Getting Started Guide - Page 283
the settings to the start-up configuration file. If the information is incorrect, enter (N) to discard the configuration and restart the wizard: [Y/N] y Thank you for using the Dell Easy Set up Wizard. You will now enter CLI mode. Applying Interface configuration, please wait ... console> 281 - Dell PowerConnect 8100 | Getting Started Guide - Page 284
IP DHCP IP DHCP IP show ip interface out-of-band. Dell OpenManage IP OOB IP OOB Telnet или SSH PowerConnect 81xx VLAN, 802.1X, RADIUS и TACACS Port Aggregator). STP 3 Multicast support.dell.com/support. 282 - Dell PowerConnect 8100 | Getting Started Guide - Page 285
Conmutador Dell PowerConnect Serie 81xx Guía de introducción Modelo reglamentario: PC8132, PC8132F, PC8164, PC8164F - Dell PowerConnect 8100 | Getting Started Guide - Page 286
material en cualquier forma sin la autorización escrita de Dell Inc. Marcas comerciales utilizadas en este texto: Dell™, el logotipo de DELL, PowerConnect™ y OpenManage™, ReadyRails™ y Torx™ son marcas comerciales de Dell Inc. Microsoft® y Windows® son marcas comerciales registradas de Microsoft - Dell PowerConnect 8100 | Getting Started Guide - Page 287
del paquete 294 Pasos del desembalaje 295 Montaje del conmutador en rack 295 Consideraciones de seguridad para el montaje en rack 296 Montaje del sistema Dell ReadyRails 296 Montaje del conmutador 301 Contenido 285 - Dell PowerConnect 8100 | Getting Started Guide - Page 288
4 Inicio y configuración del conmutador . 302 Conexión de un conmutador a un terminal 303 Inicio del conmutador 304 Realización de la configuración inicial 304 Procedimiento de configuración inicial . . . . . 305 Ejemplo de sesión 306 Pasos siguientes 311 286 Contenido - Dell PowerConnect 8100 | Getting Started Guide - Page 289
Dell (support.dell.com/support), donde encontrará las últimas actualizaciones de la documentación y el firmware. Este documento contiene las secciones siguientes: • Información general sobre el hardware • Instalación • Inicio y configuración del conmutador Característica Los PowerConnect serie 8100 - Dell PowerConnect 8100 | Getting Started Guide - Page 290
conectividad con matrices Dell EqualLogic, la función de configuración automática de iSCSI, que incluye la serie 8100, detecta automá la conectividad con matrices Dell Compellent se logra con una configuración de un sólo comando. Dell ha diseñado PowerConnect serie 8100 para que ahorre energ - Dell PowerConnect 8100 | Getting Started Guide - Page 291
4 PC8164: 10GBaseT de 48 puertos + QSFP de 40G de 2 puertos + módulo de extensión de 40G/80G Las ranuras del módulo pueden conectarse en tres tipos de módulos: • SFP+ • 10G Base-T • QSFP+ El sistema también proporciona un puerto de consola del tipo RJ45 de interfaz RS-232 y un puerto de servicio - Dell PowerConnect 8100 | Getting Started Guide - Page 292
Panel frontal La siguiente imagen muestra el panel frontal de PowerConnect 81xx: Ilustración 1. Panel frontal de PowerConnect 81xx Puertos QSFP+ El panel frontal incluye: • 24/48 puertos pueden utilizar para los conmutadores de la serie PowerConnect 81xx. 290 Información general sobre el hardware - Dell PowerConnect 8100 | Getting Started Guide - Page 293
modelo u otos dispositivos externos mediante el protocolo RS-232. Un puerto serie proporciona una conexión directa al conmutador y permite acceder a la CLI desde un terminal de consola conectado al puerto a través del cable serie suministrado (con conectores RJ45 YOST a DB-9 hembra). El puerto UART - Dell PowerConnect 8100 | Getting Started Guide - Page 294
(LED) que proporcionan información del estado del sistema, la temperatura, el diagnóstico, el ventilador, la pila y el localizador de la unidad PowerConnect 81xx. La Tabla 1 incluye las definiciones de los LED de estado: Tabla 1. Definiciones de los LED del sistema Característica LED del sistema - Dell PowerConnect 8100 | Getting Started Guide - Page 295
de 75°C. Si se supera este umbral, el LED de temperatura (Temp) pasa a color ámbar. Ilustración 2. LED de los puertos Console OOB FAN 1 Locator Stack Temp Dlag System LED owerConnecPtow8er1C6on4nect 8164 51 37 5 79 9 1111 13 13 15 1517 19 1271 23 1 2 4 6 8 10 12 14 16 18 20 - Dell PowerConnect 8100 | Getting Started Guide - Page 296
hora. Desembalaje del conmutador Contenido del paquete Cuando desembale los conmutadores, compruebe que se han incluido los elementos siguientes: • Un conmutador PowerConnect • Un cable RJ45 a DB-9 hembra • Dos juegos de kits de rieles (no se precisan herramientas) • Dos PSU (en embalaje individual - Dell PowerConnect 8100 | Getting Started Guide - Page 297
directamente en un rack de 48,26 cm que cumpla la especificación EIA-310-E (cuatro postes, dos postes o métodos de roscado). El sistema Dell ReadyRails™ viene preparado para instalaciones en rack frontal 1U y de dos postes. El sistema ReadyRails incluye dos ensamblajes de rieles y dos rieles, en - Dell PowerConnect 8100 | Getting Started Guide - Page 298
, por ejemplo: el uso de regletas de enchufes. • El producto no se debe montar con su parte trasera hacia abajo. Montaje del sistema Dell ReadyRails El sistema de montaje en rack ReadyRails permite una fácil configuración del rack para la instalación del conmutador. El sistema ReadyRails se puede - Dell PowerConnect 8100 | Getting Started Guide - Page 299
Configuración sin herramientas 1U (orificio cuadrado de cuatro postes o orificio redondo sin rosca) 1 Con las pestañas laterales del ReadyRails orientadas hacia afuera, coloque un riel entre los postes verticales derecho e izquierdo. Alinee y encaje las espigas del riel de la parte posterior en la - Dell PowerConnect 8100 | Getting Started Guide - Page 300
Configuración de montaje a ras de dos postes 1 Para esta configuración, se deben extraer las piezas fundidas de la parte frontal de cada ensamblaje de ReadyRails. Consulte la Ilustración 4, elemento 1 en la página 298. Utilice un destornillador Torx para extraer los dos tornillos de cada pestaña de - Dell PowerConnect 8100 | Getting Started Guide - Page 301
3 Deslice el soporte del fiador hacia el poste vertical y fíjelo al mismo con dos tornillos suministrados por el usuario. Consulte la Ilustración 4, elemento 3. 4 Repita este paso para el segundo riel. Configuración de montaje centrado de dos postes 1 Deslice el soporte del fiador hacia atrás hasta - Dell PowerConnect 8100 | Getting Started Guide - Page 302
Configuración de montaje roscado de cuatro postes 1 Para esta configuración, se deben extraer las piezas fundidas de las pestañas laterales situadas a cada lado de los ensamblajes del ReadyRails. Utilice un destornillador Torx para extraer los dos tornillos de cada pestaña lateral y extraiga las - Dell PowerConnect 8100 | Getting Started Guide - Page 303
Montaje del conmutador El conmutador se puede montar en dos configuraciones: rack frontal 1U o dos postes 1U (a ras o centrado). El siguiente es un ejemplo de una configuración de rack frontal 1U. En las configuraciones de dos postes 1U (a ras y centrado), puede deslizar el conmutador en los rieles - Dell PowerConnect 8100 | Getting Started Guide - Page 304
opción 2 Menú de inicio (funciones especiales) Reiniciar ¿Acceder al menu de inicio? No Cargar el programa de flash a RAM ¿Iniciar el asistente? No Configuración inicial manual Sí Configuración de Easy Setup Wizard Configuración avanzada 302 Inicio y configuración del conmutador - Dell PowerConnect 8100 | Getting Started Guide - Page 305
gina web de asistencia de Dell en support.dell.com/support. Para supervisar y configurar el conmutador mediante la consola serie, utilice el puerto de el conector DB-9 del cable serie en el terminal o equipo que ejecuta software de emulación de terminal VT100. 2 Configure el software de emulación de - Dell PowerConnect 8100 | Getting Started Guide - Page 306
Service Pack de Windows 2000. 3 Conecte el conector RJ45 del cable directamente al puerto de consola de PowerConnect se carga el firmware válido en CLI. Realización de la configuración inicial Para el procedimiento de configuración inicial, se da por sentado lo siguiente: • El conmutador PowerConnect - Dell PowerConnect 8100 | Getting Started Guide - Page 307
se puede realizar con el asistente Easy Setup Wizard de Dell o con la CLI. El asistente se inicia automáticamente cuando el archivo de usuario con privilegios durante la configuración. • Habilita el inicio de sesión de CLI y el acceso HTTP para el uso únicamente de la configuración de autenticación - Dell PowerConnect 8100 | Getting Started Guide - Page 308
de sesión de Easy Setup Wizard de Dell con los valores indicados anteriormente. Cuando el Dell) The Setup Wizard guides you through the initial switch configuration, and gets you up and running as quickly as possible. You can skip the setup wizard, and enter CLI mode to manually configure the switch - Dell PowerConnect 8100 | Getting Started Guide - Page 309
with normal operation using the default system configuration. Note: You can exit the asistente para instalación y entrar en el modo de CLI para configurar el conmutador manualmente. Debe responder a la To manage the switch using SNMP (required for Dell Network Manager) you can (Para administrar - Dell PowerConnect 8100 | Getting Started Guide - Page 310
la interfaz de administración SNMP ahora?) [Y/N] n Step 2: (Paso 2:) Now we need to setup your initial privilege (Level 15) user account. This account is used to login to the CLI and Web interface. You may setup other accounts and change privilege levels later. For more information on setting up - Dell PowerConnect 8100 | Getting Started Guide - Page 311
del conmutador.) To access the switch through any Management Interface you can (Para acceder al conmutador a través de Management Interface, puede) . Setup the IP address for the Management Interface. . Setup the default gateway if IP address is manually configured on both routing and OOB interface - Dell PowerConnect 8100 | Getting Started Guide - Page 312
ón y reiniciar el asistente: [Y/N] y) Thank you for using the Dell Easy Set up Wizard. (Gracias por utilizar Dell Easy Set up Wizard.) You will now enter CLI mode. (Ahora especificará el modo de CLI.) Applying Interface configuration, please wait ... (Aplicando configuración de interfaz, espere - Dell PowerConnect 8100 | Getting Started Guide - Page 313
banda). Para acceder a la interfaz de Dell OpenManage Switch Administrator, introduzca la dirección IP de la para el acceso local de la CLI al conmutador. El conmutador PowerConnect 81xx admite funciones de conmutación CLI, disponibles en la página web de asistencia support.dell.com/support. Inicio - Dell PowerConnect 8100 | Getting Started Guide - Page 314
312 Inicio y configuración del conmutador - Dell PowerConnect 8100 | Getting Started Guide - Page 315
Dell PowerConnect 81xx Serisi Anahtar Başlangıç Kılavuzu Düzenleyici Model: PC8132, PC8132F, PC8164, PC8164F - Dell PowerConnect 8100 | Getting Started Guide - Page 316
bu belgelerin herhangi bir şekilde çoğaltılması kesinlikle yasaktır. Bu metinde kullanılan Ticari Markalar: Dell™, DELL logosu, PowerConnect™, OpenManage™, ReadyRails™ ve Torx™ Dell Inc. ticari markalarıdır. Microsoft®, Windows® ABD ve/veya diğer ülkelerde Microsoft Corporation'ın tescilli ticari - Dell PowerConnect 8100 | Getting Started Guide - Page 317
Hazırl 323 Anahtarın Paketinin Açılmas 323 Paket Muhteviyat 323 Paketi Açma Adımlar 324 Rafın Anahtara Monte Edilmesi 324 Raf Montajı Güvenlik Hususlar 324 Dell ReadyRails Sisteminin Takılması . . . . 325 Anahtarı Takma 330 İçerik 315 - Dell PowerConnect 8100 | Getting Started Guide - Page 318
4 Anahtarın Başlatılması ve Yapılandırılmas 331 Anahtarın bir Terminale Bağlanmas 332 Anahtarı Başlatma 333 Başlangıç Yapılandırmasının Yapılması . . . . 333 Başlangıç Yapılandırma Prosedür 334 Örnek Oturum 335 Sonraki Adımlar 338 316 İçerik - Dell PowerConnect 8100 | Getting Started Guide - Page 319
en son güncellemelere ilişkin support.dell.com/support içinde yer alan Kullanıcı Yapılandırma Kılavuzu'na bakın. Bu belge aşağıdaki bölümleri kapsar: • Donanıma Genel Bakış • Kurulum • Anahtarın Başlatılması ve Yapılandırılması Özellikler PowerConnect 8100 Serisi, oldukça ölçeklendirilebilir, kamp - Dell PowerConnect 8100 | Getting Started Guide - Page 320
bağlantı noktalarına güç tasarrufu sağlamak için Dell PowerConnect 8100 Serisini tasarlamıştır, tüm bağlantı noktalarında etkin ve Kullanım Süresi Sınırlı Garantisi içerir. Donanıma Genel Bakış Bu kısım PowerConnect 81xx anahtarlar için aygıt özellikleri ve modüler donanım yapılandırmaları - Dell PowerConnect 8100 | Getting Started Guide - Page 321
kaynağı • Güç yönetimi için akım izleme • Fan çıkarılabilir ve yönetilebilir • Standart 1U şasi yüksek Ön Panel Aşağıdaki resim PowerConnect 81xx ön panelini gösterir: Şekil 1. PowerConnect 81xx Ön Panel QSFP+ Baðlantý Noktalarý Ön panel şunları içerir: • 24/48 sabit 10G Base-T veya SFP+ bağlant - Dell PowerConnect 8100 | Getting Started Guide - Page 322
kadar olan mesafelerde desteklenir. NOT: QSFP modülleri yalnızca PowerConnect 81xx serisi anahtarlarda kullanılabilir. Genişletme Yuvası 80 Gbps lar ve sağlanan seri kablo (RJ45 YOST'tan dişi DB-9 konektörlere) üzerinden bağlantı noktasına bağlanan bir konsol terminalinden CLI'a erişmenize imkân - Dell PowerConnect 8100 | Getting Started Guide - Page 323
hızı, 8 veri biti, Eşlik Yok, 1 Durma Biti, Akış Kontrolü Yok şeklindedir. Sistem LED'leri Sistem, Sisteme, Diyaloga, Fana, İstife ve PowerConnect 81xx birimi Konumlandırıcı durumuna yönelik göstergeler sağlayan ışık yayan diyotlara (LED'ler) sahiptir. Tablo 1, durum LED tanımlarını içerir: Table - Dell PowerConnect 8100 | Getting Started Guide - Page 324
örleri sistem sıcaklığı eşiği 75°C. Eşik aşıldığında, Sıc. LED'i Sarı olarak yanar. Şekil 2. Bağlantı Noktası LED'leri Console OOB FAN 1 Locator Stack Temp Dlag System LED owerConnecPtow8er1C6on4nect 8164 51 37 5 79 9 1111 13 13 15 1517 19 1271 23 1 2 4 6 8 10 12 14 16 18 - Dell PowerConnect 8100 | Getting Started Guide - Page 325
ila %85 (yoğuşmasız)'tir. Anahtarın Paketinin Açılması Paket Muhteviyatı Anahtarların paketini açarken aşağıdaki öğelerin pakette yer aldığından emin olun: • Bir adet PowerConnect anahtar • Bir adet RJ-45'den DB-9'a dişi kablo • İki ray kiti seti (alet gerekmez) • İki PSU (ayrı olarak paketlenmiştir - Dell PowerConnect 8100 | Getting Started Guide - Page 326
veya anahtarı doğrudan 19" genişliğinde EIA-310-E uyumlu rafa yerleştirebilirsiniz (dört kılıflı, iki kılıflı veya dişli yöntem). Dell ReadyRails™ sistemi 1U ön raf ve iki kılıflı kurulumlar için sağlanmıştır. ReadyRails sistemi, iki ayrı paketlenmiş ray kurulumu ve anahtarın yanlarına - Dell PowerConnect 8100 | Getting Started Guide - Page 327
bağlantıları yapmaya özellikle özen gösterin örneğin: güç şeritlerinin kullanılması. • Ürün arka panel aşağı konuma bakacak şekilde monte edilmemelidir. Dell ReadyRails Sisteminin Takılması ReadyRails raf montaj sistemi anahtarınızın kurulumu için rafınızda kolayca yapılandırılacak şekilde sağlan - Dell PowerConnect 8100 | Getting Started Guide - Page 328
1U Aletsiz Yapılandırması (Dört kılıflı Kare Delik veya Dişsiz Yuvarlak Delik) 1 ReadyRails flanş kulakları aşağı bakarken, bir rayı sol ve sağ dikey kılıflar arasına yerleştirin. Arka flanş ray kulakçıklarını arka dikey kılıf flanşında hizalayın ve buraya oturtun. Şekil 3'te, öğe bir 1 ve - Dell PowerConnect 8100 | Getting Started Guide - Page 329
İki Kılıflı Yerine Montaj Yapılandırması 1 Bu yapılandırma için, kalıplar her bir ReadyRails kurulumunun ön tarafından kaldırılmalıdır Bkz. Şekil 4, öğe 1, sayfa 327. Her bir ön flanş kulağındaki iki vidayı çıkarmak için Torx sürücüyü kullanın (rayın anahtar kısmındadır) ve her bir kalıbı çıkarın. - Dell PowerConnect 8100 | Getting Started Guide - Page 330
3 Serbest bırakma çubuğu braketini dikey kılıfa doğru ileri yönde kaydırın ve serbest bırakma çubuğu braketini iki adet kullanıcı tarafından sağlanan vidayla kılıf flaşına sabitleyin. Bkz. Şekil 4, öğe 3. 4 İkinci ray için bu yordamı tekrarlayın. İki Kılıflı Ortaya Montaj Yapılandırması 1 Serbest bı - Dell PowerConnect 8100 | Getting Started Guide - Page 331
Dört Kılıflı Dişli Yapılandırma 1 Bu yapılandırma için, flanş kulağı kalıpları ReadyRails kurulumlarının her bir ucundan kaldırılmalıdır. Her bir flanş kulağındaki iki vidayı çıkarmak için Torx sürücüyü kullanın ve her bir kalıbı çıkarın. Bkz. Şekil 6, öğe 1, sayfa 329. Gelecekteki raf - Dell PowerConnect 8100 | Getting Started Guide - Page 332
Anahtarı Takma Anahtar 1U öne raf ve 1U iki kılıflı (oturtma ve orta) yapılandırmalarında monte edilebilir. Aşağıdaki 1U öne raf yapılandırmasına bir örnektir. 1U iki kılıflı (oturtma ve orta) yapılandırmaları ile, anahtarı dört kılıflı yapılandırmalarla aynı şekilde raylara kaydırabilirsiniz. 1U Ön - Dell PowerConnect 8100 | Getting Started Guide - Page 333
Anahtarın Başlatılması ve Yapılandırılması Aşağıdaki akış çizelgesi, anahtar paketinden çıkarılıp kurulduktan sonra başlangıç yapılandırmasını gerçekleştirmek için kullanacağınız adımlara genel bir bakış sağlar. Şekil 8. Kurulum ve Yapılandırma Akış Çizelgesi Güç ve Konsol Bağlantısını Yapın Güç - Dell PowerConnect 8100 | Getting Started Guide - Page 334
notlarını okuyun. Sürüm notlarını, support.dell.com/support adresindeki Dell Destek web sitesinden indirebilirsiniz. NOT: Kullanıcı belgelerinin en son sürümünü support.dell.com/support adresindeki Dell Destek web sitesinden edinmenizi tavsiye ederiz. Anahtarı seri konsol üzerinden izlemek ve yap - Dell PowerConnect 8100 | Getting Started Guide - Page 335
için donanım bileşenlerini kontrol eder. POST kritik bir problem tespit ederse program akışı durur. POST başarılı şekilde PowerConnect anahtarı önceden hiç yapılandırılmamış ve aldığınız durumdadır. • PowerConnect anahtarı başarılı şekilde önyüklenmiştir. • Konsol bağlantısı yapılmıştır ve Dell - Dell PowerConnect 8100 | Getting Started Guide - Page 336
Yapılandırma Prosedürü Başlangıç yapılandırmasını Dell Kolay Kurulum Sihirbazı veya CLI kullanarak yapabilirsiniz. Anahtar yapılandırma dosyası boş hesabını yapılandırır. • Sadece yerel kimlik doğrulama ayarını kullanmak için CLI oturum açma ve HTTP erişimini etkinleştirir. • OOB arabirimi için IP - Dell PowerConnect 8100 | Getting Started Guide - Page 337
)> Applying Global configuration, please wait ... Welcome to Dell Easy Setup Wizard The Setup Wizard guides you through the initial switch configuration, and gets you up and running as quickly as possible. You can skip the setup wizard, and enter CLI mode to manually configure the switch. You must - Dell PowerConnect 8100 | Getting Started Guide - Page 338
enter the user password: Please reenter the user password: Step 3: Next, IP addresses are setup on the OOB (Out-Of-Band) Interface and/or the VLAN1 routing interface. You can use these IP addresses to access the CLI, Web interface, or SNMP interface of the switch. To access the switch through any - Dell PowerConnect 8100 | Getting Started Guide - Page 339
address is manually configured on both is the configuration information that has been collected: Operational Mode = Simple User Account setup configuration and restart the wizard: [Y/N] y Thank you for using the Dell Easy Set up Wizard. You will now enter CLI mode. Applying Interface configuration - Dell PowerConnect 8100 | Getting Started Guide - Page 340
olarak, anahtara yerel CLI erişimi için konsol bağlantı noktasını kullanmaya devam edebilirsiniz. PowerConnect 81xx anahtarınız VLAN' CLI kullanın. Anahtar özelliklerini yapılandırma hakkında bilgi için bkz. Kullanıcı Yapılandırma Kılavuzu veya destek sitesi support.dell.com/support adresindeki CLI - Dell PowerConnect 8100 | Getting Started Guide - Page 341
Dell PowerConnect 81xx Series ,PC8132F ,PC8132 PC8164F ,PC8164 - Dell PowerConnect 8100 | Getting Started Guide - Page 342
2012 Dell Inc Dell Inc Dell OpenManage™ ,PowerConnect™ ,DELL ReadyRails Torx Windows® ,Microsoft® .Dell Inc של Microsoft Corporation Dell Inc PC8164F ,PC8164 ,PC8132F ,PC8132 2012 JHCTM A00 - Dell PowerConnect 8100 | Getting Started Guide - Page 343
1 343 343 2 344 345 SFP Uplink 346 346 346 UART 347 3 349 349 349 349 350 350 350 351 Dell ReadyRails 355 341 - Dell PowerConnect 8100 | Getting Started Guide - Page 344
4 357 358 359 359 360 360 365 | 342 - Dell PowerConnect 8100 | Getting Started Guide - Page 345
Dell support.dell.com/support PowerConnect 8100 Series 10 GbE 3 10/40 GbE 10 GbE PC8100 Series 10 GbE 40 GbE 10 GbE 40 GbE USB CLI SNMP Dell OpenManage Network Manager PC8100 iSCSI Dell EqualLogic iSCSI 8100 Series Dell Compellent - Dell PowerConnect 8100 | Getting Started Guide - Page 346
Dell PowerConnect 8100 Series EEE PC8100 Dell PowerConnect 81xx PowerConnect 81xx 44 x 460 x 440 x x • 1.73 x 18.11 x 17.32 x x PowerConnect 81xx 640 Gbps 320 Gbps 24 - PC8132F 1 SFP 10G 40G/80G 48 - PC8164F 2 SFP 2 + 10G QSFP 40G 40G/80G 24 - - Dell PowerConnect 8100 | Getting Started Guide - Page 347
דג PC81xx USBאחת 10 Gbps 1G/10G QSFP 40 Gbps 40G 80 Gbps 10G Base-T ,SFP+ו QSFP CPU XLP308H Flashשל /256 MB NOR DDR III RAMשל .2GB TMP75 RTC 1U PowerConnect 81xx 1 PowerConnect 81xx QSFP 345 - Dell PowerConnect 8100 | Getting Started Guide - Page 348
24/48 10G Base-Tאו SFP USB 2.0 LED SFP Uplink PC8164ו PC8164F QSFP 10G QBO 40G SR4 ,CR4ו LR4 QSFP 100 QSFP PowerConnect 81xx 80 Gbps • ) SFP 10G 10G Base-T 10G QSFP 40G 10G UART UART UART 16550 UART RS-232 CLI | 346 - Dell PowerConnect 8100 | Getting Started Guide - Page 349
RJ45 YOST DB-9 UART 1,200 4M UART 7 ,6 ,5או 8 1.5 ,1או 2 sticky parity 8 , 9600 1 LED .PowerConnect 81xx 1 1 347 - Dell PowerConnect 8100 | Getting Started Guide - Page 350
1 75°C 2 | 348 - Dell PowerConnect 8100 | Getting Started Guide - Page 351
10עד 35 50עד 95 1.8 300מ' ) 985 900מ' ) 2955 8 85 10 349 PowerConnect RJ45ל DB-9 - Dell PowerConnect 8100 | Getting Started Guide - Page 352
1 2 3 4 5 19 EIA-310-E Dell ReadyRails 1U ReadyRails | 350 - Dell PowerConnect 8100 | Getting Started Guide - Page 353
50 Dell ReadyRails ReadyRails ReadyRails 1U 1U 351 - Dell PowerConnect 8100 | Getting Started Guide - Page 354
1U 1 ReadyRails 3 1 3 U1 2 3 2 3 4 3 3 | 352 - Dell PowerConnect 8100 | Getting Started Guide - Page 355
1 ReadyRails 4 1 14 Torx 4 2 4 2 3 4 3 4 353 - Dell PowerConnect 8100 | Getting Started Guide - Page 356
1 5 1 5 2 5 2 3 | 354 - Dell PowerConnect 8100 | Getting Started Guide - Page 357
1 ReadyRails Torx 6 1 16 2 6 2 16 6 1U 1U 1U 1U 355 - Dell PowerConnect 8100 | Getting Started Guide - Page 358
1U 1 PC81xx 7 1 7 2 Ready-Rails 3 | 356 - Dell PowerConnect 8100 | Getting Started Guide - Page 359
8 כן 2 לא Flash RAM כן Easy Setup 357 - Dell PowerConnect 8100 | Getting Started Guide - Page 360
support.dell.com/support RJ45 VT100 VT100 data terminal equipment DTE VT100 VT100 Microsoft Hyper Terminal RJ45 DB-9 1 DB-9 VT100 2 COM 1 9600 8 VT100 Ctrl Microsoft Windows HyperTerminal-ב,Microsoft Windows 2000 Windows 2000 Service - Dell PowerConnect 8100 | Getting Started Guide - Page 361
3 RJ45 RJ45 PowerConnect 81xx POST POST POST POST RAM POST 60 Boot POST Boot Boot CLI PowerConnect PowerConnect Dell Easy Setup Wizard VT100 IP IP OOB IP OOB IP OOB Telnet Telnet HTTP 359 - Dell PowerConnect 8100 | Getting Started Guide - Page 362
Dell Easy ,Setup CLI ctrl+z Easy Setup Wizard 60 CLI CLI CLI Easy Setup CLI HTTP IP OOB SNMP SNMP IP SNMP Dell Easy Setup IP • SNMP root admin123 OOB 192.168.2.1 IP Enter Dell Easy Setup 360 - Dell PowerConnect 8100 | Getting Started Guide - Page 363
, please wait Welcome to Dell Easy Setup Wizard Dell The Setup Wizard guides you through the initial switch configuration, and gets you up and running as quickly as possible. You can skip the setup wizard, and enter CLI mode to manually configure the switch. You must respond to the - Dell PowerConnect 8100 | Getting Started Guide - Page 364
for SNMP management by default. To manage the switch using SNMP (required for Dell Network Manager) you can SNMP Dell SNMP . Set up the initial SNMP version to setup your initial privilege (Level 15) user account. This account is used to login to the CLI and Web interface. You may setup other - Dell PowerConnect 8100 | Getting Started Guide - Page 365
, Web interface, or SNMP interface of the switch IP SNMP CLI-ה To access the switch through any Management Interface you can . Setup the IP address for the Management Interface IP . Setup the default gateway if IP address is manually configured on both routing and OOB interface IP OOB - Dell PowerConnect 8100 | Getting Started Guide - Page 366
the IP subnet mask (A.B.C.D or /nn). [255.255.255.0]: (.nn A.B.C.D) IP 255.255.255.0] This is the configuration information that has been collected Operational Mode = Simple User Account setup = root Password = ******** Out-of-band IP address = 192.168.2.1 255.255.255.0 192.168 - Dell PowerConnect 8100 | Getting Started Guide - Page 367
will now enter CLI mode Dell CLI Applying Interface configuration, please wait >console DHCP IP OOB IP DHCP IP ) show ip interface out-of-band IP OOB Dell OpenManage Switch Administrator IP OOB IP OOB Telnetאו .SSH PowerConnect 81xx VLAN - Dell PowerConnect 8100 | Getting Started Guide - Page 368
| 366
-
 1
1 -
 2
2 -
 3
3 -
 4
4 -
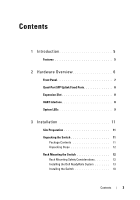 5
5 -
 6
6 -
 7
7 -
8
-
9
-
10
-
11
-
12
-
13
-
14
-
15
-
16
-
17
-
18
-
19
-
20
-
21
-
22
-
23
-
24
-
25
-
26
-
27
-
28
-
29
-
30
-
31
-
32
-
33
-
34
-
35
-
36
-
37
-
38
-
39
-
40
-
41
-
42
-
43
-
44
-
45
-
46
-
47
-
48
-
49
-
50
-
51
-
52
-
53
-
54
-
55
-
56
-
57
-
58
-
59
-
60
-
61
-
62
-
63
-
64
-
65
-
66
-
67
-
68
-
69
-
70
-
71
-
72
-
73
-
74
-
75
-
76
-
77
-
78
-
79
-
80
-
81
-
82
-
83
-
84
-
85
-
86
-
87
-
88
-
89
-
90
-
91
-
92
-
93
-
94
-
95
-
96
-
97
-
98
-
99
-
100
-
101
-
102
-
103
-
104
-
105
-
106
-
107
-
108
-
109
-
110
-
111
-
112
-
113
-
114
-
115
-
116
-
117
-
118
-
119
-
120
-
121
-
122
-
123
-
124
-
125
-
126
-
127
-
128
-
129
-
130
-
131
-
132
-
133
-
134
-
135
-
136
-
137
-
138
-
139
-
140
-
141
-
142
-
143
-
144
-
145
-
146
-
147
-
148
-
149
-
150
-
151
-
152
-
153
-
154
-
155
-
156
-
157
-
158
-
159
-
160
-
161
-
162
-
163
-
164
-
165
-
166
-
167
-
168
-
169
-
170
-
171
-
172
-
173
-
174
-
175
-
176
-
177
-
178
-
179
-
180
-
181
-
182
-
183
-
184
-
185
-
186
-
187
-
188
-
189
-
190
-
191
-
192
-
193
-
194
-
195
-
196
-
197
-
198
-
199
-
200
-
201
-
202
-
203
-
204
-
205
-
206
-
207
-
208
-
209
-
210
-
211
-
212
-
213
-
214
-
215
-
216
-
217
-
218
-
219
-
220
-
221
-
222
-
223
-
224
-
225
-
226
-
227
-
228
-
229
-
230
-
231
-
232
-
233
-
234
-
235
-
236
-
237
-
238
-
239
-
240
-
241
-
242
-
243
-
244
-
245
-
246
-
247
-
248
-
249
-
250
-
251
-
252
-
253
-
254
-
255
-
256
-
257
-
258
-
259
-
260
-
261
-
262
-
263
-
264
-
265
-
266
-
267
-
268
-
269
-
270
-
271
-
272
-
273
-
274
-
275
-
276
-
277
-
278
-
279
-
280
-
281
-
282
-
283
-
284
-
285
-
286
-
287
-
288
-
289
-
290
-
291
-
292
-
293
-
294
-
295
-
296
-
297
-
298
-
299
-
300
-
301
-
302
-
303
-
304
-
305
-
306
-
307
-
308
-
309
-
310
-
311
-
312
-
313
-
314
-
315
-
316
-
317
-
318
-
319
-
320
-
321
-
322
-
323
-
324
-
325
-
326
-
327
-
328
-
329
-
330
-
331
-
332
-
333
-
334
-
335
-
336
-
337
-
338
-
339
-
340
-
341
-
342
-
343
-
344
-
345
-
346
-
347
-
348
-
349
-
350
-
351
-
352
-
353
-
354
-
355
-
356
-
357
-
358
-
359
-
360
-
361
-
362
-
363
-
364
-
365
-
366
-
367
-
368
 |
 |

Dell PowerConnect
81xx Series Switch
Getting Started Guide
使用入门指南
入門指南
Guide de mise en route
Handbuch zum Einstieg
Panduan Pengaktifan
はじめに
시작
안내서
Guia de Primeiros Passos
Руководство по началу работы
Guía de introducción
Başlangıç Kılavuzu
Regulatory Model: PC8132, PC8132F,
PC8164, PC8164F