Dell PowerEdge 2600 Microprocessor Upgrade Installation - Page 6
Installation and Troubleshooting Guide, information on removing the heat sink. - fan
 |
View all Dell PowerEdge 2600 manuals
Add to My Manuals
Save this manual to your list of manuals |
Page 6 highlights
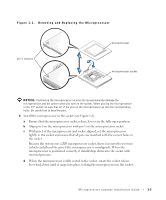
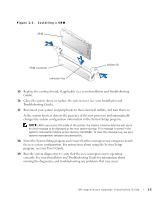
www.dell.com | support.dell.com 4 If you are upgrading an existing microprocessor, remove the microprocessor heat sink. NOTE: If a cooling fan is mounted on the heat sink, you can remove the heat sink without removing the fan. However, you can remove the fan to provide easier access to the heat-sink retention clip(s). For information on removing a cooling fan, see your Installation and Troubleshooting Guide. a Remove the retention clip(s) securing the heat sink to the microprocessor by pressing down firmly on the retention clip tab, and then removing the clip from the heat sink. CAUTION: The microprocessor and heat sink can become extremely hot. Be sure they have had sufficient time to cool before handling. NOTICE: Never remove the heat sink from a microprocessor unless you intend to remove the microprocessor. The heat sink is necessary to maintain proper thermal conditions. NOTICE: After removing the heat sink, place it upside down on a flat surface to prevent the thermal interface material from being damaged or contaminated. b Remove the heat sink. See your Installation and Troubleshooting Guide for information on removing the heat sink. 5 Swing the socket release lever upward to the fully open position (see Figure 1-1). NOTICE: Be careful not to bend any of the pins when removing the microprocessor. Bending the pins can permanently damage the microprocessor. 6 Lift the microprocessor out of the socket and leave the release lever in the open position so that the socket is ready for the new microprocessor. NOTICE: Be careful not to bend any of the pins when unpacking the microprocessor. Bending the pins can permanently damage the microprocessor. 7 Unpack the new microprocessor. If any of the pins on the microprocessor appear bent, see "Getting Help" in your Installation and Troubleshooting Guide. 1-2 Microprocessor Upgrade Installation Guide
-
 1
1 -
 2
2 -
 3
3 -
 4
4 -
 5
5 -
 6
6 -
 7
7 -
 8
8 -
 9
9 -
 10
10 -
 11
11 -
 12
12 -
13
-
14
-
15
-
16
-
17
-
18
-
19
-
20
-
21
-
22
-
23
-
24
-
25
-
26
-
27
-
28
-
29
-
30
-
31
-
32
-
33
-
34
-
35
-
36
-
37
-
38
-
39
-
40
-
41
-
42
-
43
-
44
-
45
-
46
-
47
-
48
-
49
-
50
-
51
-
52
-
53
-
54
-
55
-
56
-
57
-
58
-
59
-
60
-
61
-
62
-
63
-
64
 |
 |
