Dell PowerEdge 750 Installing the Optional CD Drive (.pdf)
Dell PowerEdge 750 Manual
 |
View all Dell PowerEdge 750 manuals
Add to My Manuals
Save this manual to your list of manuals |
Dell PowerEdge 750 manual content summary:
- Dell PowerEdge 750 | Installing
the Optional CD Drive (.pdf) - Page 1
Diskette Drive CAUTION: See your System Information Guide for complete information about safety precautions, working inside the computer, and protecting against electrostatic discharge. NOTE: For additional information about removing system components, see the Installation and Troubleshooting Guide - Dell PowerEdge 750 | Installing
the Optional CD Drive (.pdf) - Page 2
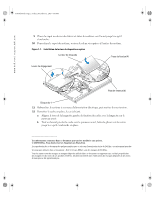
dell.com F3043am0.fm Page 2 Friday, December 12, 2003 4:44 PM 9 Place the cover over the sides of the chassis, and slide the cover forward until it snaps into place. 10 Tighten the two captive screws at the back of the system to secure the cover. Figure 1-1. Installing the Optional Diskette Drive - Dell PowerEdge 750 | Installing
the Optional CD Drive (.pdf) - Page 3
www.dell.com | support.ap.dell.com/china F3043cam0.fm Page 1 Friday, December 12, 2003 4:50 PM 注和警告 1 a b c d 2 3 4 5 6 1 1-1。 7 8 a FD b FDD 9 10 2003 年 12 月 - Dell PowerEdge 750 | Installing
the Optional CD Drive (.pdf) - Page 4
www.dell.com | support.ap.dell.com/china F3043cam0.fm Page 2 Friday, December 12, 2003 4:50 PM 图 1-1 4 个) 4 个) 1 11 12 a b 2003 Dell Inc Dell Inc Dell 和 DELL 徽标是 Dell Inc Dell Inc - Dell PowerEdge 750 | Installing
the Optional CD Drive (.pdf) - Page 5
www.dell.com | support.dell.com F3043fam0.fm Page 1 Friday, December 12, 2003 4:05 PM Remarques et avertissements et la protection contre les décharges électrostatiques. REMARQUE : reportez-vous au Guide d'installation et de dépannage pour davantage d'informations sur le retrait des composants. - Dell PowerEdge 750 | Installing
the Optional CD Drive (.pdf) - Page 6
glisser vers le verrou jusqu'à ce qu'il s'enclenche en place. Les informations contenues dans ce document peuvent être modifiées sans préavis. © 2003 Dell Inc. Tous droits réservés. Imprimé aux États-Unis. La reproduction de ce document de quelque manière que ce soit sans l'autorisation écrite de - Dell PowerEdge 750 | Installing
the Optional CD Drive (.pdf) - Page 7
www.dell.com | support.euro.dell.com F3043gam0.fm Page 1 Friday, December 12, 2003 Systemkomponenten finden Sie in der Anleitung zur Installation und Fehlersuche. 1 Entfernen Sie gegebenenfalls festgesteckt sind. a Schließen Sie das Ende des Schnittstellenkabels mit der Bezeichnung FD an das Diskettenlaufwerk - Dell PowerEdge 750 | Installing
the Optional CD Drive (.pdf) - Page 8
Frontblende, und schieben Sie sie gleichzeitig in Richtung Schlüsselverriegelung, bis sie einrastet. Irrtümer und technische Änderungen vorbehalten. © 2003 Dell Inc. Alle Rechte vorbehalten. Gedruckt in den USA. Reproduktion dieses Dokuments in jeglicher Form ohne schriftliche Genehmigung von - Dell PowerEdge 750 | Installing
the Optional CD Drive (.pdf) - Page 9
www.dell.com | support.jp.dell.com F3043jam0.fm Page 1 Friday, December 12, 2003 3:29 PM 1 a b c d 2 3 2 4 3 5 6 1 1-1 7 8 a FD b FDD 2003 年 12 月 - Dell PowerEdge 750 | Installing
the Optional CD Drive (.pdf) - Page 10
www.dell.com | support.jp.dell.com F3043jam0.fm Page 2 Friday, December 12, 2003 3:29 PM 9 10 2 図 1-1 4) 4) 1 11 12 a b 2003 Dell Inc Printed in the U.S.A. Dell Inc Dell および DELL ロゴは Dell Inc Dell Inc - Dell PowerEdge 750 | Installing
the Optional CD Drive (.pdf) - Page 11
www.dell.com | support.ap.dell.com F3043kam0.fm Page 1 Friday, December 12, 2003 5:20 PM 1 a b c d 2 3 4 1 5 6 1 1-1 7 8 a FD b FDD 9 10 2003 년 12 월 - Dell PowerEdge 750 | Installing
the Optional CD Drive (.pdf) - Page 12
www.dell.com | support.ap.dell.com F3043kam0.fm Page 2 Friday, December 12, 2003 5:20 PM 그림 1-1 4) 고정 핀 (4) 1 11 12 a b 2003 Dell Inc. All rights reserved Dell Inc Dell 및 DELL 로고는 Dell Inc Dell Inc - Dell PowerEdge 750 | Installing
the Optional CD Drive (.pdf) - Page 13
dell.com | support.dell.com F3043sam0.fm Page 1 Friday, December 12, 2003 4:37 PM Notas y precauciones NOTA: una NOTA proporciona información importante que le ayudará a utilizar mejor el ordenador. PRECAUCIÓN: una PRECAUCIÓN indica el riesgo de daños cautivos de la parte posterior del sistema. - Dell PowerEdge 750 | Installing
the Optional CD Drive (.pdf) - Page 14
www.dell.com | support.dell.com F3043sam0.fm Page 2 Friday, December 12, 2003 4:37 PM 9 Coloque la cubierta sobre los laterales del chasis y deslícela hacia adelante hasta que encaje en su sitio. 10 Apriete los dos tornillos cautivos situados en la parte posterior del sistema para fijar la
-
 1
1 -
 2
2 -
 3
3 -
 4
4 -
 5
5 -
 6
6 -
 7
7 -
8
-
9
-
10
-
11
-
12
-
13
-
14
 |
 |
www.dell.com | support.dell.com
0F3043A00
Notes and Cautions
NOTE:
A NOTE indicates important information that helps you make better use of your computer.
CAUTION:
A CAUTION indicates a potential for property damage, personal injury, or death.
Installing the Optional Diskette Drive
CAUTION:
See your
System Information Guide
for complete information about safety precautions,
working inside the computer, and protecting against electrostatic discharge.
NOTE:
For additional information about removing system components, see the
Installation
and Troubleshooting Guide
.
1
If applicable, remove the bezel.
a
If applicable, unlock the bezel.
b
While grasping the bezel, slide it toward the key lock.
c
Rotate the right side of the bezel away from the front panel.
d
Pull the bezel away from the system.
2
Turn off the system and attached peripherals, and disconnect the system from the electrical
outlet.
3
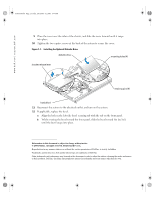
To remove the system cover, loosen the two captive screws at the back of the system.
4
While pressing down on the cover indention, slide the cover backward about an inch,
and grasp the cover on both sides.
5
Carefully lift the cover away from the system.
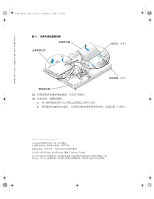
6
Align the diskette drive's mounting holes with the retaining pins on the hard drive 1 bracket.
See Figure 1-1.
7
Rotate the drive downward until it snaps into place.
8
Connect the interface cable.
NOTE:
Ensure that the interface cable is properly inserted into the connectors of the control panel
and diskette drive. Visually check the cable connection by ensuring that the cable contacts are
even across the length of the connector.
a
Connect the end of the interface cable labeled FD to the diskette drive.
b
Connect the other end of the interface cable to the control panel FDD cable connector.
December 2003
F3043am0.fm
Page 1 Friday, December 12, 2003
4:44 PM