Dell PowerEdge M520 Brocade 4424 Blade Server SAN I/O QuickStart Guide - Page 8
Dell PowerEdge M520 Manual
 |
View all Dell PowerEdge M520 manuals
Add to My Manuals
Save this manual to your list of manuals |
Page 8 highlights
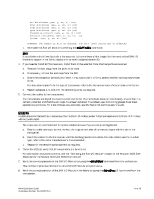
Connecting the SAN I/O Module to the fabric NOTE Refer to "Cabling guidelines" on page 6 before beginning the following procedure. Before beginning the following steps, determine whether the SAN I/O Module is in Access Gateway or Full Fabric Switch mode. This affects the configuration process. Using the SAN I/O Module CLI, you can enter the ag -- modeShow command to determine the current operating mode. 1. If the SAN I/O Module is in Full Fabric Switch mode, continue with step 2 and step 3. If the Module is in Access Gateway Mode, go on to step 4. 2. Log onto the SAN I/O Module through a Telnet connection, using the admin account. 3. Modify the domain ID if required using SAN I/O Module CLI commands. The default domain ID is 1. If the SAN I/O Module is not powered on until after it is connected to the fabric and the default domain ID is already in use, the domain ID for the new SAN I/O Module is automatically reset to a unique value. If the SAN I/O Module is connected to the fabric after it has been powered on and the default domain ID is already in use, the fabric segments. To find the domain IDs that are currently in use, run the fabricShow command on another SAN I/O Module in the fabric. Identify an unused domain ID: a. b. Disable the SAN I/O Module being configured using the switchDisable command. Enter the configure command. The command prompts display sequentially. Enter a new value or press Enter to accept each default value. The SAN I/O Module now has a unique domain ID and can join the fabric. Following is an example of command output. SW48000_155:root> configure Data field size: (256..2112) [2112] Sequence Level Switching: (0..1) [0] Disable Device Probing: (0..1) [0] Suppress Class F Traffic: (0..1) [0] Switch PID Format: (1..2) [1]Configure...Fabric parameters (yes, y, no, n): [no] y Domain: (1..239) [1] 155 R_A_TOV: (4000..120000) [10000] E_D_TOV: (1000..5000) [2000] WAN_TOV: (0..30000) [0] MAX_HOPS: (7..19) [7] Per-frame Route Priority: (0..1) [0] Long Distance Fabric: (0..1) [0] BB credit: (1..27) [16] Insistent Domain ID Mode (yes, y, no, n): [no] Virtual Channel parameters (yes, y, no, n): [no] F-Port login parameters (yes, y, no, n): [no] Zoning Operation parameters (yes, y, no, n): [no] RSCN Transmission Mode (yes, y, no, n): [no] Arbitrated Loop parameters (yes, y, no, n): [no] System services (yes, y, no, n): [no] Portlog events enable (yes, y, no, n): [no] 10 of 16 4424 QuickStart Guide Publication Number: 53-1000572-01
-
 1
1 -
2
-
 3
3 -
 4
4 -
 5
5 -
 6
6 -
 7
7 -
 8
8 -
 9
9 -
 10
10 -
 11
11 -
 12
12 -
 13
13 -
14
 |
 |