Dell PowerEdge T605 Installation Instructions AMD™ Opteron™
Dell PowerEdge T605 Manual
 |
View all Dell PowerEdge T605 manuals
Add to My Manuals
Save this manual to your list of manuals |
Dell PowerEdge T605 manual content summary:
- Dell PowerEdge T605 | Installation Instructions AMD™ Opteron™ - Page 1
injury, or death. Installation Instructions AMD™ Opteron™ 2000 and 8000 Series Processors CAUTION: Any installation that requires removal of the system cover is intended solely to be performed by trained service technicians. See your Product Information Guide for complete information about safety - Dell PowerEdge T605 | Installation Instructions AMD™ Opteron™ - Page 2
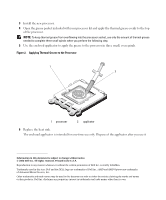
Components" in your Hardware Owner's Manual for instructions on removing and installing heat sinks and processors. NOTE: Ensure that you take all necessary precautions to prevent the CPU socket cover from popping off the processor. 1 Remove the heat sink and the processor. 2 Using a clean, lint-free - Dell PowerEdge T605 | Installation Instructions AMD™ Opteron™ - Page 3
grease evenly to the top of the processor. NOTE: To keep thermal grease from overflowing into the processor socket, use only the amount of thermal grease written permission of Dell Inc. is strictly forbidden. Trademarks used in this text: Dell and the DELL logo are trademarks of Dell Inc.; AMD - Dell PowerEdge T605 | Installation Instructions AMD™ Opteron™ - Page 4
关于警告 AMD™ Opteron™ 2000 和 8000 DIMM 1 2006 年 11 月 - Dell PowerEdge T605 | Installation Instructions AMD™ Opteron™ - Page 5
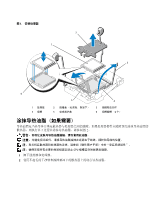
图 1 2 1 3 6 5 4 1 处理器 4 插槽 2 5 3 6 2 个) 2。 CPU 1 2 - Dell PowerEdge T605 | Installation Instructions AMD™ Opteron™ - Page 6
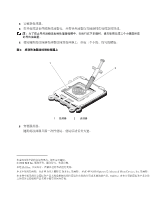
3 4 5 2 1 2 1 处理器 2 涂抹器 6 2006 Dell Inc Dell Inc Dell 和 DELL 徽标是 Dell Inc AMD 和 AMD Opteron 是 Advanced Micro Devices, Inc Dell Inc - Dell PowerEdge T605 | Installation Instructions AMD™ Opteron™ - Page 7
-vous au document Product Information Guide (Guide d'informations sur le produit) support et la carte système. Pour obtenir les instructions complètes d'installation et de retrait, voir "Installing System Components" (Installation des composants du système) dans le document Hardware Owner's Manual - Dell PowerEdge T605 | Installation Instructions AMD™ Opteron™ - Page 8
Installation du processeur 2 1 3 6 1 Processeur 4 Support 5 2 Plaque de fermeture du support (à retirer si installée) 5 Cadre de protection du processeur ) dans le document Hardware Owner's Manual (Manuel du propriétaire) pour obtenir les instructions de retrait et d'installation des dissipateurs - Dell PowerEdge T605 | Installation Instructions AMD™ Opteron™ - Page 9
REMARQUE : pour éviter que la pâte thermique déborde dans le support, n'utilisez que la quantité nécessaire pour l'appliquer en trois petites spirales contenues dans ce document peuvent être modifiées sans préavis. © 2006 Dell Inc. Tous droits réservés. Imprimé aux États-Unis. La reproduction de ce - Dell PowerEdge T605 | Installation Instructions AMD™ Opteron™ - Page 10
Warnhinweise VORSICHT: Hiermit werden Sie auf eine potentiell gefährliche Situation hingewiesen, die zu Sachschäden, Verletzungen oder zum Tod führen könnte. Installationsanleitung für Prozessoren der Reihen AMD™ Opteron™ 2000 und 8000 VORSICHT: Alle Installationsvorgänge, bei denen die - Dell PowerEdge T605 | Installation Instructions AMD™ Opteron™ - Page 11
Sie im HardwareBenutzerhandbuch unter „Installieren von Systemkomponenten". ANMERKUNG: Stellen Sie sicher, dass Sie alle erforderlichen Vorkehrungen getroffen haben, um zu verhindern, dass die Abdeckung des CPU-Sockels vom Prozessor abspringt. - Dell PowerEdge T605 | Installation Instructions AMD™ Opteron™ - Page 12
aufgetragen haben Irrtümer und technische Änderungen vorbehalten. © 2006 Dell Inc. Alle Rechte vorbehalten. Gedruckt in den USA. Die Form ohne schriftliche Genehmigung von Dell Inc. ist streng untersagt. Marken in diesem Text: Dell und das DELL Logo sind Marken von Dell Inc.; AMD und AMD Opteron - Dell PowerEdge T605 | Installation Instructions AMD™ Opteron™ - Page 13
AMD™ Opteron 2000 ΏςȜΒ͂ 8000 ΏςȜΒ DIMM 1 2006 ා 11 - Dell PowerEdge T605 | Installation Instructions AMD™ Opteron™ - Page 14
1 2 1 3 6 1 ίυΓΛ 4 ΕΉΛΠ 5 2 5 4 3 6 2ȫ 2 ικȇCPU 1 2 - Dell PowerEdge T605 | Installation Instructions AMD™ Opteron™ - Page 15
3 4 3 5 3 2 1 2 1 ίυΓΛ 2 6 2006 Dell Inc Printed in the U.S.A. Dell Inc Dell ǙȗȂ DELL ɵȼǾ Dell Inc AMD ǙȗȂ AMD Opteron Ǿ Advanced Micro Devices, Inc Dell Inc - Dell PowerEdge T605 | Installation Instructions AMD™ Opteron™ - Page 16
AMD™ Opteron™ 2000 및 8000 DIMM 1 2006 년 11 월 - Dell PowerEdge T605 | Installation Instructions AMD™ Opteron™ - Page 17
그림 1 2 1 3 6 5 4 1 4 소켓 2 5 3 6 2) 2 Installing System Components 참고 : CPU 1 2 3 - Dell PowerEdge T605 | Installation Instructions AMD™ Opteron™ - Page 18
4 3 5 3 그림 2 1 2 1 2 면봉 6 2006 Dell Inc. All rights reserved Dell Inc Dell 및 DELL 로고는 Dell Inc AMD 및 AMD Opteron은 Advanced Micro Devices, Inc Dell Inc - Dell PowerEdge T605 | Installation Instructions AMD™ Opteron™ - Page 19
en el zócalo y en la placa base. Para completar los procedimientos de instalación y extracción, consulte "Instalación de los componentes del sistema" en el Manual del propietario del hardware. NOTA: asegúrese de que la placa base está instalada en el chasis antes de instalar los módulos DIMM o el - Dell PowerEdge T605 | Installation Instructions AMD™ Opteron™ - Page 20
: consulte "Instalación de los componentes del sistema" en el Manual del propietario del hardware para obtener instrucciones sobre la extracción e todas las precauciones necesarias para evitar que la cubierta del zócalo de la CPU se suelte del procesador. 1 Extraiga el disipador de calor y el - Dell PowerEdge T605 | Installation Instructions AMD™ Opteron™ - Page 21
utilizar una vez. Deseche el aplicador después de utilizarlo. La información contenida en este documento puede modificarse sin previo aviso. © 2006 Dell Inc. Reservados todos los derechos. Impreso en EE. UU. Queda estrictamente prohibida la reproducción de este documento en cualquier forma sin
-
 1
1 -
 2
2 -
 3
3 -
 4
4 -
 5
5 -
 6
6 -
 7
7 -
8
-
9
-
10
-
11
-
12
-
13
-
14
-
15
-
16
-
17
-
18
-
19
-
20
-
21
 |
 |

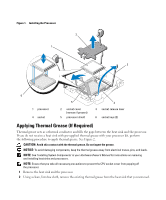
About Cautions
CAUTION:
A CAUTION indicates a potential for property damage, personal injury, or death.
Installation Instructions AMD™ Opteron™ 2000
and 8000 Series Processors
CAUTION:
Any installation that requires removal of the system cover is intended solely to be performed
by trained service technicians. See your
Product Information Guide
for complete information about safety
precautions, working inside the computer, and protecting against electrostatic discharge.
NOTICE:
When installing or removing a processor, follow these guidelines to avoid damaging the pins in
the processor socket. Bending the pins can permanently damage the socket and system board. For complete
installation and removal procedures, see "Installing System Components" in the system
Hardware Owner’s Manual
.
NOTE:
Ensure that the system board is installed in the chassis before installing the DIMMs or the processor.
•
Note the position of the socket keys. Positioning the processor incorrectly can permanently damage
the system board or the processor when you turn the system on. See Figure 1.
•
Do not use force to seat the processor. When the processor is positioned correctly, it fits easily into
the socket.
•
Never press on the processor shield or the processor surface when closing the release lever.
Opening the Processor Socket Lever
When removing or installing the processor, be sure to position your finger or thumb firmly on the socket
release lever and control the lever when releasing it so that the lever does not spring up suddenly.
The lever locks down the processor with considerable force to ensure a good socket connection.
Releasing the lever without control can cause the lever to spring up suddenly and forcefully.
November 2006