Dell PowerEdge T610 Information Update - Processor Installation - Page 9
See Running the System Diagnostics in the, System Setup Program in - manuals
 |
View all Dell PowerEdge T610 manuals
Add to My Manuals
Save this manual to your list of manuals |
Page 9 highlights
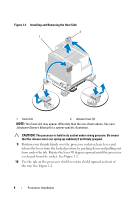
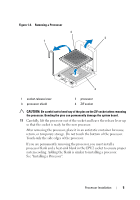
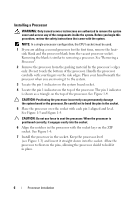
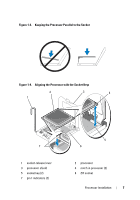
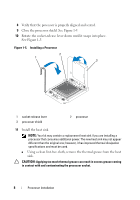
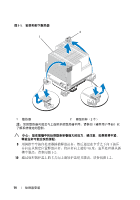
b Open the grease applicator included with your processor kit and apply all of the thermal grease in the applicator to the center of the topside of the new processor. c Place the heat sink on the processor. See Figure 1-1. d Close the heat-sink release levers or replace the screws at the corners of the heat sink. See your Hardware Owner's Manual for a systemspecific illustration. See Figure 1-1. 12 Replace the cooling shroud. See "Installing the Cooling Shroud" in the Hardware Owner's Manual. 13 Close the system. See "Closing the System" in the Hardware Owner's Manual. 14 Reconnect your system and peripherals to their electrical outlets, and turn on the system. 15 Press to enter the System Setup program, and check that the processor information matches the new system configuration. See "Entering the System Setup Program" in the Hardware Owner's Manual. 16 Run the system diagnostics to verify that the new processor operates correctly. 17 See "Running the System Diagnostics" in the Hardware Owner's Manual for information about running the diagnostics. Processor Installation 9
-
 1
1 -
2
-
3
-
 4
4 -
 5
5 -
 6
6 -
 7
7 -
 8
8 -
 9
9 -
 10
10 -
 11
11 -
 12
12 -
 13
13 -
 14
14 -
15
-
16
-
17
-
18
-
19
-
20
-
21
-
22
-
23
-
24
-
25
-
26
-
27
-
28
-
29
-
30
-
31
-
32
-
33
-
34
-
35
-
36
-
37
-
38
-
39
-
40
-
41
-
42
-
43
-
44
-
45
-
46
-
47
-
48
-
49
-
50
-
51
-
52
-
53
-
54
-
55
-
56
-
57
-
58
-
59
-
60
-
61
-
62
-
63
-
64
-
65
-
66
-
67
-
68
-
69
-
70
 |
 |
