Dell PowerVault 210S Dell PowerVault 2xxS Storage Systems SCSI Backplane Board - Page 2
SCSI Backplane Replacement Overview, Remove the SCSI Hard-Disk Drives
 |
View all Dell PowerVault 210S manuals
Add to My Manuals
Save this manual to your list of manuals |
Page 2 highlights
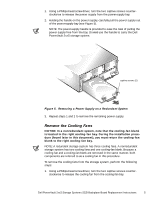
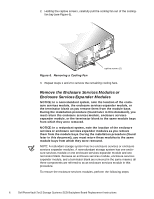
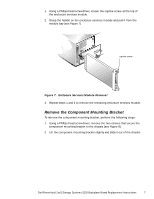
SCSI Backplane Replacement Overview Use the following procedures, in the order listed, to replace the SCSI backplane board. 1. Remove the hard-disk drives. 2. Remove the power supplies. 3. Remove the cooling fans. 4. Remove the enclosure services modules or enclosure services expander modules. 5. Remove the component mounting bracket. 6. Remove the dual-bus split backplane module. 7. Remove the SCSI backplane board. 8. Install the replacement SCSI backplane board. 9. Install the dual-bus split backplane module on the replacement SCSI backplane board. 10. Install the component mounting bracket. 11. Install the enclosure services or enclosure services expander modules. 12. Install the cooling fans. 13. Install the power supplies. 14. Install the hard-disk drives. Each procedure is described in the following sections. Remove the SCSI Hard-Disk Drives CAUTION: Note the location of the SCSI hard-disk drives as you remove them from the drive bays. During the installation procedure (found later in this document), you must return the SCSI hard-disk drives to the same drive bays from which they were removed. To remove the SCSI hard-disk drives from the drive bays, perform the following steps. NOTE: The storage system comes with either a silver, swing-out lock bar or a black, removable lock bar, which secures the hard-disk drives in their drive bay slots. 1. Using the key, unlock the keylock. 2. For a storage system with the silver, swing-out lock bar, using your fingertips, tap up on the lock bar. The lock bar easily swings out and down, just below the level of the drive bays (see Figure 1). 2 Dell PowerVault 2xxS Storage Systems SCSI Backplane Board Replacement Instructions
-
 1
1 -
 2
2 -
 3
3 -
 4
4 -
 5
5 -
 6
6 -
 7
7 -
 8
8 -
9
-
10
-
11
-
12
-
13
-
14
 |
 |