Dell PowerVault LTO-5-140 Storage User's Guide - Page 31
Loading Device Drivers
 |
View all Dell PowerVault LTO-5-140 Storage manuals
Add to My Manuals
Save this manual to your list of manuals |
Page 31 highlights
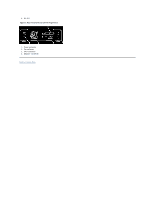
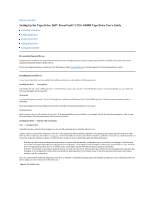
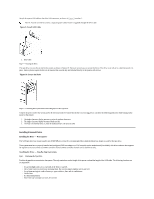
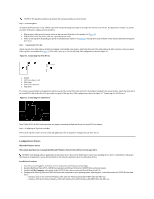
NOTICE: The tape drive should not be stacked. Do not place anything on top of the unit. Step 2 - Connecting Power An external Dell PowerVault LTO5-140HH Tape Drive will operate using any voltage in the range 100-240 volts (50-60 Hz). No adjustment is needed. To connect your drive to the power supply, proceed as follows: 1. Plug the power cable securely into the socket on the rear panel of the drive. (See number 1 in Figure 5.) 2. Plug the other end of the power cable into a grounded power outlet. 3. Power on the tape drive by pressing the power on/off button (see number 1 in Figure 12.) The tape drive runs the POST, which checks all hardware except the drive head. Step 3 - Connecting the SAS Cable Attach one end of the SAS cable to the SAS host adapter card installed in the system. Attach the other end of the SAS cable to the SAS connector on the rear panel of the tape drive (see number 2 in Figure 5). The cable can be up to 5 m (16.4 ft) long. This configuration is shown in Figure 11. Figure 11. Connecting One SAS Device 1. System 2. SAS host adapter card 3. SAS cable 4. Drive SAS connector 5. Tape drive To connect a second system to the tape drive, attach one end of the second SAS cable to the SAS host adaptor installed in the second system. Attach the other end of the second SAS cable to the other SAS port on the rear panel of the tape drive. This configuration is shown in Figure 12, "Connecting two SAS Devices." Figure 12. Connecting two SAS Devices Note: Unlike SCSI, the SAS architecture does not support connecting multiple tape drives to a single SAS host adapter. Step 4 - Configuring the Tape Drive to the Host Power on the tape drive. Refer to your system and application software manuals to configure the tape drive for use. Loading Device Drivers Microsoft Windows Server This section describes how to install the Microsoft Windows Server Device Drivers for the tape drive. NOTICE: Some backup software applications do not require device drivers to be loaded and, in some cases, installing device drivers could interfere with proper functioning of the application. See the documentation for the respective application prior to loading these drivers. Installation Procedures 1. Ensure that you are logged on to the host server or workstation with Administrator privileges. 2. Insert the Dell PowerVault LTO5-140HH Documentation and Drivers CD into the CD/DVD drive on the host system. 3. Double-click My Computer and navigate to the CD/DVD drive where you inserted the Dell PowerVault CD. 4. Navigate to the following Microsoft Hotfix file below that corresponds to your operating system, replacing the d: with the drive letter for CD/DVD drive listed above. ¡ Windows 2003 32 bit: d:\Drivers\Windows 2003 32bit x86\ WindowsServer2003-KB971650-x86-ENU.exe ¡ Windows 2003 x64: d:\Drivers\Windows 2003 x64\ WindowsServer2003.WindowsXP-KB971650-x64-ENU.exe
-
 1
1 -
2
-
3
-
4
-
5
-
6
-
7
-
8
-
9
-
10
-
11
-
12
-
13
-
14
-
15
-
16
-
17
-
18
-
19
-
20
-
21
-
22
-
23
-
24
-
25
-
 26
26 -
 27
27 -
 28
28 -
 29
29 -
 30
30 -
 31
31 -
 32
32 -
 33
33 -
 34
34 -
 35
35 -
 36
36 -
37
-
38
-
39
-
40
-
41
-
42
-
43
-
44
-
45
-
46
-
47
-
48
-
49
-
50
 |
 |