Dell Precision T1650 Owner's manual - Page 13
Installing the Hard Drive, Removing the Optical Drive
 |
View all Dell Precision T1650 manuals
Add to My Manuals
Save this manual to your list of manuals |
Page 13 highlights
5. Flex the hard-drive bracket and remove the hard drive from the bracket. 6. Repeat the steps 3 to 5 to remove the second hard drive, if available. Installing the Hard Drive 1. Insert the hard drive into the hard-drive bracket. 2. Press both the securing tabs inward and slide the hard-drive bracket into the bay. 3. Connect the data and power cables to the back of the hard drive. 4. Install the cover. 5. Follow the procedures in After Working Inside Your Computer. Removing the Optical Drive 1. Follow the procedures in Before Working Inside Your Computer. 2. Remove the: a) cover b) front panel 3. Disconnect the data cable and the power cables from the back of the optical drive. 13
-
 1
1 -
2
-
3
-
4
-
5
-
6
-
7
-
 8
8 -
 9
9 -
 10
10 -
 11
11 -
 12
12 -
 13
13 -
 14
14 -
 15
15 -
 16
16 -
 17
17 -
 18
18 -
19
-
20
-
21
-
22
-
23
-
24
-
25
-
26
-
27
-
28
-
29
-
30
-
31
-
32
-
33
-
34
-
35
-
36
-
37
-
38
-
39
-
40
-
41
-
42
-
43
-
44
-
45
-
46
-
47
-
48
-
49
-
50
-
51
-
52
-
53
-
54
-
55
 |
 |

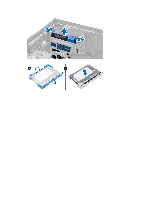
5.
Flex the hard-drive bracket and remove the hard drive from the bracket.
6.
Repeat the steps 3 to 5 to remove the second hard drive, if available.
Installing the Hard Drive
1.
Insert the hard drive into the hard-drive bracket.
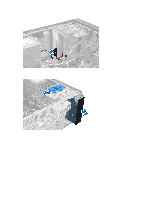
2.
Press both the securing tabs inward and slide the hard-drive bracket into the bay.
3.
Connect the data and power cables to the back of the hard drive.
4.
Install the cover.
5.
Follow the procedures in
After Working Inside Your Computer
.
Removing the Optical Drive
1.
Follow the procedures in
Before Working Inside Your Computer
.
2.
Remove the:
a)
cover
b)
front panel
3.
Disconnect the data cable and the power cables from the back of the optical drive.
13