Dell Precision T3610 Dell Precision Workstation T3610 Owners Manual - Page 21
Installing the Input/Output (I/O) Panel, Removing the Air Tunnel, Installing the Air Tunnel
 |
View all Dell Precision T3610 manuals
Add to My Manuals
Save this manual to your list of manuals |
Page 21 highlights
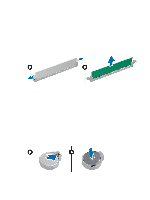
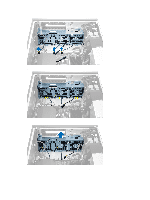
Installing the Input/Output (I/O) Panel 1. Replace the I/O panel in its slot. 2. Tighten the screws securing the I/O panel to the chassis 3. Attach the cables to the I/O panel. 4. Slide the USB 3.0 module in its slot. 5. Tighten the screws securing the USB 3.0 module to the I/O panel. 6. Install: a) front bezel b) cover 7. Follow the procedures in After Working Inside Your Computer. Removing the Air Tunnel NOTE: The air tunnel is an optional component and your computer may not ship with it. 1. Follow the procedures in Before Working Inside Your Computer. 2. Remove: a) cover b) optical drive 3. Press down on the blue retaining tab and lift the air tunnel module upwards. 4. Repeat Step 3 to remove the second air tunnel module from the computer. Installing the Air Tunnel NOTE: The air tunnel is an optional component and your computer may not ship with it. 1. Install the air tunnel base inside the computer chassis. 2. Mount the air tunnel module on the base and press downwards until it clicks into place. 3. Install: a) optical drive 21
-
 1
1 -
2
-
3
-
4
-
5
-
6
-
7
-
8
-
9
-
10
-
11
-
12
-
13
-
14
-
15
-
 16
16 -
 17
17 -
 18
18 -
 19
19 -
 20
20 -
 21
21 -
 22
22 -
 23
23 -
 24
24 -
 25
25 -
 26
26 -
27
-
28
-
29
-
30
-
31
-
32
-
33
-
34
-
35
-
36
-
37
-
38
-
39
-
40
-
41
-
42
-
43
-
44
-
45
-
46
-
47
-
48
-
49
-
50
-
51
-
52
-
53
-
54
-
55
-
56
-
57
-
58
-
59
-
60
-
61
-
62
-
63
-
64
-
65
 |
 |
