Dell SP2009W Service Manual - Page 30
Torque A., Key board
 |
View all Dell SP2009W manuals
Add to My Manuals
Save this manual to your list of manuals |
Page 30 highlights
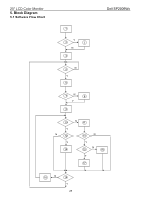
20" LCD Color Monitor Dell SP2009Wc 2. Remove the two screws and remove the base by Torque A. Key board Remove the rear cover: Pry the monitor up then find out the hooks' position, use the tool (like the picture or other card) to insert into the gap of bezel and rear cover, then turn over the monitor and take off the rear cover. Remove shield: Remove the screw and remove the small cover shield. 30
-
 1
1 -
2
-
3
-
4
-
5
-
6
-
7
-
8
-
9
-
10
-
11
-
12
-
13
-
14
-
15
-
16
-
17
-
18
-
19
-
20
-
21
-
22
-
23
-
24
-
 25
25 -
 26
26 -
 27
27 -
 28
28 -
 29
29 -
 30
30 -
 31
31 -
 32
32 -
 33
33 -
 34
34 -
 35
35 -
36
-
37
-
38
-
39
-
40
-
41
-
42
-
43
-
44
-
45
-
46
-
47
-
48
-
49
-
50
-
51
-
52
-
53
-
54
-
55
-
56
-
57
-
58
-
59
-
60
-
61
-
62
-
63
-
64
-
65
-
66
-
67
-
68
-
69
-
70
-
71
-
72
-
73
-
74
-
75
-
76
-
77
-
78
-
79
-
80
-
81
-
82
-
83
-
84
-
85
-
86
-
87
-
88
-
89
-
90
-
91
-
92
-
93
-
94
 |
 |

20" LCD Color Monitor
Dell SP2009Wc
30
2. Remove the two screws
and remove the base by
Torque A.
Remove the rear cover
:
Pry the monitor up then
find out the hooks’
position, use the tool
(like the picture or other
card) to insert into the
gap of bezel and rear
cover, then turn over the
monitor and take off the
rear cover.
Remove shield
:
Remove the screw and
remove the small cover
shield.
Key board