Dell V313w All In One Wireless Inkjet Printer User's Guide - Page 38
Printing photos from a PictBridge-enabled digital camera, Notes, Warning-Potential Damage
 |
View all Dell V313w All In One Wireless Inkjet Printer manuals
Add to My Manuals
Save this manual to your list of manuals |
Page 38 highlights
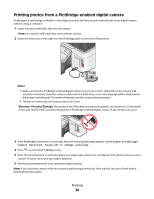
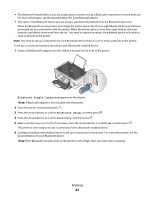
Printing photos from a PictBridge-enabled digital camera PictBridge is a technology available in most digital cameras that lets you print directly from your digital camera without using a computer. 1 Insert one end of the USB cable into the camera. Note: Use only the USB cable that came with the camera. 2 Insert the other end of the cable into the PictBridge port on the front of the printer. Notes: • Make sure that the PictBridge-enabled digital camera is set to the correct USB mode. If the camera USB selection is incorrect, then the camera is detected as a flash drive, or an error message will be displayed on the printer control panel. For more information, see the camera documentation. • The printer reads only one memory device at a time. Warning-Potential Damage: Do not touch the USB cable, any network adapter, any connector, or the printer in the area shown while actively printing from a PictBridge-enabled digital camera. A loss of data can occur. 3 If the PictBridge connection is successful, then the following message appears on the display: PictBridge Camera detected. Press OK to change settings. 4 Press to access the PictBridge menu. 5 Press the arrow buttons to select the paper size, paper type, photo size, and layout of the photos that you want to print. Press each time you make a selection. 6 See the documentation for your camera to begin printing. Note: If you insert the camera while the printer is performing another job, then wait for the job to finish before printing from the camera. Printing 38
-
 1
1 -
2
-
3
-
4
-
5
-
6
-
7
-
8
-
9
-
10
-
11
-
12
-
13
-
14
-
15
-
16
-
17
-
18
-
19
-
20
-
21
-
22
-
23
-
24
-
25
-
26
-
27
-
28
-
29
-
30
-
31
-
32
-
 33
33 -
 34
34 -
 35
35 -
 36
36 -
 37
37 -
 38
38 -
 39
39 -
 40
40 -
 41
41 -
 42
42 -
 43
43 -
44
-
45
-
46
-
47
-
48
-
49
-
50
-
51
-
52
-
53
-
54
-
55
-
56
-
57
-
58
-
59
-
60
-
61
-
62
-
63
-
64
-
65
-
66
-
67
-
68
-
69
-
70
-
71
-
72
-
73
-
74
-
75
-
76
-
77
-
78
-
79
-
80
-
81
-
82
-
83
-
84
-
85
-
86
-
87
-
88
-
89
-
90
-
91
-
92
-
93
-
94
-
95
-
96
-
97
-
98
-
99
-
100
-
101
-
102
-
103
-
104
-
105
-
106
-
107
 |
 |
