Dell W-Series 205H AP-205H-MNTR Desk Mount Kit Installation Guide - Page 2
Attaching the AP Back Cover to the Mount Stand, Securing the AP onto the AP Back Cover
 |
View all Dell W-Series 205H manuals
Add to My Manuals
Save this manual to your list of manuals |
Page 2 highlights
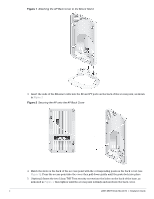
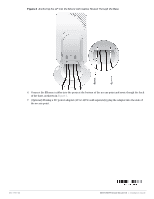
Figure 1 Attaching the AP Back Cover to the Mount Stand 3. Insert the ends of the Ethernet cable into the E0 and PT ports on the back of the access point, as shown in Figure 2. Figure 2 Securing the AP onto the AP Back Cover 4. Match the slots on the back of the acccess point with the corresponding posts on the back cover (see Figure 2). Press the access point into the cover then pull down gently until the posts lock into place. 5. (Optional) Insert the two 12mm T8H Torx security screws into the holes on the back of the base, as indicated in Figure 3, then tighten until the access point is firmly anchored into the back cover. 2 205H-MNTR Desk Mount Kit | Installation Guide
-
 1
1 -
 2
2 -
 3
3
 |
 |

2
205H-MNTR Desk Mount Kit
|
Installation Guide
Figure 1
Attaching the AP Back Cover to the Mount Stand
3.
Insert the ends of the Ethernet cable into the E0 and PT ports on the back of the access point, as shown
in
Figure 2
.
Figure 2
Securing the AP onto the AP Back Cover
4.
Match the slots on the back of the acccess point with the corresponding posts on the back cover (see
Figure 2
). Press the access point into the cover then pull down gently until the posts lock into place.
5.
(Optional) Insert the two 12mm T8H Torx security screws into the holes on the back of the base, as
indicated in
Figure 3
, then tighten until the access point is firmly anchored into the back cover.