Dell W-Series 228 AP-270-MNT-V2 Mounting Kit Installation Guide - Page 1
Dell W-Series 228 Manual
 |
View all Dell W-Series 228 manuals
Add to My Manuals
Save this manual to your list of manuals |
Page 1 highlights
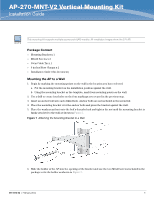
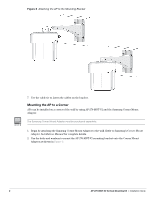
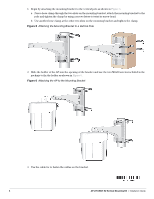
AP-270-MNT-V2 Vertical Mounting Kit Installation Guide This mounting kit supports multiple access point (AP) models. All installation images show the 275 AP. Package Content Mounting Bracket x 1 M6x20 Screws x 2 30cm Cable Tie x 1 6 inches Hose Clamps x 2 Installation Guide (this document) Mounting the AP to a Wall 1. Begin by marking the mounting points on the wall in the location you have selected. a. Put the mounting bracket on the installation position against the wall. b. Using the mounting bracket as the template, mark four mounting points on the wall. 2. Use a drill to create four holes on the four markings you created in the previous step. 3. Insert an anchor bolt into each drilled hole. Anchor bolts are not included in the mount kit. 4. Place the mounting bracket over the anchor bolts and press the bracket against the wall. 5. Place the washers and nut onto the bolt's threaded end and tighten the nut until the mounting bracket is firmly attached to the wall as shown in Figure 1. Figure 1 Attaching the Mounting Bracket to a Wall 6. Slide the holder of the AP into the opening of the bracket and use the two M6x20 screws included in the package to fix the holder as shown in Figure 2. 0511510-02 | February 2014 1
-
 1
1 -
 2
2 -
 3
3 -
 4
4
 |
 |
