Dell W-Series 324 AP-320-MNT-T Ceiling Tile Mount Kit Installation Guide - Page 2
Use the M4
 |
View all Dell W-Series 324 manuals
Add to My Manuals
Save this manual to your list of manuals |
Page 2 highlights
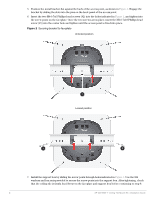
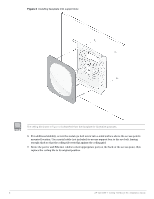
5. Position the metal bracket flat against the back of the access point, as shown in Figure 2. Engage the bracket by sliding the slots into the pins on the back panel of the access point. 6. Insert the two M4-0.7x6 Phillips head screws (#2) into the holes indicated in Figure 2, and tighten into the screw posts on the faceplate. Once the two screws are in place, insert the M4-0.7x18 Phillips head screw (#1) into the center hole and tighten until the access point is fixed into place. Figure 2 Securing bracket to faceplate Unlocked position 2 1 Locked position 2 2 7. Install the support box by sliding the screw posts through holes indicated in Figure 3. Use the M4 washers and hex nuts provided to secure the screw posts into the support box. After tightening, check that the ceiling tile is firmly fixed between the faceplate and support box before continuing to step 8. 2 AP-320-MNT-T Ceiling Tile Mount Kit | Installation Guide
-
 1
1 -
 2
2 -
 3
3 -
 4
4
 |
 |
