Dell W-Series 324 AP-320-MNT-T Ceiling Tile Mount Kit Installation Guide - Page 3
Installing faceplate into support box
 |
View all Dell W-Series 324 manuals
Add to My Manuals
Save this manual to your list of manuals |
Page 3 highlights
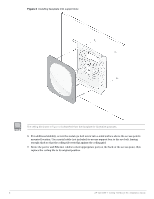
Figure 3 Installing faceplate into support box The ceiling tile shown in Figure 3 is detached from the faceplate for illustrative purposes. 8. For additional stability, screw the metal eye bolt screw into a solid surface above the access point's mounted location. Use a metal cable (not included) to secure support box to the eye bolt, leaving enough slack so that the ceiling tile rests flat against the ceiling grid. 9. Route the power and Ethernet cables to their appropriate ports at the back of the access point, then replace the ceiling tile to its original position. 3 AP-320-MNT-T Ceiling Tile Mount Kit | Installation Guide
-
 1
1 -
 2
2 -
 3
3 -
 4
4
 |
 |

3
AP-320-MNT-T Ceiling Tile Mount Kit | Installation Guide
Figure 3
Installing faceplate into support box
8.
For additional stability, screw the metal eye bolt screw into a solid surface above the access point’s
mounted location. Use a metal cable (not included) to secure support box to the eye bolt, leaving
enough slack so that the ceiling tile rests flat against the ceiling grid.
9.
Route the power and Ethernet cables to their appropriate ports at the back of the access point, then
replace the ceiling tile to its original position.
The ceiling tile shown in
Figure 3
is detached from the faceplate for illustrative purposes.