Dell XPS Gen 3 Owner's Manual - Page 65
Back View, Removing and Installing Parts, Do not plug a telephone cable into the network connector. - fan speed
 |
View all Dell XPS Gen 3 manuals
Add to My Manuals
Save this manual to your list of manuals |
Page 65 highlights
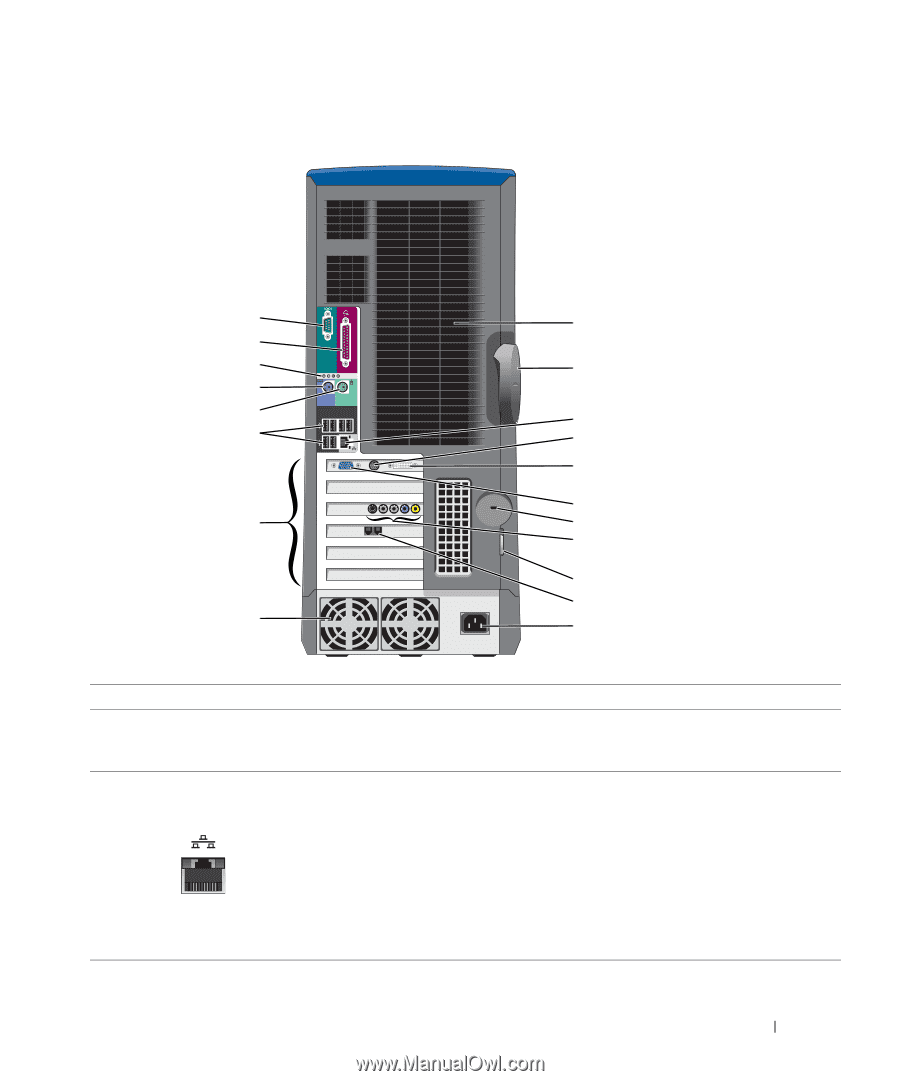
Back View 12 1 13 14 2 15 16 3 17 4 5 6 18 7 8 9 10 19 11 1 processor fans (2) For optimal cooling, two processor fans are provided. Do not block the vents. 2 cover latch release To open the computer, lay the computer on its side with the cover latch release at the top and then push the latch to the left. See "Opening the Computer Cover" on page 67. 3 network adapter connector To attach your computer to a network or broadband device, connect one end of a network cable to either a network jack or to your network or broadband device. Connect the other end of the network cable to the network adapter connector on the back panel of your computer. A click indicates that the network cable has been securely attached. NOTE: Do not plug a telephone cable into the network connector. network or broadband jack On computers with a network connector card, use the connector on the card. It is recommended that you use Category 5 wiring and connectors for your network. If you must use Category 3 wiring, force the network speed to 10 Mbps to ensure reliable operation. Removing and Installing Parts 65
-
 1
1 -
2
-
3
-
4
-
5
-
6
-
7
-
8
-
9
-
10
-
11
-
12
-
13
-
14
-
15
-
16
-
17
-
18
-
19
-
20
-
21
-
22
-
23
-
24
-
25
-
26
-
27
-
28
-
29
-
30
-
31
-
32
-
33
-
34
-
35
-
36
-
37
-
38
-
39
-
40
-
41
-
42
-
43
-
44
-
45
-
46
-
47
-
48
-
49
-
50
-
51
-
52
-
53
-
54
-
55
-
56
-
57
-
58
-
59
-
 60
60 -
 61
61 -
 62
62 -
 63
63 -
 64
64 -
 65
65 -
 66
66 -
 67
67 -
 68
68 -
 69
69 -
 70
70 -
71
-
72
-
73
-
74
-
75
-
76
-
77
-
78
-
79
-
80
-
81
-
82
-
83
-
84
-
85
-
86
-
87
-
88
-
89
-
90
-
91
-
92
-
93
-
94
-
95
-
96
-
97
-
98
-
99
-
100
-
101
-
102
-
103
-
104
-
105
-
106
-
107
-
108
-
109
-
110
-
111
-
112
-
113
-
114
-
115
-
116
-
117
-
118
-
119
-
120
-
121
-
122
-
123
-
124
-
125
-
126
-
127
-
128
-
129
-
130
-
131
-
132
-
133
-
134
-
135
-
136
-
137
-
138
-
139
-
140
-
141
-
142
-
143
-
144
-
145
-
146
 |
 |