Denon DM51DVS Owners Manual - Page 39
Play Back
 |
UPC - 081757506120
View all Denon DM51DVS manuals
Add to My Manuals
Save this manual to your list of manuals |
Page 39 highlights
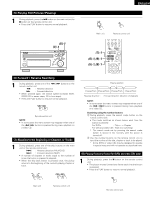
ENGLISH 4 Press the ENTER button to enter the settings. ENTER • The next screen in the system setting changing menu appears. Remote control unit Input function settings • LINE-1 and LINE-2 can be set as described below. LINE-1 : "MD", "CD-R", "MD/CD-R" or "AUX" can be selected. ("MD/CD-R" can only be set when a system MD recorder, cassette deck and CD recorder are all connected and system operations are being used.) LINE-2 : This can be set to "TAPE", "MD", "AUX" or "D.AUX". (Set "D.AUX" to use the D.AUX digital input in combination with the LINE-2 analog input.) • The setting for LINE-1 has priority. Once a function is set for LINE-1, it is not possible to set the same function for LINE-2. (For example, if "MD" is selected for LINE-1, "MD" is no longer offered as one of the choices for LINE-2.) LINE-1/LINE-2 analog recording output setting • Normally set this to "On". • With the DVD or D.AUX exclusive digital input function, set this to "Off" if noise is generated when playing sources with high bit rates in the Dolby Virtual Speaker mode. • This setting is only valid in the Dolby Virtual Speaker mode for the DVD or D.AUX exclusive digital input function. (In surround modes other than the Dolby Virtual Speaker mode and with other input functions, analog recording signals are output, regardless of this setting.) • Analog recording is not possible when this is set to "Off". To record, use a mode other than the Dolby Virtual Speaker mode (stereo, for example). (4) After changing the system settings • This completes the procedure for changing the system settings. Once the speaker settings, delay times and channel levels have been set, there is no need to change the settings again unless the connected AV components or speakers are changed or the speakers are moved to different positions. • DVD auto power off and function settings as necessary. 1 At the system setting changing menu screen, press the SETUP button. SETUP • The new settings are entered and the on-screen display turns off. Remote control unit The setup procedure can be quit at any point by pressing this button. NOTE: • When system settings have been changed with the system setting changing menu and a speaker system is selected with the quick system settings, the speaker settings and delay time settings are changed to the values preset for the quick system settings. 11 PLAY BACK (1) Before Operating DVD SURROUND RECEIVER ADV-M51 ON / STANDBY SURROUND / SELECT PUSH - PARAM. MENU /SET TONE / SDB FUNCTION PHONES -+ VOLUME BAND 2 OFF SLEEP VCR REC NTSC/PAL SOURCE CLEAR ENTER A-B REPEAT PROG/DIRECT MODE REPEAT MEMO DVD TUNER 1 2 ON TITLE TIME TV IN T V CHARAC. SLIDE MODE - TV CH EDIT/MENU ZOOM + TV CH CD SRS RANDOM SEARCH MODE BAND D.AUX 3 TUNING / TV VOL + MD/LINE-1 TAPE /LINE-2 - 4 5 6 7 DIRECT CALL 5CH STEREO AUTO DECODE 8 9 TUNER + STEREO 0/10 VIRTUAL +10 CH - TEST TONE INPUT MODE SURROUND FUNCTION TUNER TV / VCR A / V DVD IN/SURR. SYSTEM MD IN/SURR. CDR TAPE 1 2 DVD 8 9 6 3 7 STATUS + - MUTING SETUP TONE /SDB 2 CH SELECT ENTER SURROUND PARAMETER RETURN DISPLAY - + VCR CH MENU TOP MENU ANGLE AUDIO SUB TITLE RC-936 1 Refer to "CONNECTIONS" (pages 10 to 17) and check that all connections are correct. 2 Turn on the power. Press the POWER Light ON / STANDBY button. (green) ON Main unit Remote control unit When pressed, the power turns on and the display lights. The sound is muted for several seconds, after which the unit operates normally. When pressed again, the power turns off, the standby mode is set and the display turns off. Whenever the ON/STANDBY button is in the STANDBY state, the apparatus is still connected on AC line voltage. Please be sure to unplug the cord when you leave home for, say, a vacation. 39
-
 1
1 -
2
-
3
-
4
-
5
-
6
-
7
-
8
-
9
-
10
-
11
-
12
-
13
-
14
-
15
-
16
-
17
-
18
-
19
-
20
-
21
-
22
-
23
-
24
-
25
-
26
-
27
-
28
-
29
-
30
-
31
-
32
-
33
-
 34
34 -
 35
35 -
 36
36 -
 37
37 -
 38
38 -
 39
39 -
 40
40 -
 41
41 -
 42
42 -
 43
43 -
 44
44 -
45
-
46
-
47
-
48
-
49
-
50
-
51
-
52
-
53
-
54
-
55
-
56
-
57
-
58
-
59
-
60
-
61
-
62
-
63
-
64
-
65
-
66
-
67
-
68
-
69
-
70
-
71
-
72
-
73
-
74
-
75
-
76
-
77
-
78
-
79
-
80
-
81
-
82
-
83
-
84
-
85
-
86
-
87
-
88
-
89
-
90
-
91
-
92
-
93
-
94
-
95
-
96
-
97
-
98
-
99
-
100
-
101
-
102
-
103
-
104
-
105
-
106
-
107
-
108
-
109
 |
 |
