Denon DN-A7100 User Guide - Page 12
Remote Control, Operation
 |
UPC - 081757507554
View all Denon DN-A7100 manuals
Add to My Manuals
Save this manual to your list of manuals |
Page 12 highlights
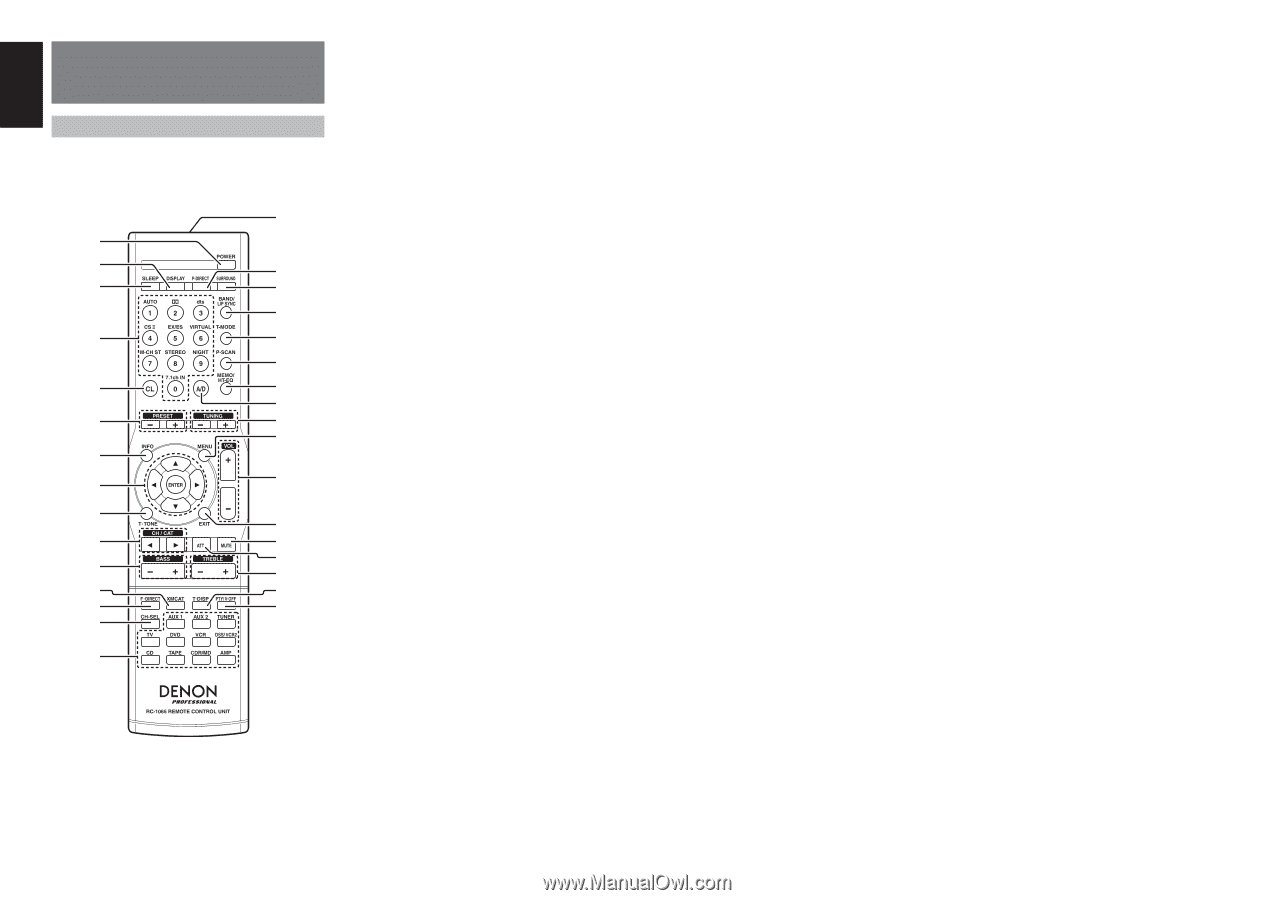
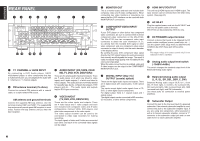
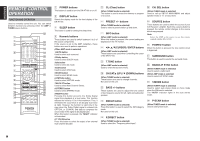
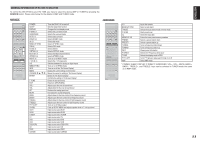
ENGLISH REMOTE CONTROL OPERATION FUNCTION AND OPERATION Used to remotely control the unit. You can switch between functions by pressing either the AMP or TUNER source buttons. ‹2 z x ⁄6 c ⁄7 ⁄8 v ⁄9 ¤0 b ¤1 ¤2 n ¤3 ¤4 m , ¤5 . ¤6 ⁄0 ¤7 ⁄1 ¤8 ¤9 ⁄2 ‹0 ⁄3 ‹1 ⁄4 ⁄5 z POWER buttons This buttons is used to turn the DN-A7100 on or off. x DISPLAY button Selects the display mode for the front display of the DN-A7100. c SLEEP button This button is used for setting the sleep timer. v Numeric buttons These buttons are used to switch between 0 to 9 of the source components. If the source is set to the AMP (amplifier), these buttons are used to perform operations. (When AMP mode is selected) 1/AUTO button Used to select auto surround. 2/Dolby button Used to select DOLBY mode. 3/dts button Used to select dts mode. 4/CSII button Used to select CSII mode. 5/EX/ES button Used to select EX/ES mode. 6/VIRTUAL button Used to select VIRTUAL mode. 7/M-CH ST button Used to select Multi Channel Stereo. 8/STEREO button Used to select STEREO mode. 9/NIGHT button Pressing this button prevents the Dolby Digital signal from playback at a loud voice. This function reduces the voice by 1/3 to 1/4 at maximum. Thus, it eliminates the occurrence of an abruptly loud voice at night. However, the function is valid only in the case when the Dolby Digital signal is entered into OPTICAL or COAXIAL and data to compress the voice exists in the signal to be played back. When this button is pressed, the "NIGHT" indicator is illuminated. 0/7.1CH IN button Press this button to select the output of an external multi channel decoder. b CL (Clear) button (When TUNER mode is selected) This button is used to erase the memory or program of a source. n PRESET +/- buttons (When TUNER mode is selected) Used to select a preset station up and down. m INFO button (When AMP mode is selected) When this button is pressed, the current setting are displayed on the TV monitor. , 1, 2, 3, 4 (CURSOR) / ENTER buttons (When AMP mode is selected) These buttons are used when controlling the cursor of the DN-A7100. . T.TONE button (When AMP mode is selected) Used to enter the test tone menu. ⁄0 CH/CAT3 (UP) / 4 (DOWN) buttons (When TUNER mode is selected) These buttons are used to change channels. Not used on this unit. ⁄1 BASS +/- buttons These buttons are used to adjust the tone control of low frequency sound for left, right and subwoofer speaker. ⁄2 XMCAT button (When TUNER mode is selected) Press this button is used to select the XM Category mode. Not used on this unit. ⁄3 F.DIRECT button (When TUNER mode is selected) Used to select the "Frequency direct input". ⁄4 CH. SEL button (When TUNER mode is selected) Used to call up SETUP MAIN MENU and adjust speaker levels or 7.1 ch input level. ⁄5 SOURCE button These buttons are used to switch the source of your A/V Receiver / amplifer. Each time a source button is pressed, the remote control changes to the source which was pressed. Note: Select the AMP as the source to use this remote controll with the DN-A7100. ⁄6 P.DIRECT button When this button is pressed, the tone control circuit is bypassed. ⁄7 SURROUND button This button is used to selects the surround mode. ⁄8 BAND/LIP SYNC button (When TUNER mode is selected) Used to select a radio band. (When AMP mode is selected) Used to select LIP SYNC mode. ⁄9 T-MODE button (When TUNER mode is selected) Used to select auto stereo mode or mono mode when the FM band is selected. The "AUTO" indicator lights in the auto stereo mode. ¤0 P-SCAN button (When TUNER mode is selected) Used to start preset scan. 8
-
 1
1 -
2
-
3
-
4
-
5
-
6
-
 7
7 -
 8
8 -
 9
9 -
 10
10 -
 11
11 -
 12
12 -
 13
13 -
 14
14 -
 15
15 -
 16
16 -
 17
17 -
18
-
19
-
20
-
21
-
22
-
23
-
24
-
25
-
26
-
27
-
28
-
29
-
30
-
31
-
32
-
33
-
34
-
35
-
36
-
37
-
38
-
39
-
40
-
41
-
42
-
43
-
44
-
45
-
46
-
47
-
48
 |
 |